Czym jest self w Pythonie: przykłady z życia wzięte

Czym jest self w Pythonie: przykłady z życia wzięte
W tym samouczku krótko omówimy, czym są przepływy procesów biznesowych i jak działają. To bardziej przypomina funkcję Power Apps niż funkcję Power Automate. Przepływy procesów biznesowych to sposób na znaczne ułatwienie obecnego tradycyjnego procesu biznesowego poprzez dodanie listy kontrolnej lub przepływu wokół niego.

Spis treści
Zrozumienie przepływów procesów biznesowych
Załóżmy, że możemy mieć proces biznesowy, w którym wdrażamy i zatrudniamy. Istnieje proces, który zazwyczaj stosuje zespół HR. Po zatrudnieniu upewniamy się, że mają laptopa, znają niezbędne informacje o firmie, a my otrzymujemy ich imię i nazwisko, numery telefonów, adres i tym podobne. HR prawdopodobnie ma małą listę kontrolną i formularze, które muszą wypełnić dla tej osoby.
Dzięki przepływom procesów biznesowych możemy zdigitalizować proces dla wszystkich tych rzeczy. Tak więc, zamiast zastanawiać się nad prawidłową sekwencją zwykłego procesu ręcznego lub czy naprawdę uzyskali wszystkie potrzebne informacje, możemy stworzyć proces, który zespół HR mógłby realizować sekwencyjnie.
Celem przepływów procesów biznesowych jest stworzenie struktury wokół bieżącego procesu biznesowego i umieszczenie wokół niego listy kontrolnej.
Proces biznesowy jest całkowicie w rękach osoby, która go używa. Po prostu robią jedną rzecz po drugiej i tak dalej, jak krok po kroku. Dzięki temu proces biznesowy jest znacznie prostszy bez automatyzacji w jakimkolwiek sensie.
Tworzenie przepływów procesów biznesowych
Utwórzmy teraz przykładowy przepływ procesów biznesowych. Najpierw musimy przełączyć nasze środowisko na takie, które ma jednostkę. Dlatego upewnij się, że najpierw utworzyłeś środowisko. Następnie kliknij Środowiska i zmień je z naszego domyślnego środowiska na nowe środowisko z encją.

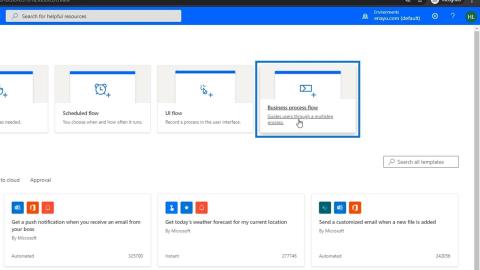
Kliknijmy teraz przepływ procesów biznesowych .

Nazwijmy to „ OnboardingANowyPracownik ”.

W polu tekstowym Wybierz encję …

…przewiń w dół i poszukaj NewEmployee , kliknij jego pole wyboru i kliknij przycisk Utwórz .

Załadowanie może zająć kilka minut, ale następnie przekieruje nas na tę stronę. To nie jest nasz zwykły schemat blokowy. Jest to diagram procesu biznesowego, który jest zupełnie inny niż schemat blokowy.

Diagram przepływu procesów biznesowych
Diagram przepływu procesów biznesowych zawiera wiele podobnych funkcji, które zwykle można znaleźć na diagramie przepływu .

Teraz spróbujmy otworzyć formularz. Aby to zrobić, przejdź do witryny Power Apps . Następnie kliknij Dane . Następnie kliknij Elementy . Następnie wyświetli się lista dostępnych formularzy.

Kliknij wielokropek ( … ) w formularzu, który chcemy otworzyć. Następnie kliknij opcję Edytuj formularz . Na koniec kliknij opcję Edytuj formularz w nowej karcie .

Następnie zobaczymy formularz, który jest gotowy do edycji.

Tak więc, zamiast przechodzić przez cały ten proces otwierania formularza i wpisywania wszystkich wymaganych w nim szczegółów, możemy po prostu poprowadzić go przez pola, na które użytkownik ma odpowiedzieć, tworząc przepływ procesów biznesowych. Na przykład możemy pozwolić im odpowiedzieć na pierwsze 3 pytania z zestawu pytań. W ten sposób jesteśmy w stanie pokierować użytkownika przez formularz, który musi wypełnić w ramach procesu biznesowego.
Komponenty przepływu procesów biznesowych: Etap
Patrząc na diagram przepływu procesów biznesowych , zobaczymy przycisk Etap . Po kliknięciu pojawi się diagram Stage .

Etap to grupa kroków , które użytkownik ma wykonać. Na przykład etap 1 polegałby na uzyskaniu podstawowych informacji o pracownikach, etap 2 na uzyskaniu informacji o ich zarobkach, etap 3 na sprawdzeniu przeszłości, a na etapie 4 przekazanie im laptopa.
Komponenty przepływu procesów biznesowych: etap danych
Każdy etap zawiera etapy danych . Po kliknięciu zostanie wyświetlony jego schemat.

Etap danych to krok lub kilka kroków z wymaganymi danymi, które użytkownik ma gromadzić w ramach przepływu procesów biznesowych . Na przykład wcześniejszy Etap 1, który polega na uzyskaniu podstawowych danych osobowych pracowników, może obejmować Kroki Danych , takie jak uzyskanie imienia w Kroku Danych #1 , uzyskanie nazwiska w Kroku Danych #2 , uzyskanie adresu w Kroku Danych # 3 , uzyskanie numeru telefonu w kroku danych # 4 i tak dalej i tak dalej.
Komponenty przepływu procesów biznesowych: Warunek
Mamy również funkcję Warunek , którą możemy ustawić. W tym miejscu użytkownik odpowiada na pytania mające określone wyniki, które skłoniłyby do wykonania innego Etapu lub innego Kroku Danych .

Na przykład za pomocą warunku możemy ustawić użytkownika, aby odpowiedział na pole DeveloperEnvironment w formularzu, jeśli jest programistą . Jeśli nie, wstawią zamiast tego pole TesterProduct jako Tester .

Komponenty przepływu procesów biznesowych: krok działania
Krok akcji jest używany, gdy chcemy, aby użytkownik wykonał akcję, taką jak wysłanie danych e-mailem. Na przykład zalecamy użytkownikowi wysłanie e-maila z zestawem podstawowych danych osobowych pracownika do zespołu ds. rozliczeń z dostawcami, aby upewnić się, że otrzymają zapłatę. Dlatego zamiast wprowadzać fragmenty danych w Data Step , prosimy użytkownika o wykonanie akcji.

Istnieją również dwa inne komponenty przepływu procesów biznesowych, takie jak przepływ pracy i krok przepływu , ale nie będziemy się na nich zbytnio koncentrować w tym samouczku.
Modyfikowanie sceny
Teraz, gdy znamy użycie różnych komponentów, możemy przystąpić do modyfikowania etapu dla naszego pierwszego przepływu procesów biznesowych . Aby to zrobić, kliknijmy diagram New Stage .

Po kliknięciu pojawią się właściwości sceny .

Następnie zmieńmy domyślną nazwę wyświetlaną na „ Pobierz podstawowe informacje o pracowniku ” i kliknij Zastosuj .

Następnie zobaczymy zmienioną nazwę sceny .

Następnie kliknij Szczegóły , aby wyświetlić Krok danych nr 1 na diagramie. Następnie kliknij go.

Po kliknięciu zostaną wyświetlone właściwości kroku danych .

W polu Nazwa kroku wpiszmy konkretne informacje, które użytkownik ma zbierać. Tak więc dla kroku danych nr 1 będzie to „ Imię ” i wybierz również Imię w polu danych .

Zaznaczmy Wymagane i kliknij Zastosuj . Następnie zobaczymy zmienioną nazwę naszego pierwszego kroku danych .

Następnie zobaczymy zmienioną nazwę naszego pierwszego kroku danych .

Dodawanie komponentu Data Steps
Aby dodać nowy krok danych na diagramie, po prostu wybierz i przeciągnij przycisk Krok danych w obszarze Składniki .

Then, place it in the plus sign (+) under Data Step #1.

When done, we’ll see Data Step #2 added in the diagram.

Let’s also specify the particular information we’d like the user to collect for Data Step #2. Type in “Last Name” as the Step Name, select LastName also in the Data Field, tick Required and lastly click Apply.

Let’s add another Data Step for this diagram. To do that, drag and drop the Data Step button in the plus sign (+) under the recent Data Step, just like ejat we did earlier.

For Data Step #3, type in “Phone Number” for the Step Name, select PhoneNumber in the Data Field as well, tick Required, and lastly, click Apply.

Let’s add another Data Step in the diagram.

For Data Step #4, the user will collect Date of Birth but will just type in “DOB” as the Step Name. Select DOB in the Data Field, tick Required, and click Apply.

Now we’re done creating our first Business Process Flow diagram consisting of 4 Data Steps.

Adding A Stage
To add another Stage in the Business Process Flow diagram, select and drag the Stage button found under Components.

Then, place it in the plus sign (+) beside our recent Stage.

When done, we’ll see the diagram for the new Stage.

After getting the employee’s basic information, we need to determine the employee position. So, we’ll name the added Stage “Determine Employee Position” and click Apply.

After naming the Stage, we’ll create a Data Step. Click Details within the diagram then click Data Step #1.

Let’s name the Data Step “Main Position”, select MainPosition as well for the Data Field and lastly click Apply.

Adding Condition To Business Process Flows
We’ll now add a Condition because we’d like the user to only populate the DeveloperEnvironment field if their main position is a Developer. Otherwise, the user would populate the TesterProduct field if the main position is a Tester. This is the main reason why we’re making this flow in the first place. To do that, let’s select and drag the Condition button.

Then, place it in the plus sign (+) right next to the Stage where the Condition will be added.

We’ll then see the new Condition diagram. The condition statement we’ll have is to test whether or not the main position is the same as the value of a developer or a tester. So, we’ll set the Yes path (?) for the Developer and the No path (X) for the Tester. If the user is a Developer, then he’ll follow the condition for Yes path. If it’s a Tester, then the condition for the No path will be followed, instead.

To set the Condition, edit its Properties. To do that, let’s type the statement “Is Employee a Developer?” as the Display Name for the Condition. Then, we’ll set the rules Main Position Equals the Value of a Developer. After that, click Apply.

Adding Stage To The Condition Diagram
Now, let’s add a Stage with Data Steps for the path when the user’s position matches the condition within the yes path (?). Select and drag the Stage button then place it in the plus sign (+) right next to the check mark (?).

Type in the Display Name “Fill out Develop Information” for the Stage.

After that, let’s set the Data Step. Click Details, then Data Step #1. Select DeveloperEnvironment as Data Field under Properties.

Then, tick Required and click Apply.

Let’s also add a Stage for the no path (X) or the “no” answer for the Condition. Like what we did earlier, we’ll just select and drag the Stage button then place it in the displayed plus sign (+) just beneath the no path (X).

Then, we’ll see the New Stage displayed for the path.

If the user is NOT a developer, this Data Step should be the Tester Product. Let’s type in the Step Name “Tester Product ” and select TesterProduct for the Data Field. Then click Apply.

Now, we’re done with adding Conditions to the business process flow. This just made filling out the form easier since the user won’t have to worry about the Tester Product field when he’s a Developer or the other way around if he’s a Tester.
Adding A New Stage For The Other Fields
The last thing we’ll do is to add a New Stage diagram for the Manager field and Starting Pay field for both users — Developers and Testers. To do that, we’ll select and drag the Stage button from Components then place it in the plus sign (+) beside the Stage we made for the yes path (?) or for the Developers.

Let’s call the added New Stage “Manager and Salary” by typing it in the Display Name under Properties, then click Apply.

We also need to add Data Steps to the Stage. Click Details, then the Data Step #1. Select ReportingManager as the Data Field in the Properties.

After that, tick Required and click Apply.

Since we need 2 fields in this diagram, we’ll add another Data Step for this. Simply select and drag the Data Step button under Components then place it in the plus sign (+) under Data Step #1.

While in the Properties, we’ll select StartingPay for the Data Field and click Apply.

We’ll also do the same for the no path (X) or for the Testers. Select and drag the Stage button under Components and place it in the plus sign (+) beside the Stage of the Tester path.

After that, we’ll also add two Data Steps in this Stage. Similar to what we did in the Developer path, just click Details, then click Data Step #1. Select ReportingManager in the Data Field and click Apply.

To add the second Data Step, just select and drag the Data Step button under Components then place it in the plus sign (+) under Data Step #1.

While in the Properties, select StartingPay in the Data Field and click Apply.

So now, we have a full Business Process Flow diagram set up for the process of Onboarding A New Employee.

Saving, Validating And Activating The Business Process Flow
Before we can see our Business Process Flow in action, we need to save, validate and activate it first. To do that, let’s click Save.

Then, click Validate.

After that, click Activate.

When clicked, a dialogue box will appear. Click the Activate button to confirm the process of activation.

The activation process may take a while then we’ll be good to go after that.

Running The Business Process Flow
Since we’ve already activated our Business Process Flow, we can now run and test it. To do that, let’s go back to Power Automate and click My flows.

Go to the Business process flows tab and click the Run icon across the flow OnboardingANewEmployee.

When clicked, we’ll be redirected to the similar form we had earlier.

The user can still fill in the form manually as desired, but we’ve already added a process for them to follow which is displayed on top.

The first target we’ll see in the process is the stage that we’d like the user to follow first which is to Get Employee Basic Information.

Let’s click it and the specific portion of the form will be displayed where it wants the user to type in the employee’s First Name, Last Name, Phone Number, and the Date of Birth (DOB). These are the same things we specified in the first stage of our Business Process Flow diagram earlier.

Let’s try filling in the details. For example, let’s type in “Henry” as the First Name, “Legge” as the Last Name, a random Phone Number “5023369985” and the Date of Birth “February 7th, 1973”.

As we fill in the details of the Business Process Flow, the form is also filled in automatically.

To go to the next stage, we’ll click the forward arrow on the far right of the last stage.

When clicked, the next stage Determine Employee Position will then ask the Main Position of the user.

For this one, let’s try selecting Developer from the drop-down list.

Testing The Condition
If we’ve done the flow set up correctly, the next stage should only ask for the DevelopmentEnvironment and not the TesterProduct when the position is Developer. That’s what we’ve set as the Condition statement. Let’s click the forward arrow to check that.

As we can see, the next stage wants the user to type in the DevelopmentEnvironment which means the flow setup was correct.

Now, let’s go back and change our selection to Tester. To do that, we’ll just click the back arrow.

Select Tester as our position this time.

Click the forward arrow and the next stage will then tell us to type in a Tester Product.

Now, let’s go back and continue as a Developer. Click the back arrow to do that.

Choose Developer.

Click the forward arrow to move to the next step.

We’ll type in “Linux” as the DevelopmentEnvironment for example.

Click the forward arrow.

Then, the Manager And Salary stage will be displayed asking us to type in the details for the ReportingManager and the StartingPay.

Let’s type in “Steve Jobs” in the ReportingManager field with the StartingPay of “80000”.

Click the forward arrow.

Then click the Save button.

After saving the form, it’ll notify us that the EmployeeID is a required field to fill in. Hence, this is one thing we forgot to integrate into our Business Process Flow and we’ll fix this one later on.

For this example, let’s just enter the Employee ID “212” manually in the form.

Lastly, click Save & Close.

Then, it will redirect us to our business process flows in the Power Automate page.

Fixing Form Errors
We can also fix the different issues we have with our flow. For example, the Position field in the form earlier should’ve been MainPosition instead.

To correct that, we need to go back to Power Apps Form and edit the displayed field label.

Since I already corrected it, MainPosition is now displayed as the label. What I did was just click the label in the form I want to correct.

Then in its Properties, type the correct Field label, click Save and click Publish.

Fixing The Current Flow
We also need to fix the flow since our current flow doesn’t tell the user to enter an Employee ID. To do that, let’s go back to our Business Process Flow diagram. First, add a new Data Step to the stage Get Employee Basic Information by selecting and dragging the Data Step button under Components then place it in the plus sign (+) above Data Step #1.

Under its Properties, let’s type in “EmployeeID” as the Step Name. Select EmployeeID in the Data Field, tick Required, and lastly click Apply.

After that, let’s click Update to save the form.

Click Validate and make sure the validation is successful as displayed.

Rechecking The Business Process Flow
Let’s run the flow to check if the fixes were successful. To do that, go back to Power Automate and click the Run icon to display the form.

When the stage Get Employee Basic Information is clicked in the form, it’s now requiring us to fill in the EmployeeID field.

Let’s try it. Type in “1234” as our Employee ID.

Fill in the other fields as well. For this time, we’ll type in “Bob” as the First Name, “Chuck” as the Last Name, “1234567890” for the Phone Number and “September 1, 2020” as the DOB.

Click the forward arrow.

Let’s select the Main Position “Tester” for this one.

Click the forward arrow.

For the Tester Product field, let’s type in “Video Game”.

Click the forward arrow.

Then, on the ReportingManager field let’s type “Bill Gates” and “90000” in the StartingPay.

Lastly, click the Save & Close button.

Business Process Flow Integration In Power Automate
PowerApps Form: Adding And Modifying Fields
Microsoft Power Automate: Workflow Automation
Conclusion
That’s how we can use business process flows to create a flow guide for the HR Personnel that needs to submit a form when they’re onboarding a new employee.
A business process flow powerfully works as it shows a user what specific steps to follow through Stages and Conditions consisting of Data Steps and Action Steps. The flow simply guides a user through a business process. In addition, a business process flow is useful when we’d like the user to enter and fill out only specific fields of a business process form rather than going through the form from top to bottom which is rather confusing most of the time. Hopefully, you were able to clearly understand its usage and concept via this tutorial.
All the best,
Henry
Czym jest self w Pythonie: przykłady z życia wzięte
Dowiesz się, jak zapisywać i ładować obiekty z pliku .rds w R. Ten blog będzie również omawiał sposób importowania obiektów z R do LuckyTemplates.
Z tego samouczka języka kodowania DAX dowiesz się, jak używać funkcji GENERUJ i jak dynamicznie zmieniać tytuł miary.
W tym samouczku omówiono sposób korzystania z techniki wielowątkowych wizualizacji dynamicznych w celu tworzenia szczegółowych informacji na podstawie dynamicznych wizualizacji danych w raportach.
W tym artykule omówię kontekst filtra. Kontekst filtrowania to jeden z głównych tematów, z którym każdy użytkownik usługi LuckyTemplates powinien zapoznać się na początku.
Chcę pokazać, jak usługa online LuckyTemplates Apps może pomóc w zarządzaniu różnymi raportami i spostrzeżeniami generowanymi z różnych źródeł.
Dowiedz się, jak obliczyć zmiany marży zysku przy użyciu technik, takich jak rozgałęzianie miar i łączenie formuł języka DAX w usłudze LuckyTemplates.
W tym samouczku omówiono idee materializacji pamięci podręcznych danych oraz ich wpływ na wydajność języka DAX w dostarczaniu wyników.
Jeśli do tej pory nadal korzystasz z programu Excel, jest to najlepszy moment, aby zacząć korzystać z usługi LuckyTemplates na potrzeby raportowania biznesowego.
Co to jest brama LuckyTemplates? Wszystko co musisz wiedzieć


