Con Logic Pro X, obtienes una gran cantidad de instrumentos que podrían reemplazar fácilmente todos los sintetizadores y teclados que posees. Son potentes y flexibles, y suenan increíbles. Además, los sintetizadores de Logic Pro pueden parecer desalentadores de programar cuando miras todos los controles y parámetros que puedes ajustar. Aquí, obtiene un recorrido por las interfaces y los parámetros del instrumento. Vea un video de demostración más detallado de lo que pueden hacer estos sintetizadores de Logic Pro , donde verá cómo funcionan los sintetizadores y cómo usar estos sintetizadores de Logic Pro en su música.
Para reproducir los sintetizadores Logic Pro, debe crear una pista de instrumento de software y seleccionar el instrumento de la ranura de instrumento de la tira de canal de la siguiente manera:
Elija Pista → Nueva pista de instrumento de software (o presione Opción-⌘ -S).
Se agrega una nueva pista de instrumentos de software a la lista de pistas.
Elija Ver → Mostrar inspector (o presione I).
El inspector se abre a la izquierda de la lista de pistas.
Haga clic en el lado derecho de la ranura del instrumento y elija el instrumento que desee.
Se abre la interfaz del instrumento de software.
Antes de comenzar el recorrido por la fabulosa colección de sintetizadores de Logic Pro, es importante comprender algunos términos básicos de síntesis:
- Oscilador: un oscilador de sintetizador produce una señal continua que forma la base de su sonido. Los osciladores son capaces de producir varias formas de onda diferentes que tienen diferentes cualidades tonales. Los osciladores son la parte más importante del sintetizador porque crean el sonido que darán forma a los otros parámetros del sintetizador.
- Modulación: un sonido de sintetizador estático gana interés cuando varía de alguna manera. La modulación es el proceso de variar los parámetros del sintetizador. El vibrato es un ejemplo común de modulación.
- Filtro: los sonidos de sintetizador se moldean mediante el uso de filtros. Los filtros eliminan partes del espectro de frecuencias, lo que le permite contornear el sonido.
- Envolvente: una envolvente de sintetizador da forma al principio, medio y final de su sonido. La envolvente más común ajusta el ataque, la caída, el sostenido y la liberación (ADSR). Por ejemplo, un piano tiene un ataque rápido, un decaimiento rápido, un sostenido medio y una liberación rápida.
- LFO: un oscilador de baja frecuencia (LFO) es una señal, generalmente por debajo del espectro de frecuencia audible, que modula una señal. Los LFO se utilizan para alterar la señal original de alguna manera. Un uso común de un LFO es crear vibrato.
Logic Pro X: el sintetizador EFM1 FM
El sintetizador EFM1 FM obtiene sonidos como el clásico Yamaha DX7 de los 80, uno de los sintetizadores digitales más populares de todos los tiempos. El EFM1 utiliza la síntesis de FM ( modulación de frecuencia ) para obtener sonidos digitales como pianos eléctricos, campanas, órganos, bajos y otros sonidos interesantes y complejos. El EFM1 es capaz de reproducir 16 voces simultáneas y, a diferencia del DX7, es fácil de programar.
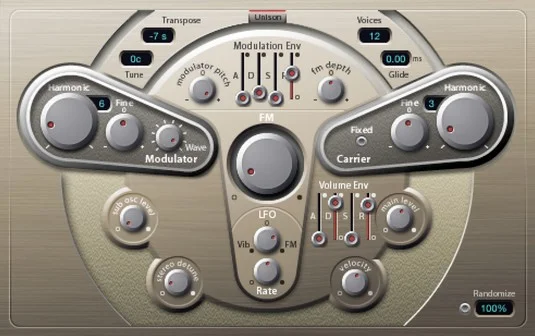
El sintetizador EFM1 FM.
Para diseñar sonidos con síntesis de FM, establezca los parámetros del modulador y la portadora y luego modifique la intensidad de FM. Las relaciones de sintonización entre el modulador y la portadora establecen los sobretonos armónicos. La intensidad de FM establece el nivel de los armónicos. Aquí hay una descripción de los parámetros EFM1:
- Parámetros del modulador: Los parámetros del modulador están en el lado izquierdo de la interfaz EFM1. Gire la perilla Harmonic para establecer la relación de sintonización de la señal del modulador. Gire la perilla Fine tune para ajustar los armónicos. Gire la perilla Wave completamente hacia la izquierda para establecer la forma de onda del modulador en la onda sinusoidal FM tradicional o en cualquier lugar a la derecha para obtener formas de onda adicionales. Gire la perilla de FM central grande para ajustar la intensidad de FM.
- Parámetros de la portadora: Los parámetros de la portadora se encuentran en el lado derecho de la interfaz EFM1. Gire la perilla Harmonic para establecer la relación de sintonización de la señal portadora. Gire la perilla Fine tune para ajustar los armónicos. Haga clic en el botón Fixed Carrier para evitar que la portadora sea modulada por el teclado, el pitch bend o el LFO.
- Parámetros globales: en la sección superior de EFM1, puede establecer parámetros globales. Haga clic en el campo Transpose y en el campo Tune para cambiar el tono del EFM1. Haga clic en el campo Voces para elegir cuántas notas se pueden tocar simultáneamente. Haga clic en el campo Glide para establecer el tiempo que lleva deslizarse de un tono a otro, también conocido como Haga clic en el botón Unison para superponer voces y enriquecer el sonido, lo que también reduce a la mitad el número de voces que se pueden reproducir simultáneamente.
- Parámetros de modulación: en el centro del EFM1 hay controles deslizantes de envolvente de modulación que ajustan el ataque, la caída, el sostenido y la liberación (ADSR) del sonido. Gire la perilla Modulator Pitch para establecer cómo afecta la envolvente de modulación al tono. Gire la perilla FM Depth para establecer cómo afecta la envolvente de modulación a la intensidad de FM. Gire la perilla LFO para establecer cuánto modula el LFO la intensidad o el tono de FM. Gire la perilla Rate para establecer la velocidad del LFO.
- Parámetros de salida: la mitad inferior del EFM1 está dedicada a los parámetros de salida. Gire la perilla Sub Osc Level para aumentar la respuesta de graves. Gire la perilla Stereo Detune para agregar un efecto de coro al sonido. Gire la perilla de velocidad para establecer la sensibilidad de la velocidad en respuesta a su controlador MIDI. Gire la perilla de nivel principal para ajustar el volumen general. Ajuste los controles deslizantes de la envolvente de volumen para establecer el ADSR del sonido.
Haga clic en el botón Aleatorizar en la parte inferior derecha de la interfaz EFM1 para crear sonidos aleatorios. Ajuste la cantidad de aleatorización haciendo clic en el campo Aleatorizar y estableciendo el porcentaje de aleatorización. Si te gustan los sonidos digitales locos, la aleatorización al 100% es tu mejor amiga.
No es necesario ser un genio de la programación para obtener excelentes sonidos de los sintetizadores de Logic Pro. Cada sintetizador viene con un menú de ajustes preestablecidos en la parte superior de la interfaz. Carga un sonido que te guste, gira algunas perillas y diviértete. Debajo del menú predeterminado hay otros botones útiles como Copiar, Pegar, Deshacer y Rehacer. El botón Comparar le permite comparar su configuración editada con la configuración guardada para que pueda editar tanto como desee pero siempre volver a su punto de partida.
Logic Pro X: el sintetizador sustractivo ES1
El sintetizador ES1 crea sonidos mediante el uso de síntesis sustractiva, en la que comienza con un oscilador y un suboscilador y luego resta partes del sonido para darle forma. El ES1 sigue el modelo de los sintetizadores analógicos clásicos y es excelente para crear bajos, leads, pads e incluso sonidos de percusión.
![Explorando los sintetizadores Logic Pro]()
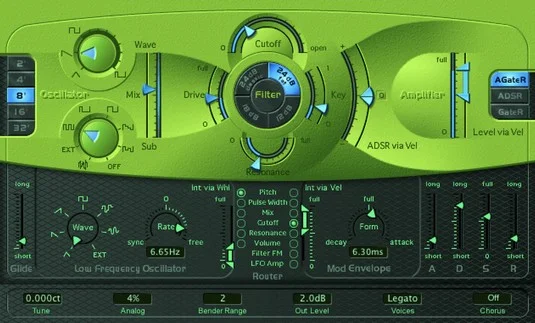
The ES1 subtractive synth.
A description of the ES1 parameters follows:
- Oscillator parameters: The left half of the ES1 interface gives you the oscillator parameters that define your basic sound. Click the buttons on the left to choose the octave. Rotate the Wave knob to set the oscillator waveform. Rotate the Sub knob to set the suboscillator waveform. Adjust the Mix slider to set the mix between the two oscillators.
- Filter parameters: The center section of the ES1 filters the two oscillator waveforms. Adjust the Cutoff slider to set the cutoff frequency of the low-pass filter. Adjust the Resonance slider to set the quality of the frequencies around the cutoff frequency. Click one of the four Slope buttons to choose how extreme the low-pass filter affects the signal. Adjust the Drive slider to affect the resonance setting and to overdrive the filter. Adjust the Key slider to set how the pitch adjusts the filter. Adjust the ADSR via Velocity slider to set how the filter is affected by note velocity.
- Amplifier parameters: The right sections of the ES1 adjust the volume level and performance. Adjust the Level via Velocity slider to set how the volume is affected by note velocity. Click the Amplifier Envelope buttons to set how the ADSR envelope affects the volume.
- Modulation parameters: The largest section of the dark-green area of the ES1 adjusts how the sound is modulated. The Glide parameter sets the speed of the portamento. Rotate the Wave and Rate knobs to set how the Low Frequency Oscillator (LFO) stimulates the sound over time. The Modulation Envelope sets how the modulation fades in or out. The Router parameters set the targets of the LFO and Modulation Envelope.
- Envelope parameters: The far right section of the dark-green area adjusts the ADSR envelope. Use the sliders to set the time of the attack, decay, sustain, and release (ADSR).
- Global parameters: The bottom row of parameters controls the ES1 global parameters. Click the Tune field to adjust the overall tuning. Click the Analog field to introduce random changes to the tuning and cutoff frequency, similar to an analog circuit that changes due to heat and age. Click the Bender Range to adjust the amount of pitch bend. Click the Out Level to adjust the overall volume. Click the Voices field to set the number of voices the ES1 can play simultaneously. Click the Chorus field to choose the type of built-in chorus effect that will thicken the sound.
The ES1 is a great instrument to use for getting the feel of analog synthesis. Many of the synths that follow have similar parameters. Getting the hang of setting oscillator waveforms, filters, envelopes, and modulators will help you take command of the synths and design your own sounds.
Some of these software instruments haven’t had their interfaces updated since Apple introduced hardware Retina displays, which are capable of extremely smooth and crisp graphics. The consequence is fuzzy graphics with controls and text that can be difficult to read. At the top right of the software instrument is a View pop-up menu that can change the size of the window. If you’re having trouble seeing something, make the window bigger.
Logic Pro X: The ES2 hybrid synth
The ES2 is like a combined EFM1 and ES1 synth plus another type of synthesis called wavetable synthesis. A wavetable is made up of many different waveforms that evolve from one to another or blend at once, creating complex digital sounds. Although the ES2 can produce sounds similar to the EFM1 and ES1, it shines at creating pads, sonic textures, and synthetic sounds that evolve over time.
![Explorando los sintetizadores Logic Pro]()
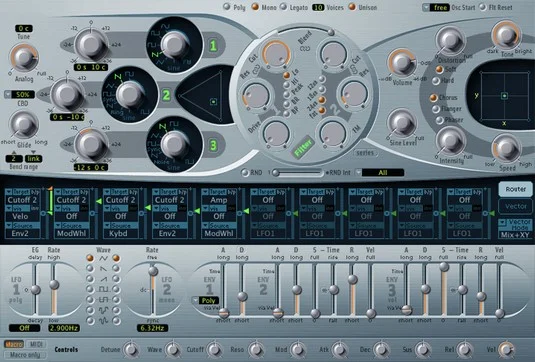
The ES2 hybrid synth.
Check out the the unique features of the ES2:
- Oscillator parameters: The three numbered oscillators on the upper-left side of the ES2 interface choose the basic sound. The triangle-shaped area to the right of the three oscillators blends them together.
- Filter parameters: The round section in the center of the ES2 adjusts the filters that shape your synth sound.
- Amplifier parameters: The top-right section contains the ES2 volume level. You can add a sine wave to the output section using the Sine Level knob.
- Effects parameters: To the right of the ES2 parameters are several built-in effects, including distortion and chorus, as well as a flanger and a phaser.
- Planar pad: The X/Y pad to the right of the amplifier parameters can control two parameters simultaneously. The planar pad parameters are chosen in the modulation router or vector envelope.
- Modulation router and vector envelope parameters: The dark-blue strip of the ES2 controls the modulation sources and targets as well as the vector envelope generator. You can toggle between the modulation router and vector envelope using the Router and Vector buttons on the right.
- Modulation parameters: Below the modulation router and vector envelope parameters are the modulation parameters. Adjust the two LFOs and three envelopes to modulate the ES2 modulation targets. You set the modulation sources and targets in the modulation router.
- Macro controls and controller assignment parameters: The bottom strip of buttons and knobs are where you set the macro controls and MIDI controller assignments. Click the Macro or MIDI button to toggle between the two types of controls. Click the Macro Only button to hide all ES2 parameters except the preprogrammed macro controls, which are useful when you went to adjust the ES2 sounds globally. The MIDI controller assignments allow you to map controls on your MIDI controller to parameters of the ES2.
- Global parameters: Found above the filter parameters and to the left of the oscillator parameters are the ES2 global parameters. You can tune the instrument, set the number of voices, adjust the portamento speed, and more.
The ES2 hybrid synth can be used in surround mode to pan your sound throughout the surround spectrum if you’re monitoring your Logic Pro project in surround sound. Logic Pro designers have seemingly thought of everything. To get to the surround parameters, click the disclosure triangle at the bottom of the ES2 interface to display the advanced parameters.
Logic Pro X: The ES E ensemble synth
The ES E synth is a lightweight, eight-voice subtractive synth. The E in its name stands for ensemble, and the ES E is great for warm pads such as analog brass and strings. Best of all, it’s much easier to program than the ES1 or ES2.
![Explorando los sintetizadores Logic Pro]()
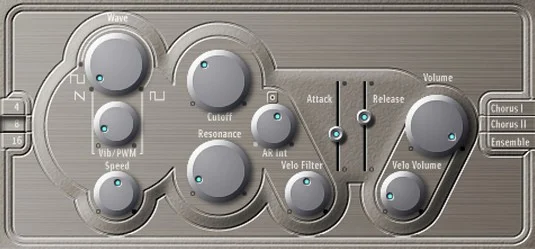
The ES E ensemble synth.
Here’s a description of the ES E parameters:
- Oscillator parameters: The left side of the ES E interface adjusts the oscillator parameters. Click the buttons on the far left to choose the octave of your sound. Rotate the Wave knob all the way to the left to generate a sawtooth wave, which is bright with strong odd and even harmonics and excels at generating rich pads. The rest of the wave range generates pulse waves, which are hollow sounding with strong odd harmonics and can create excellent reedy sounds such as woodwinds.
- LFO parameters: The knobs below the wave parameter adjust the LFO settings. The LFO modulates the oscillator waveform. Rotate the Vibrato/PWM (pulse wave modulation) knob to set the modulation intensity. Rotate the Speed knob to set the LFO speed.
- Filter parameters: To the right of the oscillator and LFO parameters are the low-pass filter parameters. A low-pass filter allows low frequencies to pass through while reducing the higher frequencies. Rotate the Cutoff knob to set the cutoff frequency, and rotate the Resonance knob to raise or lower the frequencies around the cutoff frequency. Rotate the Attack/Release Intensity knob to adjust how the envelope generator affects the filter. Rotate the Velocity Filter knob to adjust how velocity affects the filter.
- Envelope parameters: To the right of the filter parameters are the envelope parameters. Adjust the Attack and Release sliders to set the level of your sound over time. A low attack setting will result in a more immediate sound, and a higher setting will result in a slow fade up to the final volume. A high release setting will cause the sound to slowly fade when you release the key, and a lower setting will cause the sound to fade quickly.
- Output parameters: To the right of the envelope parameters are the output parameters. Rotate the Volume knob to adjust the overall ESE volume. Rotate the Velocity Volume knob to adjust the velocity sensitivity.
- Effects parameters: To the right of the envelope parameters, you can choose a built-in effect. Choose between Chorus I, Chorus II, and Ensemble to thicken your sound.
Logic Pro X: The ES M mono synth
The ES M is another lightweight subtractive synth. The M stands for mono, which means the ES M can play only one note at a time. Monophonic synths such as the ES M are perfect for bass and lead sounds. Like the ES E, the ES M is simple to program and features a stripped-down set of controls. Both the ES E and ES M are great instruments for learning the basics of synthesis.
![Explorando los sintetizadores Logic Pro]()
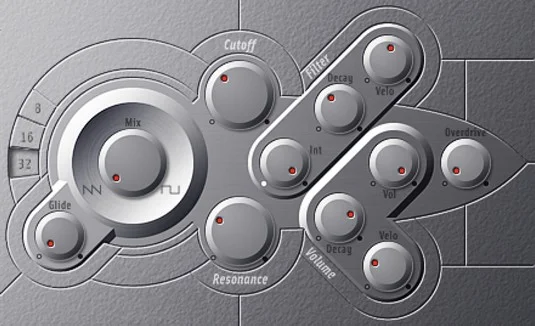
The ES M monophonic synth.
A description of the ES M parameters follows:
- Oscillator parameters: The left side of the ES M adjusts the oscillator parameters. Click the numbered buttons on the far left to choose the octave. Rotate the Mix knob all the way to the left to select a sawtooth wave and all the way to the right to select a rectangular wave. Rotate the Mix knob between the two positions to mix the sawtooth and rectangular waves. Rectangular waves, like pulse waves, are reedy and nasal and great for synth bass sounds. Rotate the Glide knob to adjust the speed of the portamento.
- Filter parameters: To the right of the oscillator parameters are the filter parameters. Rotate the Cutoff knob to adjust the cutoff frequency of the low-pass filter. Rotate the Resonance knob to boost or cut the frequencies around the cutoff frequency. Rotate the Filter Intensity knob to adjust how the envelope generator modulates the cutoff frequency. Rotate the Filter Decay knob to adjust the filter envelope decay time. Rotate the Filter Velocity knob to adjust how velocity affects the filter.
- Volume parameters: To the lower right of the filter parameters are the output parameters. Rotate the Volume knob to adjust the overall volume. Rotate the Volume Decay knob to adjust how the sound decays over time. Rotate the Volume Velocity knob to adjust how volume responds to velocity. Rotate the Overdrive knob to add distortion to your sound.
Click the disclosure triangle at the bottom of the interface to view the extended parameters. You can adjust the pitch bend amount and fine-tuning in this area.
Logic Pro X: The ES P poly synth
The ES P is another lightweight subtractive synth. The P stands for polyphonic; you can play eight voices at once. The ES P is modeled after classic 80s synths and does a great job of creating analog pads, bass, and brass sounds.
![Explorando los sintetizadores Logic Pro]()
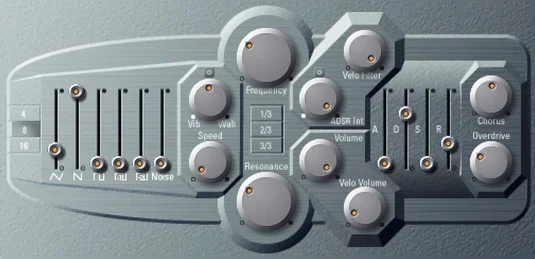
The ES P polyphonic synth.
Here’s a description of the ES P parameters:
- Oscillator parameters: The left side of the ES P adjusts the oscillator parameters. Click the numbered buttons to choose the octave. The Oscillator sliders are used to mix the six oscillators. From left to right, you can set the level of a triangle wave, sawtooth wave, rectangle wave, suboscillator -1 (one octave below), suboscillator -2 (two octaves below), and noise generator.
- LFO parameters: To the right of the oscillator parameters are the LFO parameters. Rotate the Vibrato/Wah knob to adjust the amount of vibrato or wah-wah effect. Rotate the Speed knob to adjust the speed of the vibrato or wah.
- Filter parameters: To the right of the LFO parameters are the filter parameters. Rotate the Frequency knob to set the cutoff frequency of the low-pass filter. Rotate the Resonance knob to boost or cut the frequencies around the cutoff frequency. Click the 1/3, 2/3, or 3/3 buttons to adjust how the pitch affects the cutoff frequency modulation. Rotate the ADSR Intensity knob to adjust how the envelope generator affects the cutoff frequency modulation. Rotate the Velocity Filter knob to set how velocity affects the filter.
- Parámetros de volumen: en la parte inferior derecha de los parámetros de filtro están los parámetros de volumen. Gire la perilla de volumen para ajustar el volumen general. Gire la perilla Velocity Volume para ajustar cómo afecta la velocidad al volumen. Los niveles más bajos imitan a los sintetizadores clásicos sin teclados sensibles a la velocidad; los niveles más altos hacen que las notas sean más fuertes si se golpea la tecla con más fuerza.
- Parámetros de envolvente: a la derecha de los parámetros de volumen están los parámetros de envolvente. Ajuste los parámetros de ataque, caída, sostenido y liberación (ADSR) para ajustar la envolvente de ES P.
- Parámetros de efectos: a la derecha de los parámetros de la envolvente están los parámetros de efectos. Gire la perilla Chorus hacia la derecha para agregar chorus y espesar su sonido. Gire la perilla Overdrive hacia la derecha para agregar distorsión.
Logic Pro X: el codificador de voz EVOC 20 poly synth
El sintetizador polivinílico EVOC 20 es un codificador de voz y un sintetizador de 20 voces. Un vocoder (codificador de voz) toma una señal de audio entrante, por lo general una voz, y aplica esta señal para el sintetizador, la creación de un sintetizador vocal híbrido. Sin embargo, una voz no es lo único que puede utilizar como entrada. Puede ingresar un bucle de batería o un instrumento en el sintetizador o ejecutar el sintetizador sin ninguna entrada como sintetizador independiente.
![Explorando los sintetizadores Logic Pro]()
El sintetizador de codificador de voz EVOC 20.
Para utilizar EVOC 20 PS como un codificador de voz clásico, haga lo siguiente:
En el menú Side Chain en el encabezado del complemento EVOC 20 PS, elija la fuente de entrada.
La fuente puede ser una entrada en vivo, una pista de audio o un bus. El efecto de codificador de voz clásico utiliza una entrada en vivo o una pista vocal pregrabada.
Silencia la fuente de entrada para que solo escuches la salida del EVOC 20 PS.
Toque su controlador MIDI simultáneamente con la fuente de entrada.
El EVOC 20 PS sintetiza su fuente de entrada.
Aquí hay una breve descripción de un par de parámetros importantes de EVOC 20 PS:
- Parámetros de análisis de la cadena lateral: el área superior izquierda de EVOC 20 PS ajusta los parámetros de la cadena lateral. Gire la perilla Attack para establecer qué tan rápido o lento reacciona el sintetizador al comienzo de la señal de entrada. Gire la perilla Release para ajustar qué tan rápido o lento reacciona el sintetizador al final de la señal de entrada. Haga clic en el botón Congelar para mantener la señal de entrada actual indefinidamente.
- Parámetros de detección de U / V: el lado derecho del EVOC 20 PS ajusta los parámetros de detección de U / V (sordo / sonoro). La voz humana se compone de sonidos sonoros como vocales y sonidos sordos como oclusivas, fricativas y nasales. Gire la perilla de sensibilidad para ajustar la sensibilidad del EVOC 20 PS a las señales de entrada sonoras y sordas. Haga clic en el campo Modo para elegir cómo se sintetizan los sonidos sordos. Gire la perilla de nivel para ajustar el volumen del contenido sordo.
Obtendrá excelentes resultados si su fuente de entrada es un volumen constante con mucho contenido de alta frecuencia. Asegúrese de que el volumen de su fuente de entrada no varíe demasiado. También puede ecualizar la fuente de entrada para potenciar el contenido de alta frecuencia.