Con Logic Pro X, ottieni un sacco di strumenti che potrebbero facilmente sostituire ogni sintetizzatore e tastiera che possiedi. Sono potenti e flessibili e suonano in modo straordinario. Inoltre, i sintetizzatori di Logic Pro possono sembrare scoraggianti da programmare quando si osservano tutti i controlli e i parametri che è possibile regolare. Qui si ottiene un tour delle interfacce e dei parametri dello strumento. Guarda una dimostrazione video più dettagliata di cosa possono fare questi sintetizzatori Logic Pro , dove vedi come funzionano i sintetizzatori e come utilizzare questi sintetizzatori Logic Pro nella tua musica.
Per riprodurre i sintetizzatori Logic Pro, è necessario creare una traccia di strumento software e selezionare lo strumento dallo slot dello strumento della striscia di canale come segue:
Scegli Traccia → Nuova traccia di strumenti software (o premi Opzione-⌘ -S).
Una nuova traccia di strumento software viene aggiunta all'elenco delle tracce.
Scegli Visualizza → Mostra impostazioni (o premi I).
L'inspector si apre a sinistra dell'elenco dei brani.
Fare clic sul lato destro dello slot dello strumento e scegliere lo strumento desiderato.
Si apre l'interfaccia dello strumento software.
Prima di iniziare il tour della favolosa collezione di sintetizzatori di Logic Pro, è importante comprendere alcuni termini di sintesi di base:
- Oscillatore: un oscillatore sintetizzatore produce un segnale continuo che costituisce la base per il tuo suono. Gli oscillatori sono in grado di produrre diverse forme d'onda con diverse qualità tonali. Gli oscillatori sono la parte più importante del sintetizzatore perché creano il suono che gli altri parametri del sintetizzatore modelleranno.
- Modulazione: un suono di synth statico guadagna interesse quando viene variato in qualche modo. La modulazione è il processo di variazione dei parametri del sintetizzatore. Il vibrato è un esempio comune di modulazione.
- Filtro: i suoni del sintetizzatore vengono modellati attraverso l'uso di filtri. I filtri rimuovono parti dello spettro di frequenza, consentendo di modellare il suono.
- Inviluppo: un inviluppo synth modella l'inizio, la parte centrale e la fine del suono. L'inviluppo più comune regola l'attacco, il decadimento, il sustain e il rilascio (ADSR). Ad esempio, un pianoforte ha un attacco veloce, un decadimento veloce, un sustain medio e un rilascio veloce.
- LFO: Un oscillatore a bassa frequenza (LFO) è un segnale, solitamente al di sotto dello spettro di frequenza udibile, che modula un segnale. Gli LFO sono usati per alterare in qualche modo il segnale originale. Un uso comune di un LFO è creare il vibrato.
Logic Pro X: il sintetizzatore FM EFM1
Il sintetizzatore FM EFM1 ottiene suoni come il classico Yamaha DX7 degli anni '80, uno dei sintetizzatori digitali più popolari di tutti i tempi. L'EFM1 utilizza la sintesi FM ( modulazione di frequenza ) per ottenere suoni digitali come pianoforti elettrici, campane, organi, bassi e altri suoni interessanti e complessi. L'EFM1 è in grado di riprodurre 16 voci simultanee e, a differenza del DX7, è facile da programmare.
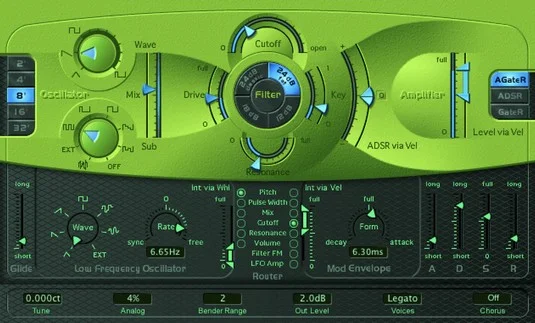
Il sintetizzatore FM EFM1.
Per progettare suoni con la sintesi FM, si impostano i parametri del modulatore e della portante, quindi si modifica l'intensità FM. I rapporti di sintonia tra il modulatore e la portante impostano i sovratoni armonici. L'intensità FM imposta il livello degli armonici. Ecco una descrizione dei parametri EFM1:
- Parametri del modulatore: i parametri del modulatore si trovano sul lato sinistro dell'interfaccia EFM1. Ruotare la manopola Harmonic per impostare il rapporto di sintonizzazione del segnale del modulatore. Ruotare la manopola Fine tune per regolare le armoniche. Ruota la manopola Wave completamente a sinistra per impostare la forma d'onda del modulatore sulla tradizionale onda sinusoidale FM o ovunque a destra per forme d'onda aggiuntive. Ruotare la grande manopola FM centrale per regolare l'intensità FM.
- Parametri della portante: i parametri della portante si trovano sul lato destro dell'interfaccia EFM1. Ruotare la manopola Harmonic per impostare il rapporto di sintonizzazione del segnale portante. Ruotare la manopola Fine tune per regolare le armoniche. Fare clic sul pulsante Portante fissa per evitare che la portante venga modulata dalla tastiera, dal pitch bend o dall'LFO.
- Parametri globali: nella sezione superiore dell'EFM1, è possibile impostare i parametri globali. Fare clic sui campi Transpose e Tune per modificare l'intonazione dell'EFM1. Fare clic sul campo Voci per scegliere quante note possono essere suonate contemporaneamente. Fare clic sul campo Glide per impostare il tempo necessario per passare da un tono all'altro, noto anche come Fare clic sul pulsante Unison per sovrapporre le voci e rendere il suono più ricco, riducendo anche della metà il numero di voci che possono essere suonate contemporaneamente.
- Parametri di modulazione: al centro dell'EFM1 ci sono gli slider dell'inviluppo di modulazione che impostano l'attacco, il decadimento, il sustain e il rilascio (ADSR) del suono. Ruotare la manopola Modulator Pitch per impostare come l'inviluppo di modulazione influisce sul pitch. Ruotare la manopola FM Depth per impostare come l'inviluppo di modulazione influisce sull'intensità FM. Ruotare la manopola LFO per impostare quanto l'LFO modula l'intensità FM o il tono. Ruotare la manopola Rate per impostare la velocità dell'LFO.
- Parametri di uscita: la metà inferiore dell'EFM1 è dedicata ai parametri di uscita. Ruotare la manopola Sub Osc Level per aumentare la risposta dei bassi. Ruotare la manopola Stereo Detune per aggiungere un effetto chorus al suono. Ruota la manopola Velocity per impostare la sensibilità alla velocità in risposta al tuo controller MIDI. Ruotare la manopola del livello principale per regolare il volume generale. Regolare i cursori Volume Envelope per impostare l'ADSR del suono.
Fare clic sul pulsante Randomize in basso a destra dell'interfaccia EFM1 per creare suoni casuali. Regola la quantità di randomizzazione facendo clic sul campo Randomizza e impostando la percentuale di randomizzazione. Se ti piacciono i suoni digitali pazzi, la randomizzazione al 100% è la tua migliore amica.
Non devi essere un genio della programmazione per ottenere grandi suoni dai sintetizzatori di Logic Pro. Ogni synth viene fornito con un menu di preset nella parte superiore dell'interfaccia. Carica un suono che ti piace, ruota alcune manopole e divertiti. Sotto il menu predefinito ci sono altri pulsanti utili come Copia, Incolla, Annulla e Ripristina. Il pulsante Confronta ti consente di confrontare le impostazioni modificate con le impostazioni salvate in modo da poter modificare quanto vuoi ma tornare sempre al punto di partenza.
Logic Pro X: il sintetizzatore sottrattivo ES1
Il sintetizzatore ES1 crea suoni utilizzando la sintesi sottrattiva, in cui si inizia con un oscillatore e un suboscillatore e quindi si sottraggono parti del suono per modellarlo. L'ES1 è modellato sui classici sintetizzatori analogici ed è ottimo per creare bassi, lead, pad e persino suoni di percussioni.
![Esplorazione dei sintetizzatori Logic Pro]()
The ES1 subtractive synth.
A description of the ES1 parameters follows:
- Oscillator parameters: The left half of the ES1 interface gives you the oscillator parameters that define your basic sound. Click the buttons on the left to choose the octave. Rotate the Wave knob to set the oscillator waveform. Rotate the Sub knob to set the suboscillator waveform. Adjust the Mix slider to set the mix between the two oscillators.
- Filter parameters: The center section of the ES1 filters the two oscillator waveforms. Adjust the Cutoff slider to set the cutoff frequency of the low-pass filter. Adjust the Resonance slider to set the quality of the frequencies around the cutoff frequency. Click one of the four Slope buttons to choose how extreme the low-pass filter affects the signal. Adjust the Drive slider to affect the resonance setting and to overdrive the filter. Adjust the Key slider to set how the pitch adjusts the filter. Adjust the ADSR via Velocity slider to set how the filter is affected by note velocity.
- Amplifier parameters: The right sections of the ES1 adjust the volume level and performance. Adjust the Level via Velocity slider to set how the volume is affected by note velocity. Click the Amplifier Envelope buttons to set how the ADSR envelope affects the volume.
- Modulation parameters: The largest section of the dark-green area of the ES1 adjusts how the sound is modulated. The Glide parameter sets the speed of the portamento. Rotate the Wave and Rate knobs to set how the Low Frequency Oscillator (LFO) stimulates the sound over time. The Modulation Envelope sets how the modulation fades in or out. The Router parameters set the targets of the LFO and Modulation Envelope.
- Envelope parameters: The far right section of the dark-green area adjusts the ADSR envelope. Use the sliders to set the time of the attack, decay, sustain, and release (ADSR).
- Global parameters: The bottom row of parameters controls the ES1 global parameters. Click the Tune field to adjust the overall tuning. Click the Analog field to introduce random changes to the tuning and cutoff frequency, similar to an analog circuit that changes due to heat and age. Click the Bender Range to adjust the amount of pitch bend. Click the Out Level to adjust the overall volume. Click the Voices field to set the number of voices the ES1 can play simultaneously. Click the Chorus field to choose the type of built-in chorus effect that will thicken the sound.
The ES1 is a great instrument to use for getting the feel of analog synthesis. Many of the synths that follow have similar parameters. Getting the hang of setting oscillator waveforms, filters, envelopes, and modulators will help you take command of the synths and design your own sounds.
Some of these software instruments haven’t had their interfaces updated since Apple introduced hardware Retina displays, which are capable of extremely smooth and crisp graphics. The consequence is fuzzy graphics with controls and text that can be difficult to read. At the top right of the software instrument is a View pop-up menu that can change the size of the window. If you’re having trouble seeing something, make the window bigger.
Logic Pro X: The ES2 hybrid synth
The ES2 is like a combined EFM1 and ES1 synth plus another type of synthesis called wavetable synthesis. A wavetable is made up of many different waveforms that evolve from one to another or blend at once, creating complex digital sounds. Although the ES2 can produce sounds similar to the EFM1 and ES1, it shines at creating pads, sonic textures, and synthetic sounds that evolve over time.
![Esplorazione dei sintetizzatori Logic Pro]()
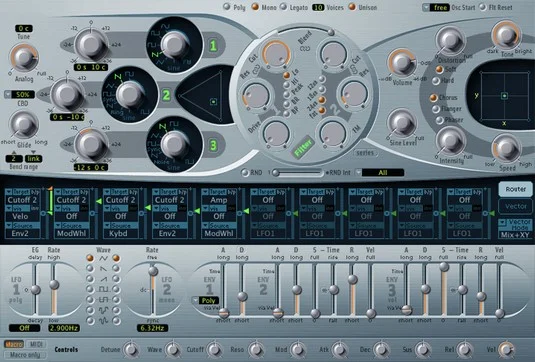
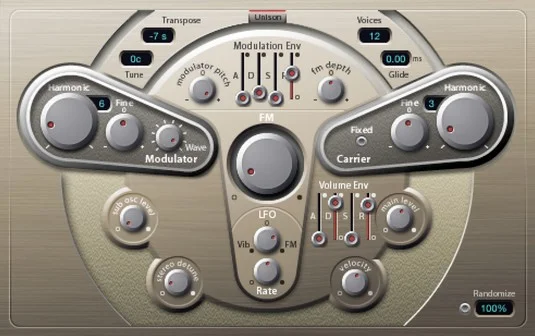
The ES2 hybrid synth.
Check out the the unique features of the ES2:
- Oscillator parameters: The three numbered oscillators on the upper-left side of the ES2 interface choose the basic sound. The triangle-shaped area to the right of the three oscillators blends them together.
- Filter parameters: The round section in the center of the ES2 adjusts the filters that shape your synth sound.
- Amplifier parameters: The top-right section contains the ES2 volume level. You can add a sine wave to the output section using the Sine Level knob.
- Effects parameters: To the right of the ES2 parameters are several built-in effects, including distortion and chorus, as well as a flanger and a phaser.
- Planar pad: The X/Y pad to the right of the amplifier parameters can control two parameters simultaneously. The planar pad parameters are chosen in the modulation router or vector envelope.
- Modulation router and vector envelope parameters: The dark-blue strip of the ES2 controls the modulation sources and targets as well as the vector envelope generator. You can toggle between the modulation router and vector envelope using the Router and Vector buttons on the right.
- Modulation parameters: Below the modulation router and vector envelope parameters are the modulation parameters. Adjust the two LFOs and three envelopes to modulate the ES2 modulation targets. You set the modulation sources and targets in the modulation router.
- Macro controls and controller assignment parameters: The bottom strip of buttons and knobs are where you set the macro controls and MIDI controller assignments. Click the Macro or MIDI button to toggle between the two types of controls. Click the Macro Only button to hide all ES2 parameters except the preprogrammed macro controls, which are useful when you went to adjust the ES2 sounds globally. The MIDI controller assignments allow you to map controls on your MIDI controller to parameters of the ES2.
- Global parameters: Found above the filter parameters and to the left of the oscillator parameters are the ES2 global parameters. You can tune the instrument, set the number of voices, adjust the portamento speed, and more.
The ES2 hybrid synth can be used in surround mode to pan your sound throughout the surround spectrum if you’re monitoring your Logic Pro project in surround sound. Logic Pro designers have seemingly thought of everything. To get to the surround parameters, click the disclosure triangle at the bottom of the ES2 interface to display the advanced parameters.
Logic Pro X: The ES E ensemble synth
The ES E synth is a lightweight, eight-voice subtractive synth. The E in its name stands for ensemble, and the ES E is great for warm pads such as analog brass and strings. Best of all, it’s much easier to program than the ES1 or ES2.
![Esplorazione dei sintetizzatori Logic Pro]()
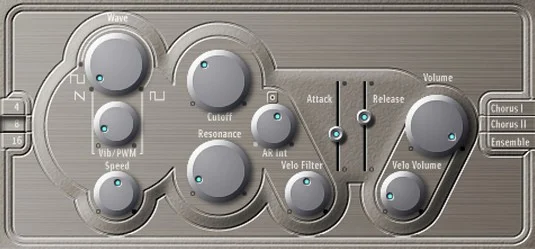
The ES E ensemble synth.
Here’s a description of the ES E parameters:
- Oscillator parameters: The left side of the ES E interface adjusts the oscillator parameters. Click the buttons on the far left to choose the octave of your sound. Rotate the Wave knob all the way to the left to generate a sawtooth wave, which is bright with strong odd and even harmonics and excels at generating rich pads. The rest of the wave range generates pulse waves, which are hollow sounding with strong odd harmonics and can create excellent reedy sounds such as woodwinds.
- LFO parameters: The knobs below the wave parameter adjust the LFO settings. The LFO modulates the oscillator waveform. Rotate the Vibrato/PWM (pulse wave modulation) knob to set the modulation intensity. Rotate the Speed knob to set the LFO speed.
- Filter parameters: To the right of the oscillator and LFO parameters are the low-pass filter parameters. A low-pass filter allows low frequencies to pass through while reducing the higher frequencies. Rotate the Cutoff knob to set the cutoff frequency, and rotate the Resonance knob to raise or lower the frequencies around the cutoff frequency. Rotate the Attack/Release Intensity knob to adjust how the envelope generator affects the filter. Rotate the Velocity Filter knob to adjust how velocity affects the filter.
- Envelope parameters: To the right of the filter parameters are the envelope parameters. Adjust the Attack and Release sliders to set the level of your sound over time. A low attack setting will result in a more immediate sound, and a higher setting will result in a slow fade up to the final volume. A high release setting will cause the sound to slowly fade when you release the key, and a lower setting will cause the sound to fade quickly.
- Output parameters: To the right of the envelope parameters are the output parameters. Rotate the Volume knob to adjust the overall ESE volume. Rotate the Velocity Volume knob to adjust the velocity sensitivity.
- Effects parameters: To the right of the envelope parameters, you can choose a built-in effect. Choose between Chorus I, Chorus II, and Ensemble to thicken your sound.
Logic Pro X: The ES M mono synth
The ES M is another lightweight subtractive synth. The M stands for mono, which means the ES M can play only one note at a time. Monophonic synths such as the ES M are perfect for bass and lead sounds. Like the ES E, the ES M is simple to program and features a stripped-down set of controls. Both the ES E and ES M are great instruments for learning the basics of synthesis.
![Esplorazione dei sintetizzatori Logic Pro]()
The ES M monophonic synth.
A description of the ES M parameters follows:
- Oscillator parameters: The left side of the ES M adjusts the oscillator parameters. Click the numbered buttons on the far left to choose the octave. Rotate the Mix knob all the way to the left to select a sawtooth wave and all the way to the right to select a rectangular wave. Rotate the Mix knob between the two positions to mix the sawtooth and rectangular waves. Rectangular waves, like pulse waves, are reedy and nasal and great for synth bass sounds. Rotate the Glide knob to adjust the speed of the portamento.
- Filter parameters: To the right of the oscillator parameters are the filter parameters. Rotate the Cutoff knob to adjust the cutoff frequency of the low-pass filter. Rotate the Resonance knob to boost or cut the frequencies around the cutoff frequency. Rotate the Filter Intensity knob to adjust how the envelope generator modulates the cutoff frequency. Rotate the Filter Decay knob to adjust the filter envelope decay time. Rotate the Filter Velocity knob to adjust how velocity affects the filter.
- Volume parameters: To the lower right of the filter parameters are the output parameters. Rotate the Volume knob to adjust the overall volume. Rotate the Volume Decay knob to adjust how the sound decays over time. Rotate the Volume Velocity knob to adjust how volume responds to velocity. Rotate the Overdrive knob to add distortion to your sound.
Click the disclosure triangle at the bottom of the interface to view the extended parameters. You can adjust the pitch bend amount and fine-tuning in this area.
Logic Pro X: The ES P poly synth
The ES P is another lightweight subtractive synth. The P stands for polyphonic; you can play eight voices at once. The ES P is modeled after classic 80s synths and does a great job of creating analog pads, bass, and brass sounds.
![Esplorazione dei sintetizzatori Logic Pro]()
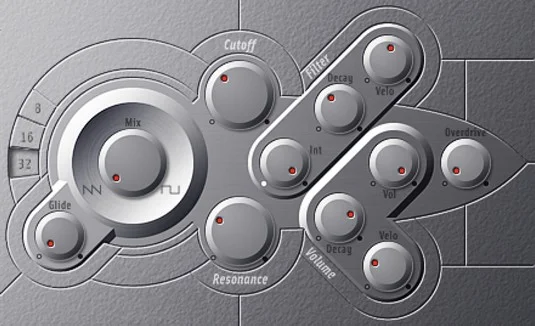
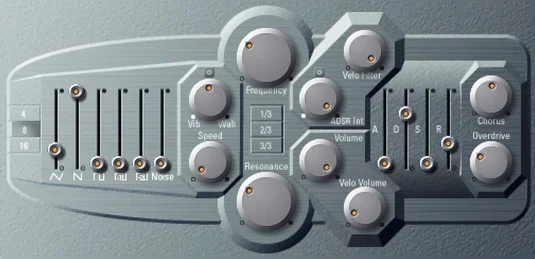
The ES P polyphonic synth.
Here’s a description of the ES P parameters:
- Oscillator parameters: The left side of the ES P adjusts the oscillator parameters. Click the numbered buttons to choose the octave. The Oscillator sliders are used to mix the six oscillators. From left to right, you can set the level of a triangle wave, sawtooth wave, rectangle wave, suboscillator -1 (one octave below), suboscillator -2 (two octaves below), and noise generator.
- LFO parameters: To the right of the oscillator parameters are the LFO parameters. Rotate the Vibrato/Wah knob to adjust the amount of vibrato or wah-wah effect. Rotate the Speed knob to adjust the speed of the vibrato or wah.
- Filter parameters: To the right of the LFO parameters are the filter parameters. Rotate the Frequency knob to set the cutoff frequency of the low-pass filter. Rotate the Resonance knob to boost or cut the frequencies around the cutoff frequency. Click the 1/3, 2/3, or 3/3 buttons to adjust how the pitch affects the cutoff frequency modulation. Rotate the ADSR Intensity knob to adjust how the envelope generator affects the cutoff frequency modulation. Rotate the Velocity Filter knob to set how velocity affects the filter.
- Parametri del volume: in basso a destra dei parametri del filtro ci sono i parametri del volume. Ruotare la manopola Volume per regolare il volume generale. Ruotare la manopola Velocity Volume per regolare il modo in cui la velocità influisce sul volume. I livelli più bassi imitano i sintetizzatori classici senza tastiere sensibili alla velocità; livelli più alti rendono le note più forti se il tasto viene premuto più forte.
- Parametri dell'inviluppo : a destra dei parametri del volume ci sono i parametri dell'inviluppo. Regolare i parametri di attacco, decadimento, sustain e rilascio (ADSR) per regolare l'inviluppo ES P.
- Parametri degli effetti: a destra dei parametri dell'inviluppo ci sono i parametri degli effetti. Ruota la manopola Chorus verso destra per aggiungere chorus e addensare il tuo suono. Ruota la manopola Overdrive verso destra per aggiungere distorsione.
Logic Pro X: il poly synth vocoder EVOC 20
Il poly synth EVOC 20 è un vocoder e un sintetizzatore a 20 voci. Un vocoder (codificatore vocale) prende un segnale audio in ingresso, in genere una voce, e applica questo segnale al sintetizzatore, creando un sintetizzatore vocale ibrido. Tuttavia, una voce non è l'unica cosa che puoi usare come input. Puoi inserire un loop di batteria o uno strumento nel sintetizzatore o eseguire il sintetizzatore senza alcun input come sintetizzatore autonomo.
![Esplorazione dei sintetizzatori Logic Pro]()
Il sintetizzatore vocoder EVOC 20.
Per utilizzare EVOC 20 PS come vocoder classico, procedi come segue:
Nel menu Side Chain nell'intestazione del plug-in EVOC 20 PS, scegli la sorgente di ingresso.
La sorgente può essere un ingresso live, una traccia audio o un bus. Il classico effetto vocoder utilizza un ingresso live o una traccia vocale preregistrata.
Disattiva la sorgente di ingresso in modo da ascoltare solo l'uscita dall'EVOC 20 PS.
Riproduci il tuo controller MIDI contemporaneamente alla sorgente di ingresso.
L'EVOC 20 PS sintetizza la tua sorgente di ingresso.
Ecco una breve descrizione di un paio di importanti parametri dell'EVOC 20 PS:
- Parametri di analisi della catena laterale: l'area in alto a sinistra dell'EVOC 20 PS regola i parametri della catena laterale. Ruota la manopola Attack per impostare quanto velocemente o lentamente il synth reagisce all'inizio del segnale in ingresso. Ruotare la manopola Release per regolare la velocità o il rallentamento con cui il sintetizzatore reagisce alla fine del segnale in ingresso. Fare clic sul pulsante Congela per mantenere indefinitamente il segnale di ingresso corrente.
- Parametri di rilevamento U/V: Il lato destro di EVOC 20 PS regola i parametri di rilevamento U/V (non sonoro/sonoro). La voce umana è composta da suoni sonori come vocali e suoni afoni come esplosive, fricative e nasali. Ruotare la manopola Sensibilità per regolare la sensibilità dell'EVOC 20 PS ai segnali di ingresso sonori e non sonori. Fare clic sul campo Modalità per scegliere come vengono sintetizzati i suoni non vocali. Ruotare la manopola del livello per regolare il volume del contenuto non vocale.
Otterrai ottimi risultati se la tua sorgente di input è un volume costante con molti contenuti ad alta frequenza. Assicurati che il volume della tua sorgente di ingresso non vari troppo. Puoi anche equalizzare la sorgente di ingresso per aumentare il contenuto ad alta frequenza.