使用 Logic Pro X,您可以獲得一大堆樂器,可以輕鬆替換您擁有的每個合成器和鍵盤。它們功能強大且靈活——而且它們聽起來很棒。此外,當您查看所有可以調整的控件和參數時,Logic Pro 的合成器似乎很難編程。在這裡,您可以瀏覽儀器界面和參數。查看更詳細的視頻演示,了解這些 Logic Pro 合成器的功能,您可以在其中了解合成器的工作原理以及如何在您的音樂中使用這些 Logic Pro 合成器。
要播放 Logic Pro 合成器,您必須創建軟件樂器軌道並從通道條樂器插槽中選擇樂器,如下所示:
選擇軌道 → 新軟件樂器軌道(或按 Option-⌘ -S)。
一個新的軟件樂器軌道被添加到軌道列表中。
選擇“視圖”→“顯示檢查器”(或按 I)。
檢查器在曲目列表的左側打開。
單擊樂器插槽的右側並選擇您想要的樂器。
軟件儀器界面打開。
在您開始遊覽 Logic Pro 美妙的合成器系列之前,了解一些基本的合成術語很重要:
- 振盪器:合成器振盪器產生連續信號,構成聲音的基礎。振盪器能夠產生具有不同音質的幾種不同波形形狀。振盪器是合成器中最重要的部分,因為它們會產生其他合成器參數將塑造的聲音。
- 調製:靜態合成器聲音在以某種方式變化時會引起興趣。調製是改變合成器參數的過程。顫音是調製的常見示例。
- 過濾器:通過使用過濾器來塑造合成聲音。濾波器會去除部分頻譜,讓您可以勾勒出聲音的輪廓。
- 包絡:合成器包絡塑造聲音的開頭、中間和結尾。最常見的包絡調整起音、衰減、延音和釋音 (ADSR)。例如,鋼琴具有快速起音、快速衰減、中等延音和快速釋放。
- LFO:甲低頻振盪器(LFO)是一個信號,通常低於可聽頻譜,即調製的信號。LFO 用於以某種方式改變原始信號。LFO 的一個常見用途是創建顫音。
Logic Pro X:EFM1 FM 合成器
EFM1 FM 合成器的聲音類似於 80 年代經典的 Yamaha DX7,它是有史以來最受歡迎的數字合成器之一。EFM1 使用 FM(調頻)合成來獲得數字聲音,例如電鋼琴、鐘聲、風琴、貝司和其他酷炫而復雜的聲音。EFM1 能夠同時播放 16 個聲音,並且與 DX7 不同,它易於編程。
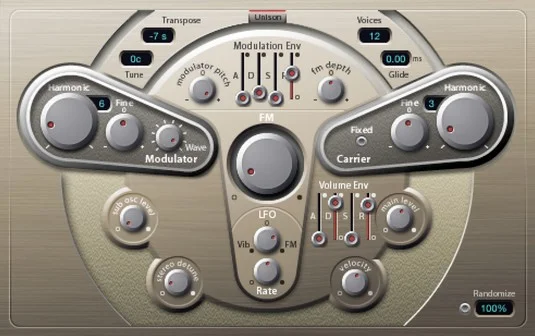
EFM1 FM 合成器。
要使用 FM 合成設計聲音,請設置調製器和載波參數,然後更改 FM 強度。調製器和載波之間的調諧比設置諧波泛音。FM 強度設置泛音的級別。以下是 EFM1 參數的說明:
- 調製器參數:調製器參數位於 EFM1 界面的左側。旋轉諧波旋鈕以設置調製器信號的調諧比。旋轉微調旋鈕調整諧波。將 Wave 旋鈕一直向左旋轉,將調製器波形設置為傳統的 FM 正弦波,或向右任意位置設置其他波形。旋轉中央 FM 大旋鈕以調節 FM 強度。
- 載波參數:載波參數在EFM1界面右側。旋轉諧波旋鈕以設置載波信號的調諧比。旋轉微調旋鈕調整諧波。點按“固定載波”按鈕以避免通過鍵盤、彎音或 LFO 調製載波。
- 全局參數:在 EFM1 的頂部,您可以設置全局參數。單擊 Transpose 字段和 Tune 字段以更改 EFM1 的音高。點按“音色”欄以選取可以同時播放的音符數。點按“滑音”欄可設置從一個音高滑到另一個音高所需的時間,也稱為點按“齊奏”按鈕可將聲音分層並使聲音更豐富,這也將可同時播放的聲音數量減少了一半。
- 調製參數: EFM1 的中心是調製包絡滑塊,用於設置聲音的起音、衰減、延音和釋音 (ADSR)。旋轉調製器音高旋鈕以設置調製包絡如何影響音高。旋轉 FM Depth 旋鈕以設置調製包絡如何影響 FM 強度。旋轉 LFO 旋鈕以設置 LFO 調製 FM 強度或音高的程度。旋轉“速率”旋鈕以設置 LFO 的速度。
- 輸出參數: EFM1 的下半部分專用於輸出參數。旋轉 Sub Osc Level 旋鈕以增加低音響應。旋轉 Stereo Detune 旋鈕為聲音添加合唱效果。旋轉力度旋鈕以根據 MIDI 控制器設置力度靈敏度。旋轉 Main Level 旋鈕以調節整體音量。調整音量包絡滑塊以設置聲音的 ADSR。
單擊 EFM1 界面右下方的隨機化按鈕以創建隨機聲音。通過單擊隨機化字段並設置隨機化百分比來調整隨機化量。如果您喜歡瘋狂的數字聲音,100% 隨機化是您最好的朋友。
您不必是編程天才也能從 Logic Pro 的合成器中獲得美妙的聲音。每個合成器在界面頂部都有一個預設菜單。加載您喜歡的聲音,轉動一些旋鈕,享受一些樂趣。預設菜單下方是其他有用的按鈕,例如復制、粘貼、撤消和重做。比較按鈕允許您將編輯的設置與保存的設置進行比較,以便您可以根據需要進行編輯,但始終返回到起點。
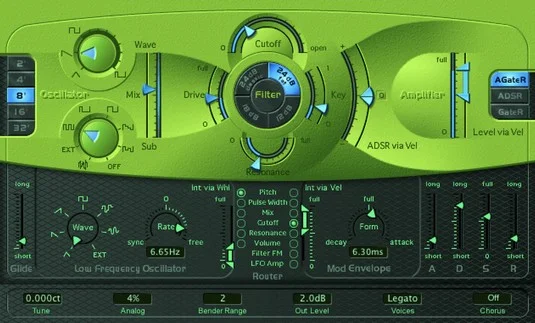
Logic Pro X:ES1 減法合成器
ES1 合成器通過使用減法合成來創建聲音,其中您從一個振盪器和一個子振盪器開始,然後減去部分聲音以對其進行整形。ES1 以經典模擬合成器為藍本,非常擅長創建貝斯、主音、打擊墊,甚至打擊樂聲音。
![探索 Logic Pro 合成器]()
ES1 減法合成器。
ES1 參數的說明如下:
- 振盪器參數: ES1 界面的左半部分為您提供定義基本聲音的振盪器參數。單擊左側的按鈕以選擇八度。旋轉 Wave 旋鈕以設置振盪器波形。旋轉 Sub 旋鈕以設置子振盪器波形。調整混合滑塊以設置兩個振盪器之間的混合。
- 濾波器參數: ES1 的中心部分對兩個振盪器波形進行濾波。調整截止滑塊以設置低通濾波器的截止頻率。調整共振滑塊以設置截止頻率附近的頻率質量。單擊四個斜率按鈕之一來選擇低通濾波器對信號的影響程度。調整驅動滑塊以影響共振設置並使濾波器過載。調整鍵滑塊以設置音高如何調整過濾器。通過力度滑塊調整 ADSR 以設置濾波器如何受音符力度影響。
- 放大器參數: ES1 的右側部分可調節音量和性能。調整 Level via Velocity 滑塊以設置音量如何受音符力度影響。點按“放大器包絡”按鈕以設置 ADSR 包絡如何影響音量。
- 調製參數: ES1 深綠色區域的最大部分調整聲音的調製方式。Glide 參數設置滑音的速度。旋轉 Wave 和 Rate 旋鈕以設置低頻振盪器 (LFO) 如何隨著時間的推移刺激聲音。調製包絡設置調製淡入或淡出的方式。路由器參數設置 LFO 和調製包絡的目標。
- 包絡參數:深綠色區域的最右側部分調整 ADSR 包絡。使用滑塊設置起音、衰減、延音和釋音 (ADSR) 的時間。
- 全局參數:底行參數控制 ES1 全局參數。單擊“調諧”字段以調整整體調諧。單擊模擬字段可對調諧頻率和截止頻率進行隨機更改,類似於因熱量和老化而發生變化的模擬電路。單擊 Bender Range 以調整彎音量。單擊 Out Level 以調整整體音量。點按“音色”欄以設置 ES1 可以同時播放的音色數。點按“合唱”欄以選擇將使聲音變厚的內置合唱效果類型。
ES1 是一種很好的樂器,可以用來獲得模擬合成的感覺。後面的許多合成器都有相似的參數。掌握設置振盪器波形、濾波器、包絡和調製器的竅門將幫助您控制合成器並設計自己的聲音。
自從 Apple 推出硬件 Retina 顯示器後,其中一些軟件樂器的界面就沒有更新,這些顯示器能夠呈現極其流暢和清晰的圖形。結果是帶有難以閱讀的控件和文本的模糊圖形。軟件樂器的右上角是一個視圖彈出菜單,可以更改窗口的大小。如果你看東西有困難,把窗戶放大。
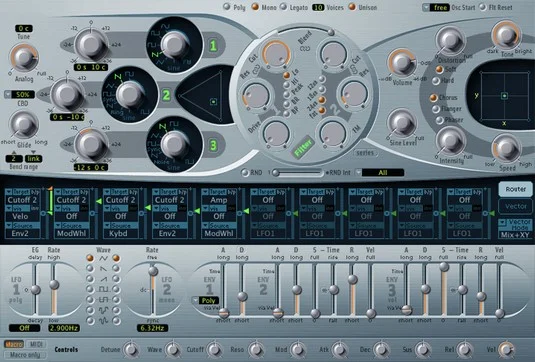
Logic Pro X:ES2 混合合成器
ES2 就像一個組合的 EFM1 和 ES1 合成器加上另一種稱為波表合成的合成器。一個波表是由從一個到另一個一次或混合進化許多不同的波形,創建複雜的數字聲音。儘管 ES2 可以產生類似於 EFM1 和 ES1 的聲音,但它在創建打擊墊、聲音紋理和隨時間演變的合成聲音方面表現出色。
![探索 Logic Pro 合成器]()
ES2 混合合成器。
查看 ES2 的獨特功能:
- 振盪器參數: ES2 界面左上角的三個編號振盪器選擇基本聲音。三個振盪器右側的三角形區域將它們混合在一起。
- 濾波器參數: ES2 中心的圓形部分可調整塑造合成器聲音的濾波器。
- Amplifier parameters: The top-right section contains the ES2 volume level. You can add a sine wave to the output section using the Sine Level knob.
- Effects parameters: To the right of the ES2 parameters are several built-in effects, including distortion and chorus, as well as a flanger and a phaser.
- Planar pad: The X/Y pad to the right of the amplifier parameters can control two parameters simultaneously. The planar pad parameters are chosen in the modulation router or vector envelope.
- Modulation router and vector envelope parameters: The dark-blue strip of the ES2 controls the modulation sources and targets as well as the vector envelope generator. You can toggle between the modulation router and vector envelope using the Router and Vector buttons on the right.
- Modulation parameters: Below the modulation router and vector envelope parameters are the modulation parameters. Adjust the two LFOs and three envelopes to modulate the ES2 modulation targets. You set the modulation sources and targets in the modulation router.
- Macro controls and controller assignment parameters: The bottom strip of buttons and knobs are where you set the macro controls and MIDI controller assignments. Click the Macro or MIDI button to toggle between the two types of controls. Click the Macro Only button to hide all ES2 parameters except the preprogrammed macro controls, which are useful when you went to adjust the ES2 sounds globally. The MIDI controller assignments allow you to map controls on your MIDI controller to parameters of the ES2.
- Global parameters: Found above the filter parameters and to the left of the oscillator parameters are the ES2 global parameters. You can tune the instrument, set the number of voices, adjust the portamento speed, and more.
The ES2 hybrid synth can be used in surround mode to pan your sound throughout the surround spectrum if you’re monitoring your Logic Pro project in surround sound. Logic Pro designers have seemingly thought of everything. To get to the surround parameters, click the disclosure triangle at the bottom of the ES2 interface to display the advanced parameters.
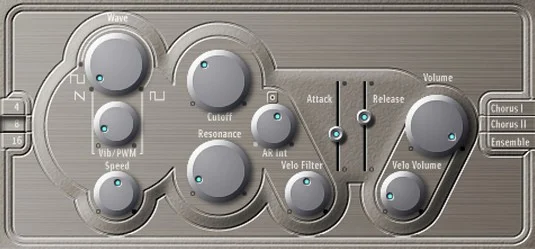
Logic Pro X: The ES E ensemble synth
The ES E synth is a lightweight, eight-voice subtractive synth. The E in its name stands for ensemble, and the ES E is great for warm pads such as analog brass and strings. Best of all, it’s much easier to program than the ES1 or ES2.
![探索 Logic Pro 合成器]()
The ES E ensemble synth.
Here’s a description of the ES E parameters:
- Oscillator parameters: The left side of the ES E interface adjusts the oscillator parameters. Click the buttons on the far left to choose the octave of your sound. Rotate the Wave knob all the way to the left to generate a sawtooth wave, which is bright with strong odd and even harmonics and excels at generating rich pads. The rest of the wave range generates pulse waves, which are hollow sounding with strong odd harmonics and can create excellent reedy sounds such as woodwinds.
- LFO parameters: The knobs below the wave parameter adjust the LFO settings. The LFO modulates the oscillator waveform. Rotate the Vibrato/PWM (pulse wave modulation) knob to set the modulation intensity. Rotate the Speed knob to set the LFO speed.
- Filter parameters: To the right of the oscillator and LFO parameters are the low-pass filter parameters. A low-pass filter allows low frequencies to pass through while reducing the higher frequencies. Rotate the Cutoff knob to set the cutoff frequency, and rotate the Resonance knob to raise or lower the frequencies around the cutoff frequency. Rotate the Attack/Release Intensity knob to adjust how the envelope generator affects the filter. Rotate the Velocity Filter knob to adjust how velocity affects the filter.
- Envelope parameters: To the right of the filter parameters are the envelope parameters. Adjust the Attack and Release sliders to set the level of your sound over time. A low attack setting will result in a more immediate sound, and a higher setting will result in a slow fade up to the final volume. A high release setting will cause the sound to slowly fade when you release the key, and a lower setting will cause the sound to fade quickly.
- Output parameters: To the right of the envelope parameters are the output parameters. Rotate the Volume knob to adjust the overall ESE volume. Rotate the Velocity Volume knob to adjust the velocity sensitivity.
- Effects parameters: To the right of the envelope parameters, you can choose a built-in effect. Choose between Chorus I, Chorus II, and Ensemble to thicken your sound.
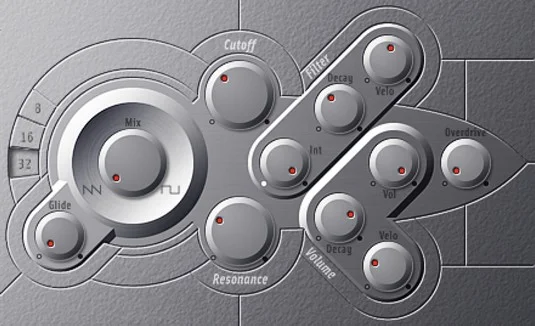
Logic Pro X: The ES M mono synth
The ES M is another lightweight subtractive synth. The M stands for mono, which means the ES M can play only one note at a time. Monophonic synths such as the ES M are perfect for bass and lead sounds. Like the ES E, the ES M is simple to program and features a stripped-down set of controls. Both the ES E and ES M are great instruments for learning the basics of synthesis.
![探索 Logic Pro 合成器]()
The ES M monophonic synth.
A description of the ES M parameters follows:
- Oscillator parameters: The left side of the ES M adjusts the oscillator parameters. Click the numbered buttons on the far left to choose the octave. Rotate the Mix knob all the way to the left to select a sawtooth wave and all the way to the right to select a rectangular wave. Rotate the Mix knob between the two positions to mix the sawtooth and rectangular waves. Rectangular waves, like pulse waves, are reedy and nasal and great for synth bass sounds. Rotate the Glide knob to adjust the speed of the portamento.
- Filter parameters: To the right of the oscillator parameters are the filter parameters. Rotate the Cutoff knob to adjust the cutoff frequency of the low-pass filter. Rotate the Resonance knob to boost or cut the frequencies around the cutoff frequency. Rotate the Filter Intensity knob to adjust how the envelope generator modulates the cutoff frequency. Rotate the Filter Decay knob to adjust the filter envelope decay time. Rotate the Filter Velocity knob to adjust how velocity affects the filter.
- Volume parameters: To the lower right of the filter parameters are the output parameters. Rotate the Volume knob to adjust the overall volume. Rotate the Volume Decay knob to adjust how the sound decays over time. Rotate the Volume Velocity knob to adjust how volume responds to velocity. Rotate the Overdrive knob to add distortion to your sound.
Click the disclosure triangle at the bottom of the interface to view the extended parameters. You can adjust the pitch bend amount and fine-tuning in this area.
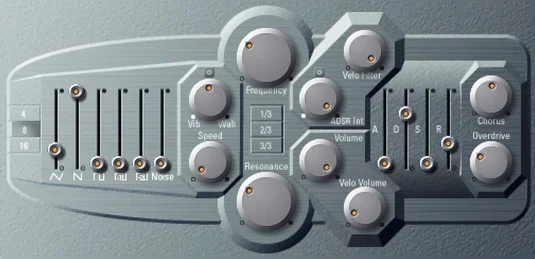
Logic Pro X: The ES P poly synth
The ES P is another lightweight subtractive synth. The P stands for polyphonic; you can play eight voices at once. The ES P is modeled after classic 80s synths and does a great job of creating analog pads, bass, and brass sounds.
![探索 Logic Pro 合成器]()
ES P 和弦合成器。
下面是對 ES P 參數的描述:
- 振盪器參數: ES P 的左側調整振盪器參數。單擊編號按鈕以選擇八度。振盪器滑塊用於混合六個振盪器。從左到右,您可以設置三角波、鋸齒波、矩形波、子振盪器-1(低一個八度)、子振盪器-2(低兩個八度)和噪聲發生器的電平。
- LFO 參數:振盪器參數的右側是 LFO 參數。旋轉顫音/哇音旋鈕可調節顫音或哇音效果的量。旋轉 Speed 旋鈕可調節顫音或哇音的速度。
- 濾波器參數: LFO 參數的右側是濾波器參數。旋轉頻率旋鈕以設置低通濾波器的截止頻率。旋轉共振旋鈕以增強或減弱截止頻率附近的頻率。點按 1/3、2/3 或 3/3 按鈕以調整音高如何影響截止頻率調製。旋轉 ADSR Intensity 旋鈕以調整包絡發生器如何影響截止頻率調製。旋轉力度濾波器旋鈕以設置力度如何影響濾波器。
- 音量參數:過濾器參數的右下方是音量參數。旋轉音量旋鈕調節整體音量。旋轉力度音量旋鈕以調整力度對音量的影響。較低級別模仿經典合成器,沒有力度感應鍵盤;如果用力敲擊琴鍵,更高的音量會使音符更響亮。
- 包絡參數:音量參數右側是包絡參數。調整起音、衰減、延音和釋音參數 (ADSR) 以調整 ES P 包絡。
- 效果參數:包絡參數的右側是效果參數。向右旋轉 Chorus 旋鈕以添加合唱並使聲音變厚。向右旋轉 Overdrive 旋鈕以添加失真。
Logic Pro X:EVOC 20 複音合成器聲碼器
EVOC 20 多音合成器是一個聲碼器和一個 20 聲部合成器。甲聲碼器(語音編碼器)接受一個輸入的音頻信號,典型的是語音,並且該信號施加到合成器,形成混合聲合成器。但是,語音並不是您可以用作輸入的唯一內容。您可以將鼓循環或樂器輸入到合成器中,或者在沒有任何輸入的情況下將合成器作為獨立的合成器運行。
![探索 Logic Pro 合成器]()
EVOC 20 聲碼器合成器。
要將 EVOC 20 PS 用作經典聲碼器,請執行以下操作:
在 EVOC 20 PS 插件標題的側鏈菜單上,選擇輸入源。
源可以是實時輸入、音軌或總線。經典聲碼器效果使用實時輸入或預先錄製的聲軌。
將輸入源靜音,以便您只聽到 EVOC 20 PS 的輸出。
使用輸入源同時播放 MIDI 控制器。
EVOC 20 PS 合成您的輸入源。
以下是幾個重要的 EVOC 20 PS 參數的簡要說明:
- 側鏈分析參數: EVOC 20 PS 的左上角區域調整側鏈參數。旋轉 Attack 旋鈕可設置合成器對輸入信號開始的反應速度有多快或多慢。旋轉“Release”旋鈕以調整合成器對輸入信號結束的反應速度。單擊“凍結”按鈕可無限期地保持當前輸入信號。
- U/V檢測參數: EVOC 20 PS右側調節U/V(清音/濁音)檢測參數。人聲由元音等濁音和爆破音、擦音和鼻音等清音組成。旋轉靈敏度旋鈕可調整 EVOC 20 PS 對濁音和清音輸入信號的敏感程度。點按“模式”欄以選取清音的合成方式。旋轉 Level 旋鈕可調節清音內容的音量。
如果您的輸入源是具有大量高頻內容的恆定音量,您將獲得出色的效果。確保您的輸入源的音量不會變化太大。您還可以均衡輸入源以增強高頻內容。