Mit Logic Pro X erhalten Sie eine ganze Reihe von Instrumenten, die jeden Synthesizer und jedes Keyboard, das Sie besitzen, problemlos ersetzen könnten. Sie sind leistungsstark und flexibel – und sie klingen fantastisch. Außerdem kann das Programmieren der Synthesizer von Logic Pro entmutigend erscheinen, wenn Sie sich alle Bedienelemente und Parameter ansehen, die Sie anpassen können. Hier erhalten Sie einen Rundgang durch die Geräteschnittstellen und Parameter. Sehen Sie sich eine ausführlichere Videodemonstration an, was diese Logic Pro-Synths leisten können , in der Sie sehen, wie Synthesizer funktionieren und wie Sie diese Logic Pro-Synths in Ihrer Musik verwenden.
Um die Logic Pro-Synths zu spielen, müssen Sie eine Software-Instrumentenspur erstellen und das Instrument wie folgt aus dem Channel-Strip- Instrumenten-Slot auswählen :
Wählen Sie Spur → Neue Software-Instrumentenspur (oder drücken Sie Wahltaste-⌘ -S).
Der Track-Liste wird eine neue Software-Instrument-Spur hinzugefügt.
Wählen Sie Ansicht → Inspektor anzeigen (oder drücken Sie I).
Der Inspektor öffnet sich links neben der Spurliste.
Klicken Sie auf die rechte Seite des Instrumenten-Slots und wählen Sie das gewünschte Instrument aus.
Die Software-Instrumentenschnittstelle öffnet sich.
Bevor Sie mit der Tour durch die fabelhafte Synthesizer-Sammlung von Logic Pro beginnen, ist es wichtig, einige grundlegende Synthesebegriffe zu verstehen:
- Oszillator: Ein Synthesizer- Oszillator erzeugt ein kontinuierliches Signal, das die Grundlage für Ihren Sound bildet. Oszillatoren sind in der Lage, mehrere verschiedene Wellenformen mit unterschiedlichen Klangqualitäten zu erzeugen. Oszillatoren sind der wichtigste Teil des Synthesizers, da sie den Sound erzeugen, den die anderen Synth-Parameter formen.
- Modulation: Ein statischer Synth-Sound gewinnt an Interesse, wenn er in irgendeiner Weise variiert wird. Modulation ist der Prozess des Variierens von Synthesizer-Parametern. Vibrato ist ein gängiges Beispiel für Modulation.
- Filter: Synth-Sounds werden durch den Einsatz von Filtern geformt. Filter entfernen Teile des Frequenzspektrums, sodass Sie den Klang konturieren können.
- Hüllkurve: Eine Synthesizer- Hüllkurve formt den Anfang, die Mitte und das Ende Ihres Sounds. Die gebräuchlichste Hüllkurve regelt Attack, Decay, Sustain und Release (ADSR). Ein Klavier hat beispielsweise einen schnellen Attack, schnellen Decay, mittleres Sustain und schnelles Release.
- LFO: Ein Niederfrequenzoszillator (LFO) ist ein Signal, das normalerweise unterhalb des hörbaren Frequenzspektrums liegt und ein Signal moduliert. LFOs werden verwendet, um das Originalsignal in irgendeiner Weise zu verändern. Eine übliche Verwendung eines LFOs ist die Erzeugung von Vibrato.
Logic Pro X: Der EFM1 FM-Synthesizer
Der FM-Synthesizer EFM1 bekommt Sounds wie der Klassiker der 80er Jahre Yamaha DX7, einer der beliebtesten digitalen Synthesizer aller Zeiten. Der EFM1 verwendet FM- Synthese ( Frequenzmodulation ), um digitale Klänge wie E-Pianos, Glocken, Orgeln, Bässe und andere coole und komplexe Klänge zu erhalten. Der EFM1 kann 16 Stimmen gleichzeitig spielen und ist im Gegensatz zum DX7 einfach zu programmieren.
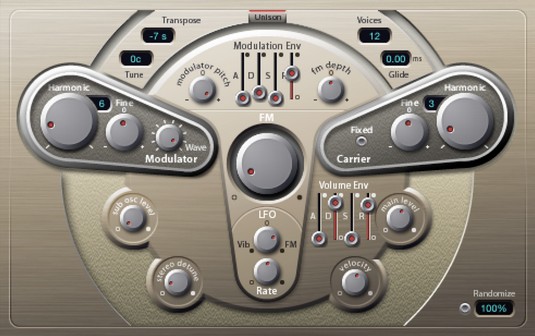
Der EFM1 FM-Synth.
Um Sounds mit FM-Synthese zu entwerfen, stellen Sie die Modulator- und Trägerparameter ein und ändern dann die FM-Intensität. Die Abstimmverhältnisse zwischen Modulator und Träger bestimmen die harmonischen Obertöne. Die FM-Intensität bestimmt den Pegel der Obertöne. Hier ist eine Beschreibung der EFM1-Parameter:
- Modulator-Parameter: Die Modulator-Parameter befinden sich auf der linken Seite der EFM1-Schnittstelle. Drehen Sie den Harmonic-Regler, um das Abstimmverhältnis des Modulatorsignals einzustellen. Drehen Sie den Finetune-Knopf, um die Obertöne einzustellen. Drehen Sie den Wave-Regler ganz nach links, um die Modulatorwellenform auf die traditionelle FM-Sinuswelle einzustellen, oder nach rechts für zusätzliche Wellenformen. Drehen Sie den großen mittleren FM-Knopf, um die FM-Intensität einzustellen.
- Trägerparameter : Die Trägerparameter befinden sich auf der rechten Seite der EFM1-Schnittstelle. Drehen Sie den Harmonic-Regler, um das Abstimmverhältnis des Trägersignals einzustellen. Drehen Sie den Finetune-Regler, um die Obertöne einzustellen. Klicken Sie auf die Schaltfläche Fixed Carrier, um zu vermeiden, dass der Träger durch Tastatur, Pitch Bend oder LFO moduliert wird.
- Globale Parameter: Im oberen Bereich des EFM1 können Sie globale Parameter einstellen. Klicken Sie auf das Transpose-Feld und das Tune-Feld, um die Tonhöhe des EFM1 zu ändern. Klicken Sie auf das Voices-Feld, um auszuwählen, wie viele Noten gleichzeitig gespielt werden können. Klicken Sie auf das Glide-Feld, um die Zeit einzustellen, die benötigt wird, um von einer Tonhöhe zur anderen zu gleiten, auch bekannt als Klicken Sie auf die Unison-Schaltfläche, um Stimmen zu überlagern und den Klang reicher zu machen, wodurch auch die Anzahl der gleichzeitig spielbaren Stimmen um die Hälfte reduziert wird.
- Modulationsparameter: In der Mitte des EFM1 befinden sich die Modulation Envelope-Schieberegler, die Attack, Decay, Sustain und Release (ADSR) des Sounds einstellen. Drehen Sie den Modulator Pitch-Regler, um einzustellen, wie sich die Modulationshüllkurve auf die Tonhöhe auswirkt. Drehen Sie den FM Depth-Regler, um einzustellen, wie sich die Modulationshüllkurve auf die FM-Intensität auswirkt. Drehen Sie den LFO-Regler, um einzustellen, wie stark der LFO die FM-Intensität oder die Tonhöhe moduliert. Drehen Sie den Rate-Regler, um die Geschwindigkeit des LFO einzustellen.
- Ausgangsparameter: Die untere Hälfte des EFM1 ist den Ausgangsparametern gewidmet. Drehen Sie den Sub Osc Level-Regler, um die Basswiedergabe zu erhöhen. Drehen Sie den Stereo Detune-Regler, um dem Sound einen Chorus-Effekt hinzuzufügen. Drehen Sie den Velocity-Regler, um die Velocity-Empfindlichkeit als Reaktion auf Ihren MIDI-Controller einzustellen. Drehen Sie den Main Level-Regler, um die Gesamtlautstärke einzustellen. Passen Sie die Lautstärke-Hüllkurven-Schieberegler an, um die ADSR des Sounds einzustellen.
Klicken Sie unten rechts in der EFM1-Benutzeroberfläche auf die Schaltfläche Randomize, um zufällige Sounds zu erstellen. Passen Sie den Randomisierungsgrad an, indem Sie auf das Feld Randomize klicken und den Prozentsatz der Randomisierung festlegen. Wenn Sie verrückte digitale Sounds mögen, ist die 100-prozentige Randomisierung Ihr bester Freund.
Sie müssen kein Programmiergenie sein, um mit den Synthesizern von Logic Pro großartige Sounds zu erzielen. Jeder Synthesizer verfügt über ein Menü mit Presets am oberen Rand der Benutzeroberfläche. Laden Sie einen Sound, den Sie mögen, drehen Sie an einigen Reglern und haben Sie Spaß. Unterhalb des Preset-Menüs befinden sich weitere nützliche Schaltflächen wie Kopieren, Einfügen, Rückgängig und Wiederherstellen. Mit der Schaltfläche „Vergleichen“ können Sie Ihre bearbeiteten Einstellungen mit den gespeicherten vergleichen, sodass Sie beliebig viele Änderungen vornehmen können, aber immer wieder zu Ihrem Ausgangspunkt zurückkehren.
Logic Pro X: Der subtraktive Synthesizer ES1
Der ES1-Synthesizer erzeugt Klänge mithilfe der subtraktiven Synthese, bei der Sie mit einem Oszillator und einem Suboszillator beginnen und dann Teile des Klangs subtrahieren, um ihn zu formen. Der ES1 ist klassischen analogen Synthesizern nachempfunden und eignet sich hervorragend zum Erstellen von Bässen, Leads, Pads und sogar Percussion-Sounds.
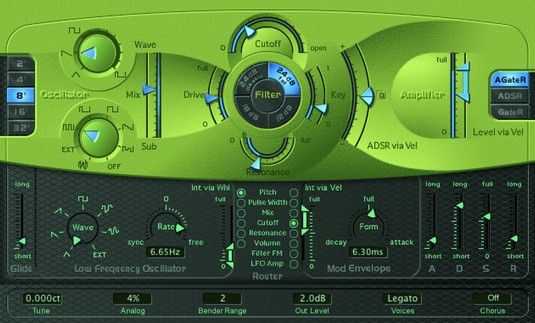
The ES1 subtractive synth.
A description of the ES1 parameters follows:
- Oscillator parameters: The left half of the ES1 interface gives you the oscillator parameters that define your basic sound. Click the buttons on the left to choose the octave. Rotate the Wave knob to set the oscillator waveform. Rotate the Sub knob to set the suboscillator waveform. Adjust the Mix slider to set the mix between the two oscillators.
- Filter parameters: The center section of the ES1 filters the two oscillator waveforms. Adjust the Cutoff slider to set the cutoff frequency of the low-pass filter. Adjust the Resonance slider to set the quality of the frequencies around the cutoff frequency. Click one of the four Slope buttons to choose how extreme the low-pass filter affects the signal. Adjust the Drive slider to affect the resonance setting and to overdrive the filter. Adjust the Key slider to set how the pitch adjusts the filter. Adjust the ADSR via Velocity slider to set how the filter is affected by note velocity.
- Amplifier parameters: The right sections of the ES1 adjust the volume level and performance. Adjust the Level via Velocity slider to set how the volume is affected by note velocity. Click the Amplifier Envelope buttons to set how the ADSR envelope affects the volume.
- Modulation parameters: The largest section of the dark-green area of the ES1 adjusts how the sound is modulated. The Glide parameter sets the speed of the portamento. Rotate the Wave and Rate knobs to set how the Low Frequency Oscillator (LFO) stimulates the sound over time. The Modulation Envelope sets how the modulation fades in or out. The Router parameters set the targets of the LFO and Modulation Envelope.
- Envelope parameters: The far right section of the dark-green area adjusts the ADSR envelope. Use the sliders to set the time of the attack, decay, sustain, and release (ADSR).
- Global parameters: The bottom row of parameters controls the ES1 global parameters. Click the Tune field to adjust the overall tuning. Click the Analog field to introduce random changes to the tuning and cutoff frequency, similar to an analog circuit that changes due to heat and age. Click the Bender Range to adjust the amount of pitch bend. Click the Out Level to adjust the overall volume. Click the Voices field to set the number of voices the ES1 can play simultaneously. Click the Chorus field to choose the type of built-in chorus effect that will thicken the sound.
The ES1 is a great instrument to use for getting the feel of analog synthesis. Many of the synths that follow have similar parameters. Getting the hang of setting oscillator waveforms, filters, envelopes, and modulators will help you take command of the synths and design your own sounds.
Some of these software instruments haven’t had their interfaces updated since Apple introduced hardware Retina displays, which are capable of extremely smooth and crisp graphics. The consequence is fuzzy graphics with controls and text that can be difficult to read. At the top right of the software instrument is a View pop-up menu that can change the size of the window. If you’re having trouble seeing something, make the window bigger.
Logic Pro X: The ES2 hybrid synth
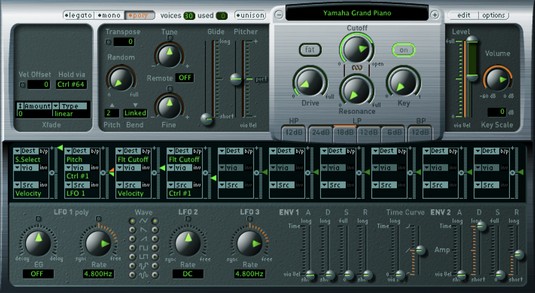
The ES2 is like a combined EFM1 and ES1 synth plus another type of synthesis called wavetable synthesis. A wavetable is made up of many different waveforms that evolve from one to another or blend at once, creating complex digital sounds. Although the ES2 can produce sounds similar to the EFM1 and ES1, it shines at creating pads, sonic textures, and synthetic sounds that evolve over time.
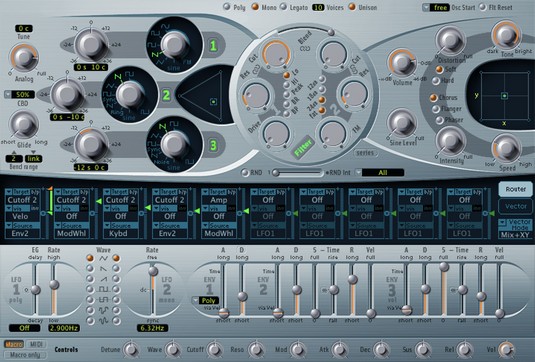
The ES2 hybrid synth.
Check out the the unique features of the ES2:
- Oscillator parameters: The three numbered oscillators on the upper-left side of the ES2 interface choose the basic sound. The triangle-shaped area to the right of the three oscillators blends them together.
- Filter parameters: The round section in the center of the ES2 adjusts the filters that shape your synth sound.
- Amplifier parameters: The top-right section contains the ES2 volume level. You can add a sine wave to the output section using the Sine Level knob.
- Effects parameters: To the right of the ES2 parameters are several built-in effects, including distortion and chorus, as well as a flanger and a phaser.
- Planar pad: The X/Y pad to the right of the amplifier parameters can control two parameters simultaneously. The planar pad parameters are chosen in the modulation router or vector envelope.
- Modulation router and vector envelope parameters: The dark-blue strip of the ES2 controls the modulation sources and targets as well as the vector envelope generator. You can toggle between the modulation router and vector envelope using the Router and Vector buttons on the right.
- Modulation parameters: Below the modulation router and vector envelope parameters are the modulation parameters. Adjust the two LFOs and three envelopes to modulate the ES2 modulation targets. You set the modulation sources and targets in the modulation router.
- Macro controls and controller assignment parameters: The bottom strip of buttons and knobs are where you set the macro controls and MIDI controller assignments. Click the Macro or MIDI button to toggle between the two types of controls. Click the Macro Only button to hide all ES2 parameters except the preprogrammed macro controls, which are useful when you went to adjust the ES2 sounds globally. The MIDI controller assignments allow you to map controls on your MIDI controller to parameters of the ES2.
- Global parameters: Found above the filter parameters and to the left of the oscillator parameters are the ES2 global parameters. You can tune the instrument, set the number of voices, adjust the portamento speed, and more.
The ES2 hybrid synth can be used in surround mode to pan your sound throughout the surround spectrum if you’re monitoring your Logic Pro project in surround sound. Logic Pro designers have seemingly thought of everything. To get to the surround parameters, click the disclosure triangle at the bottom of the ES2 interface to display the advanced parameters.
Logic Pro X: The ES E ensemble synth
The ES E synth is a lightweight, eight-voice subtractive synth. The E in its name stands for ensemble, and the ES E is great for warm pads such as analog brass and strings. Best of all, it’s much easier to program than the ES1 or ES2.
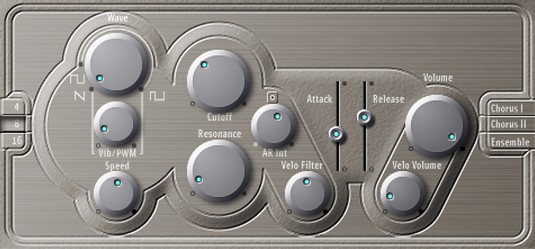
The ES E ensemble synth.
Here’s a description of the ES E parameters:
- Oscillator parameters: The left side of the ES E interface adjusts the oscillator parameters. Click the buttons on the far left to choose the octave of your sound. Rotate the Wave knob all the way to the left to generate a sawtooth wave, which is bright with strong odd and even harmonics and excels at generating rich pads. The rest of the wave range generates pulse waves, which are hollow sounding with strong odd harmonics and can create excellent reedy sounds such as woodwinds.
- LFO parameters: The knobs below the wave parameter adjust the LFO settings. The LFO modulates the oscillator waveform. Rotate the Vibrato/PWM (pulse wave modulation) knob to set the modulation intensity. Rotate the Speed knob to set the LFO speed.
- Filter parameters: To the right of the oscillator and LFO parameters are the low-pass filter parameters. A low-pass filter allows low frequencies to pass through while reducing the higher frequencies. Rotate the Cutoff knob to set the cutoff frequency, and rotate the Resonance knob to raise or lower the frequencies around the cutoff frequency. Rotate the Attack/Release Intensity knob to adjust how the envelope generator affects the filter. Rotate the Velocity Filter knob to adjust how velocity affects the filter.
- Envelope parameters: To the right of the filter parameters are the envelope parameters. Adjust the Attack and Release sliders to set the level of your sound over time. A low attack setting will result in a more immediate sound, and a higher setting will result in a slow fade up to the final volume. A high release setting will cause the sound to slowly fade when you release the key, and a lower setting will cause the sound to fade quickly.
- Output parameters: To the right of the envelope parameters are the output parameters. Rotate the Volume knob to adjust the overall ESE volume. Rotate the Velocity Volume knob to adjust the velocity sensitivity.
- Effects parameters: To the right of the envelope parameters, you can choose a built-in effect. Choose between Chorus I, Chorus II, and Ensemble to thicken your sound.
Logic Pro X: The ES M mono synth
The ES M is another lightweight subtractive synth. The M stands for mono, which means the ES M can play only one note at a time. Monophonic synths such as the ES M are perfect for bass and lead sounds. Like the ES E, the ES M is simple to program and features a stripped-down set of controls. Both the ES E and ES M are great instruments for learning the basics of synthesis.
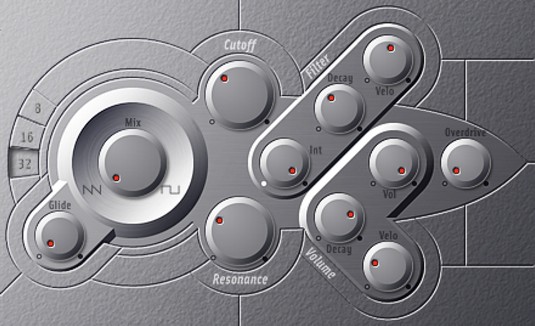
The ES M monophonic synth.
A description of the ES M parameters follows:
- Oscillator parameters: The left side of the ES M adjusts the oscillator parameters. Click the numbered buttons on the far left to choose the octave. Rotate the Mix knob all the way to the left to select a sawtooth wave and all the way to the right to select a rectangular wave. Rotate the Mix knob between the two positions to mix the sawtooth and rectangular waves. Rectangular waves, like pulse waves, are reedy and nasal and great for synth bass sounds. Rotate the Glide knob to adjust the speed of the portamento.
- Filter parameters: To the right of the oscillator parameters are the filter parameters. Rotate the Cutoff knob to adjust the cutoff frequency of the low-pass filter. Rotate the Resonance knob to boost or cut the frequencies around the cutoff frequency. Rotate the Filter Intensity knob to adjust how the envelope generator modulates the cutoff frequency. Rotate the Filter Decay knob to adjust the filter envelope decay time. Rotate the Filter Velocity knob to adjust how velocity affects the filter.
- Volume parameters: To the lower right of the filter parameters are the output parameters. Rotate the Volume knob to adjust the overall volume. Rotate the Volume Decay knob to adjust how the sound decays over time. Rotate the Volume Velocity knob to adjust how volume responds to velocity. Rotate the Overdrive knob to add distortion to your sound.
Click the disclosure triangle at the bottom of the interface to view the extended parameters. You can adjust the pitch bend amount and fine-tuning in this area.
Logic Pro X: The ES P poly synth
The ES P is another lightweight subtractive synth. The P stands for polyphonic; you can play eight voices at once. The ES P is modeled after classic 80s synths and does a great job of creating analog pads, bass, and brass sounds.
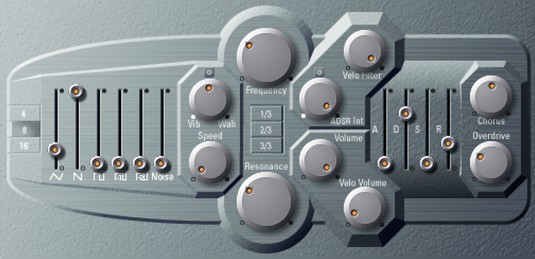
The ES P polyphonic synth.
Here’s a description of the ES P parameters:
- Oscillator parameters: The left side of the ES P adjusts the oscillator parameters. Click the numbered buttons to choose the octave. The Oscillator sliders are used to mix the six oscillators. From left to right, you can set the level of a triangle wave, sawtooth wave, rectangle wave, suboscillator -1 (one octave below), suboscillator -2 (two octaves below), and noise generator.
- LFO parameters: To the right of the oscillator parameters are the LFO parameters. Rotate the Vibrato/Wah knob to adjust the amount of vibrato or wah-wah effect. Rotate the Speed knob to adjust the speed of the vibrato or wah.
- Filter parameters: To the right of the LFO parameters are the filter parameters. Rotate the Frequency knob to set the cutoff frequency of the low-pass filter. Rotate the Resonance knob to boost or cut the frequencies around the cutoff frequency. Click the 1/3, 2/3, or 3/3 buttons to adjust how the pitch affects the cutoff frequency modulation. Rotate the ADSR Intensity knob to adjust how the envelope generator affects the cutoff frequency modulation. Rotate the Velocity Filter knob to set how velocity affects the filter.
- Lautstärkeparameter : Unten rechts neben den Filterparametern befinden sich die Lautstärkeparameter. Drehen Sie den Lautstärkeregler, um die Gesamtlautstärke einzustellen. Drehen Sie den Velocity Volume-Regler, um einzustellen, wie sich die Velocity auf die Lautstärke auswirkt. Niedrigere Pegel imitieren klassische Synthesizer ohne anschlagdynamische Keyboards; höhere Pegel machen die Noten lauter, wenn die Taste stärker angeschlagen wird.
- Hüllkurvenparameter: Rechts neben den Lautstärkeparametern befinden sich die Hüllkurvenparameter. Passen Sie die Attack-, Decay-, Sustain- und Release-Parameter (ADSR) an, um die ES P-Hüllkurve anzupassen.
- Effektparameter: Rechts neben den Hüllkurvenparametern befinden sich die Effektparameter. Drehen Sie den Chorus-Knopf nach rechts, um Chorus hinzuzufügen und Ihren Sound dicker zu machen. Drehen Sie den Overdrive-Regler nach rechts, um eine Verzerrung hinzuzufügen.
Logic Pro X: Der EVOC 20 Poly-Synth-Vocoder
Der EVOC 20 Poly-Synth ist ein Vocoder und ein 20-stimmiger Synthesizer. Ein Vocoder (Sprachencoder) nimmt ein eingehendes Audiosignal, typischerweise eine Stimme, und legt dieses Signal an den Synthesizer an, wodurch ein hybrider Vokalsynthesizer entsteht. Eine Stimme ist jedoch nicht das einzige, was Sie als Eingabe verwenden können. Sie können einen Drum-Loop oder ein Instrument in den Synthesizer eingeben oder den Synthesizer ohne jegliche Eingabe als eigenständigen Synthesizer betreiben.
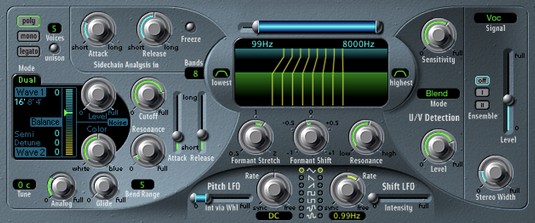
Der EVOC 20 Vocoder-Synth.
Um den EVOC 20 PS als klassischen Vocoder zu verwenden, gehen Sie wie folgt vor:
Wählen Sie im Side Chain-Menü im EVOC 20 PS-Plug-In-Header die Eingangsquelle aus.
Die Quelle kann ein Live-Eingang, eine Audiospur oder ein Bus sein. Der klassische Vocoder-Effekt verwendet einen Live-Eingang oder eine aufgezeichnete Gesangsspur.
Schalten Sie die Eingangsquelle stumm, damit Sie nur den Ausgang des EVOC 20 PS hören.
Spielen Sie Ihren MIDI-Controller gleichzeitig mit der Eingangsquelle.
Der EVOC 20 PS synthetisiert Ihre Eingangsquelle.
Hier ist eine kurze Beschreibung einiger wichtiger Parameter des EVOC 20 PS:
- Parameter der Side-Chain-Analyse: Der obere linke Bereich des EVOC 20 PS passt die Parameter der Side-Chain an. Drehen Sie den Attack-Regler, um einzustellen, wie schnell oder langsam der Synthesizer auf den Beginn des Eingangssignals reagiert. Drehen Sie den Release-Regler, um einzustellen, wie schnell oder langsam der Synthesizer auf das Ende des Eingangssignals reagiert. Klicken Sie auf die Schaltfläche Freeze, um das aktuelle Eingangssignal auf unbestimmte Zeit zu halten.
- U/V-Erkennungsparameter: Auf der rechten Seite des EVOC 20 PS werden die U/V-Erkennungsparameter (stimmlos/stimmhaft) eingestellt. Die menschliche Stimme besteht aus stimmhaften Lauten wie Vokalen und stimmlosen Lauten wie Plosiven, Frikativen und Nasalen. Drehen Sie den Sensitivity-Regler, um einzustellen, wie empfindlich der EVOC 20 PS auf stimmhafte und stimmlose Eingangssignale reagiert. Klicken Sie auf das Mode-Feld, um auszuwählen, wie stimmlose Sounds synthetisiert werden. Drehen Sie den Level-Regler, um die Lautstärke des stimmlosen Inhalts einzustellen.
Sie erhalten großartige Ergebnisse, wenn Ihre Eingangsquelle eine konstante Lautstärke mit vielen hochfrequenten Inhalten hat. Achten Sie darauf, dass die Lautstärke Ihrer Eingangsquelle nicht zu stark variiert. Sie können die Eingangsquelle auch mit einem EQ versehen, um den Hochfrequenzanteil zu verstärken.
