Cómo exportar sus fotos desde Adobe Lightroom Classic

Después de procesar sus fotos en Adobe Lightroom Classic (¡como un profesional!), Estará listo para enviarlas al mundo. ¡Eso significa que es hora de exportar! El humilde cuadro de diálogo Exportar ofrece una gran cantidad de poder y, con un poco de práctica, puede aprovechar todo lo que tiene para ofrecer.

Emplear un flujo de trabajo de exportación

Lightroom Classic (como probablemente ya se habrá dado cuenta) es una aplicación de flujo de trabajo, y dentro del flujo de trabajo más amplio de tomar sus fotos de entrada a salida, existen muchos flujos de trabajo más pequeños dentro de los flujos de trabajo. La exportación no es una excepción. Aquí están los pasos básicos:

Seleccione las imágenes que desea exportar.

Inicie el comando Exportar.

Configure los ajustes necesarios para satisfacer sus necesidades de salida.

(Opcional) Guarde la configuración como un ajuste preestablecido para su reutilización.

Paso 1: seleccionar las imágenes que desea exportar

Las fotos que seleccione para exportar están determinadas por sus necesidades en ese momento. Puede exportar imágenes desde cualquier módulo de Lightroom Classic, pero el módulo Biblioteca le brinda el mayor acceso a toda su cartera y, por lo general, exportar desde allí tiene más sentido. Entonces, si aún no está allí, presione G para saltar a la vista de cuadrícula de la biblioteca. Desde aquí, tiene acceso a todas sus carpetas y colecciones, así como a la barra de Filtro de biblioteca, lo que significa que puede seguir adelante y rastrear las imágenes que desee. (Adelante, tómate tu tiempo).

Después de localizar las imágenes que desea exportar, puede seleccionarlas mediante cualquiera de los siguientes métodos:

  • Presionando Comando + A (Ctrl + A para Windows) para seleccionar todas las fotos dentro de una carpeta u otro grupo de fotos.
  • Hacer clic en la primera imagen de una serie, mantener presionada la tecla Mayús y hacer clic en la última imagen de la serie para seleccionar todas las imágenes intermedias.
  • Manteniendo presionada la tecla Comando (tecla Ctrl para Windows) y haciendo clic en cada imagen individualmente para hacer una selección no contigua.

Paso 2: Iniciar el comando Exportar

Después de seleccionar las imágenes, puede iniciar una exportación desde cualquier módulo (excepto donde se indique) a través de los siguientes medios:

  • Elija Archivo → Inicia el cuadro de diálogo Exportar.
  • Elija Archivo → Exportar con anterior. Omite el cuadro de diálogo Exportar y simplemente exporta los archivos seleccionados utilizando la configuración de la última exportación.
  • Elija Archivo  →  Exportar con ajuste preestablecido  →  Seleccionar ajuste preestablecido. Le permite seleccionar un ajuste preestablecido y exportar sin configuración adicional del cuadro de diálogo Exportar.
  • Presione Comando + Mayús + E (Ctrl + Mayús + E para Windows). Atajo de teclado que abre el cuadro de diálogo Exportar.
  • Presione Comando + Opción + Mayús + E (Ctrl + Alt + Mayús + E para Windows). Atajo de teclado para Exportar con Anterior.
  • Haga clic con el botón derecho en una foto seleccionada y elija una de las opciones de exportación mencionadas anteriormente en el menú contextual que aparece.
  • Haga clic en el botón Exportar en la parte inferior del panel izquierdo del módulo Biblioteca. Solo visible en el módulo Biblioteca, pero es útil.

Utilice los atajos de teclado en su flujo de trabajo de exportación tan pronto y con tanta frecuencia como sea posible. Serán una segunda naturaleza antes de que te des cuenta y son excelentes para ahorrar tiempo.

Paso 3: configurar los ajustes para satisfacer sus necesidades de salida

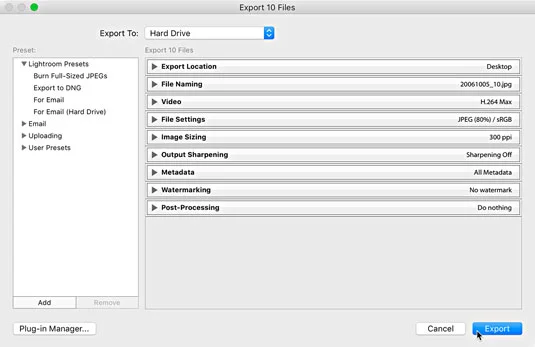
La primera elección que tomará es si planea exportar a su disco duro, a una grabadora de CD / DVD (¡si es que todavía tiene una!), Un correo electrónico o algún complemento de exportación que haya instalado. Su opción más común será el disco duro. A partir de ahí, configura todos los paneles relacionados con la elección que hizo. Si bien aparecerán paneles adicionales con diferentes complementos de exportación, son demasiado específicos y variados para cubrirlos aquí; Me concentro solo en los paneles que vienen con el disco duro, ya que cubre la mayoría de las opciones.

EL PANEL DE UBICACIÓN DE EXPORTACIÓN

El panel Ubicación de exportación, que se muestra aquí, se utiliza para configurar dónde desea guardar un lote de copias en su disco duro. Incluso si finalmente graba estas copias en un DVD o las entrega a otra aplicación, Lightroom Classic primero debe guardar las copias en su disco duro.

Cómo exportar sus fotos desde Adobe Lightroom Classic

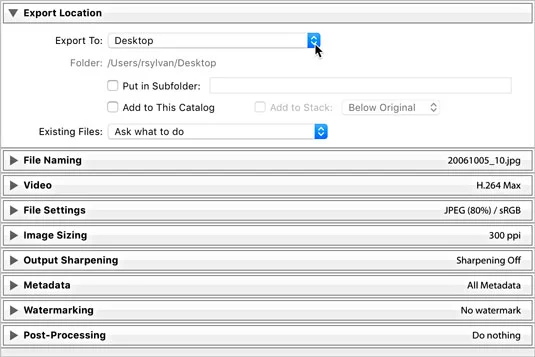
Se expandió el panel Ubicación de exportación.

El lugar donde elija guardar los archivos depende de dos factores: cómo administra sus archivos y cuál determina que debe ser su salida. El menú desplegable Exportar a ofrece algunas opciones para designar una ubicación:

  • Carpeta específica: cuando selecciona esta opción, puede apuntar Lightroom Classic a cualquier carpeta de su disco. Solo asegúrese de que tenga suficiente espacio libre para guardar todas las copias nuevas. Haga clic en el botón Elegir y navegue hasta la carpeta que desea usar.
  • Misma carpeta que la foto original: esta opción hace exactamente lo que describe, que es volver a colocar las copias exportadas en la misma carpeta que la original.
  • Elegir carpeta más tarde: esta opción es útil cuando está creando ajustes preestablecidos y no desea codificar una ubicación específica en el ajuste preestablecido. Cuando utiliza un ajuste preestablecido, Lightroom Classic le solicita que proporcione una ubicación.
  • Ubicaciones de usuario: debajo de esas opciones habrá una lista de ubicaciones de usuario comunes como carpetas de Escritorio, Documentos, Inicio, Películas e Imágenes para facilitar la selección.

Después de elegir la ubicación para la exportación, tiene algunas opciones adicionales para considerar:

  • Colocar en subcarpeta: esta opción le permite crear una subcarpeta dentro de la ubicación de exportación designada. Marque la casilla e ingrese un nombre para la subcarpeta en el campo de texto correspondiente.
  • Agregar a este catálogo: piense en esto como una opción de importación automática. Una vez exportadas las copias, aparecen dentro de Lightroom Classic sin que tenga que pasar por el cuadro de diálogo Importar.
  • Agregar a la pila: apilar es una función que le permite organizar grupos de fotos en una sola miniatura con fines organizativos. Esta opción solo está disponible cuando exporta copias a la misma carpeta exacta que los originales (y no las coloca en una subcarpeta). Cuando se marca, las fotos exportadas aparecen apiladas con las fotos de origen cuando visualiza esa carpeta en Lightroom Classic.

Because you may export photos into a folder that already contains other photos, you must tell Lightroom Classic how to handle situations where your exported copies have the same name and are the same file type as the existing photos. You have four options under the Existing Files drop-down menu:

  • Ask What to Do: This option is the safest option and the one recommended. If such a situation occurs, Lightroom Classic prompts you for further instructions and then you choose one of the other three options.
  • Choose a New Name for the Exported File: In this case, Lightroom Classic simply appends a new sequence number to the end of the exported file, so you end up with two copies of the same file but with unique names.
  • Overwrite WITHOUT WARNING: Does what it says (and it even uses all caps in the drop-down menu). Only choose this option if you are really sure it is what you want to do. Note that Lightroom Classic does not allow you to overwrite the source photos, so don’t choose this option thinking you can export copies with Lightroom Classic adjustments and save over the existing source files — it won’t work.
  • Skip: If you choose this option, no new copy is created (that is, Lightroom Classic skips the file) when an existing file with the same filename is encountered.

THE FILE NAMING PANEL

In many cases, you’ll want to maintain name consistency between your source files and your exported copies. By simply choosing the Filename template, you can achieve just that. Other times, you may want to use custom names that are completely different or perhaps some variation of the original name, as shown. In any case, because you’re always creating copies, you must tell Lightroom Classic how you want them named, and just as when you use the Import command or rename files in the Library module, Lightroom Classic uses filename templates to do it.

Cómo exportar sus fotos desde Adobe Lightroom Classic

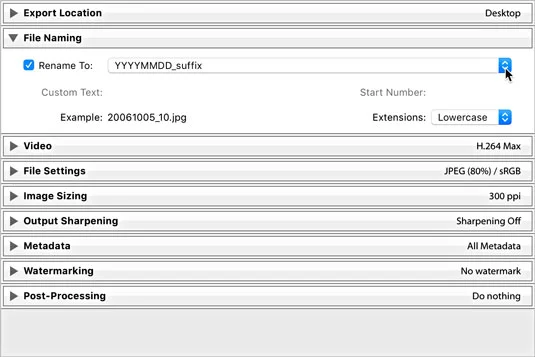
The File Naming panel.

Click the Template drop-down list and choose one of the installed templates, or you can click Edit and create a custom filename template using the good old Filename Template Editor.

THE VIDEO PANEL

If you have a video file selected for export, you need to check the Include Video Files check box to access the (limited) format options for video, as shown.

  • DPX: A lossless format suited for sending to professional video editing tools (like Adobe Premiere). Choose this only if you know it is required.
  • 264: Good for exporting compressed video files for viewing and sharing. A description of each quality setting appears under it when selected.
  • Original, unedited file: Produces an exact copy of the original.

Cómo exportar sus fotos desde Adobe Lightroom Classic

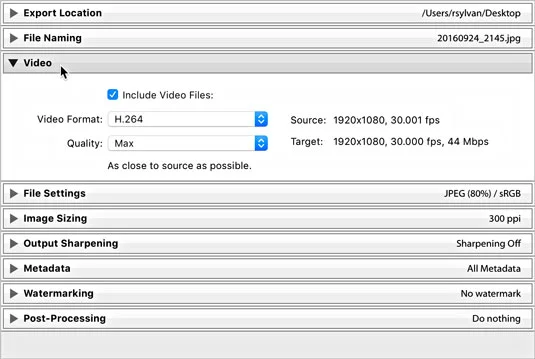
The video panel expanded.

THE FILE SETTINGS PANEL

Choose your file format based on your output needs (such as choosing JPEG for photos going on a website). Some formats require additional settings. Here’s a list of the formats and their options:

  • JPEG: When you choose the JPEG (or JPG) format, you also need to choose the level of compression to be applied to each JPEG file. You make this selection by using the Quality slider, as shown in the following figure. The higher the quality value, the less compression — and the larger the file size. JPEG compression is always a tradeoff between file size and image quality. If you’re not too concerned about file size, leave it set around 90. The Limit File Size To option is useful if you need to achieve a specific file size in bytes, but keep in mind that you may need to also reduce the pixel dimensions when exporting large files.
  • PSD: PSD is Photoshop’s native file format. You can choose between 8- and 16-bit.
  • TIFF: TIFF is a widely supported format. Use the panel’s Compression drop-down list to pick one of the lossless compression options. “None” is pretty straightforward; ZIP and LZW reduce the file size, but the length of time to open and close the file increases. (Note that not all image editors can open compressed TIFF files. Also note that only the ZIP compression option is available with 16-bit files.) If your photo contains transparent pixels and you want to keep them in the exported copy, check the Save Transparency box.
  • DNG: This is Adobe’s open format for raw (unprocessed by the camera) photos. Note that the Use Lossy Compression option is occasionally useful for situations in which you want to keep the exported copy as a DNG file while also reducing its pixel dimensions by using the options in the Image Sizing panel.
  • Original: Selecting Original from the drop-down list results in the creation of an exact copy of your source image. (Raw and DNG photos will include Lightroom Classic edits in the photo’s XMP metadata.) No additional file settings are available with this option.

Cómo exportar sus fotos desde Adobe Lightroom Classic

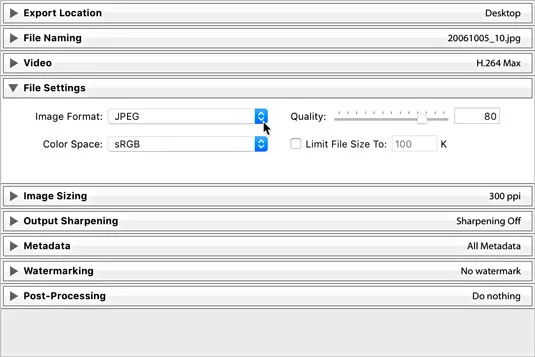
The File Settings panel expanded to show JPEG format and Quality slider.

Two additional options, which appear only when you choose JPEG, TIFF, and PSD formats, warrant a separate discussion. (Raw files are always 16-bit and don’t have a color space.)

  • Color Space: A photo’s color space is what determines the range of possible colors it can contain. You need to decide what color space you want these copies converted into during the export process. Your choice of color space is determined by the reason you are exporting these copies to begin with and where they will be used. Here’s a look at your choices:
    • sRGB: This color space contains the narrowest range of colors and is the standard for exporting photos destined for the web. It’s also used by some print services.
    • AdobeRGB (1998): Contains a wider range of colors than sRGB and is most often used when additional editing or printing is the next destination for your files.
    • ProPhoto RGB: Contains the widest range of colors and should only be used with 16-bit files. (I discuss bit depth in the next boldfaced bullet.) This is the best option when you want to retain all the color information that was in your source files. Not recommended when delivering copies destined for the web or anyone not used to working with ProPhoto color space.
    • Other: While the previous three options are the most common, there may also be advanced situations where you need to convert your files to a custom color space for printing purposes. Consult your print service to see whether it provides or requires custom profiles, and it will help you get them installed. By choosing Other, you’ll be taken to the Choose Profiles dialog, where you can select a color profile.
  • Bit Depth: Bit depth determines the amount of data a file contains. The higher the bit depth, the more data is contained in the file (which also means its file size is going to be larger too). If you’re working with raw files, you’re working with 16-bit files. If you’re working with JPEG files, you’re working with 8-bit files. During export, you have the option of saving PSD and TIFF files as 16-bit. If you choose JPG, bit depth is grayed out, but know that JPEGs are all 8-bit by default. Saving files in 16-bit only makes sense when both the source files were originally 16-bit and when the output needs require this original data (such as when you plan to archive the exported copies to DVD or edit them in some other image editor). In all other situations, 8-bit is the more common choice.

THE IMAGE SIZING PANEL

Sometimes, you need to save your exported copies in a different size from the source photos, such as when you want to email them or put them in a web page. To do so, you use options in the Image Sizing panel (see the following figure). Lightroom Classic can make the exported images smaller or larger than the original images — a process known as resampling. The six options for resizing your exports are

  • Width & Height: The values entered for width and height define the maximum amount each side can be resized to fit while maintaining original aspect ratio.
  • Dimensions: This option resizes exported images to fit within the entered dimensions while maintaining aspect ratio. When this option is selected, height and width are no longer associated with the values fields. You just enter the maximum dimensions you want the images resized to fit, and Lightroom Classic does the rest regardless of orientation.
  • Megapixels: If you need to resize to a specific total number of pixels (width times height), this is your option.
  • Long Edge and Shortest Edge: These options function in the same manner. You set the maximum value for the edge in question, and Lightroom Classic resizes all images to fit.
  • Percentage: This option is useful when you want to create exported copies that are a certain percentage smaller than the original.

Cómo exportar sus fotos desde Adobe Lightroom Classic

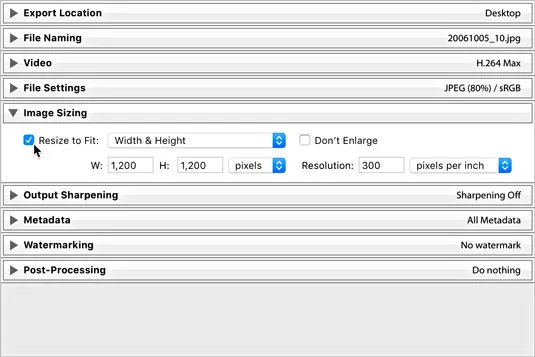
The Image Sizing panel.

Check the Don’t Enlarge box to prevent an image from being resampled larger than its original pixel dimensions. (This option is grayed out when Resize to Fit is unchecked.)

If your output needs require your photos to print at a specific size and at a specific number of pixels per inch (PPI), you can set its resolution value — the metadata tag used by software to determine how big the printed file appears. For example, the value of 300 PPI is commonly requested by print services, in which case you would enter 300 and choose pixels per inch. 300 PPI is always a safe choice, but if your photos are destined for the web only, this value is meaningless and can be ignored.

THE OUTPUT SHARPENING PANEL

I love having the ability to add sharpening tailored for the specific output destination as part of the export process. The Output Sharpening panel, shown in the following figure, is where you choose and configure your output sharpening settings. The possible output settings are defined as

  • Screen: Use this option when your photo’s final viewing destination will be on a computer screen (that is, on a web page).
  • Matte Paper: Use this option when you’re sending your photos to be printed on a type of photo paper that has a matte (non-shiny) finish.
  • Glossy Paper: Use this option when you’re sending your photos to be printed on a type of photo paper that has a glossy (shiny) finish.

Cómo exportar sus fotos desde Adobe Lightroom Classic

The Output Sharpening panel.

After you identify the output you are sharpening for, you can set the amount of sharpening to apply; your choices here range from Low (almost none) to High (often too much), with Standard in the middle (just right).

THE METADATA PANEL

The Metadata panel, shown in the following figure, allows you some level of control over what metadata is included in the exported copies. Clicking the Include drop-down menu offers the following options:

  • Copyright Only: Only the metadata entered into the Copyright field of the Metadata panel is applied to copies.
  • Copyright & Contact Info Only: This is the same as the above option with the inclusion of any contact information you applied via the Metadata panel (or a metadata template).
  • All Except Camera Raw Info: Camera Raw Info means the actual slider values dialed into Lightroom Classic, written as part of the metadata (the adjustments themselves are applied to the pixels regardless of any of these settings). So, this option builds on the above option and then includes all other metadata except the slider values (Camera Raw Info).
  • All Except Camera & Camera Raw Info: This does everything that the previous option but leaves out the camera-generated EXIF metadata and the Camera Raw Info.
  • All Metadata: Nothing is left out. All EXIF metadata created by camera, plus everything added in Lightroom Classic, is applied to copies.

Cómo exportar sus fotos desde Adobe Lightroom Classic

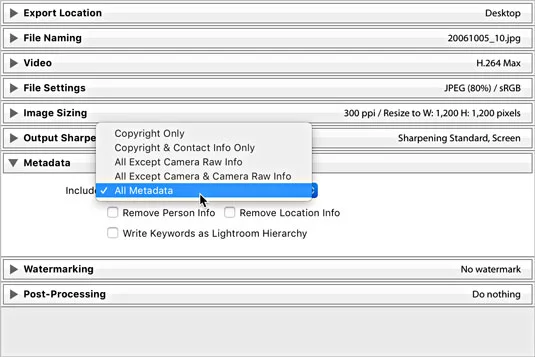
The Metadata panel expanded.

Th Metadata panel has three additional check boxes:

  • Remove Person Info: If you used People view to tag photos with the names of the people shown, you can check this box to avoid writing that information into the metadata of the exported copies.
  • Remove Location Info: If your photos have GPS information in them, you can check this box to avoid writing that information into the metadata of exported copies.
  • Write Keywords as Lightroom Hierarchy: Keywords are the descriptive terms you assign to your photos in the Library module. When you enable this option, and \ use keywords with parent/child relationships (meaning that the keywords are in a hierarchical structure), the exported copies retain that same keyword structure. This feature is useful for photos that will be imported into another Lightroom Classic catalog or managed with Adobe Bridge.

THE WATERMARKING PANEL

You can apply one of three types of watermarks to exported copies. Check the Watermark box to enable the drop-down choices. The most basic is the Simple Copyright Watermark, which pulls the information from the Copyright field of each file’s metadata and renders it as a watermark in the lower-left corner of each exported copy. This type of watermark has no configuration options.

Cómo exportar sus fotos desde Adobe Lightroom Classic

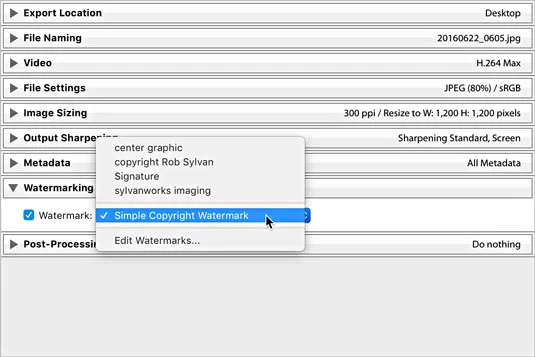
The Watermarking options.

For greater control, choose Edit Watermarks to enter the Watermark Editor, where you can create either a text-based or graphical watermark with more control and save it as a preset for easy reuse.

THE POST-PROCESSING PANEL

This is an optional panel, but it can provide a nice productivity boost to your output when you know your photos are going to be opened in some other application after they have been created (such as for additional image editing or viewing in your file browser). The Post-Processing panel (with the After Export drop-down list expanded) is shown in the following figure.

With the help of the options in this panel, you can tell Lightroom Classic to hand off your exported images to another application — in effect, having Lightroom Classic perform what is commonly referred to as an “export action” on your photos. The After Export drop-down list includes the following preinstalled options:

  • Show in Finder (Show in Explorer for Windows): Automatically opens the folder containing the exported images in your file browser.
  • Open in Photoshop: If you have Photoshop installed, you have the option to open the exported images in Photoshop after they’re saved to the export location.
  • Open in Additional Editor: If you configured an additional external editor you see it listed here as an option.
  • Open in Other Application: Selecting this option gives you the opportunity to designate another application (such as an email client, an alternative image editor, or an FTP client) that will be invoked at the end of the export. Lightroom Classic attempts to open the exported photos in that application; just keep in mind that not every application can accept images this way. Click the Choose button and navigate to the application you want to send your photos to.

Cómo exportar sus fotos desde Adobe Lightroom Classic

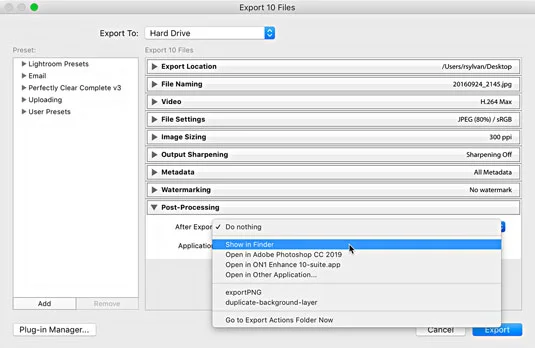
Post-Processing panel expanded to show After Export options.

At the bottom of the After Export drop-down list is the Go to Export Actions Folder Now command. Selecting this option opens Finder (or Windows Explorer for Windows) with Lightroom Classic’s Export Actions folder selected. You can place either an executable file or an alias (shortcut for Windows) to an executable file in the Export Actions folder to include it as an option in the After Export drop-down list the next time you start Lightroom Classic. This is another way to set things up so you can send your photos to a specific program or a Photoshop droplet with one quick command.

“What’s a droplet?” you say. A droplet is a Photoshop action that you manage to turn (with Photoshop’s help) into a tiny executable file. After you create a droplet, you can literally drag and drop photos on top of it to run the photos through the action automatically — a really powerful way to run a batch of images through a favorite action, such as applying a specific Photoshop filter, converting to an alternative color space, or applying a custom watermark. By including the droplet as an export action, Lightroom Classic automatically runs the exported copies through the droplet after they are created.

Saving export settings as a preset for reuse

Presets are such an awesome time-saver! Just think about it — you get to save scads of commonly used settings and then access them any time you want to directly from the Export with Preset menu (choose File → Export with Preset). Sweet!

Refer to the following figure to see the Presets panel — it’s there on the left side.

Cómo exportar sus fotos desde Adobe Lightroom Classic

The Export dialog.

You get four preinstalled presets to start you off, right under the Lightroom Classic Presets heading — presets that can’t be ditched or updated, by the way. They are

  • Burn Full-Sized JPEGs: Sets JPG as the file format with the least compression and no resizing and then adds burning the exported images to a disc as an After Export step.
  • Exportar a DNG: establece DNG como formato de archivo, lo que esencialmente significa que está configurado para convertir a DNG en la exportación. Tenga en cuenta que el uso de este ajuste preestablecido tiene sentido solo cuando sus archivos de origen están en formato sin procesar.
  • Para correo electrónico: establece JPG como formato de archivo con la compresión JPG establecida en 60 y cambia el tamaño de todas las imágenes para que quepan en 500 x 500 píxeles. Esta opción le indica a Lightroom Classic que pase las copias exportadas a su cliente de correo predeterminado cuando las exporte.
  • Para correo electrónico (disco duro): establece JPG como formato de archivo con la compresión JPG establecida en 50 y cambia el tamaño de todas las imágenes para que quepan en 640 x 640 píxeles. Tenga en cuenta que este ajuste preestablecido no pasa archivos a su cliente de correo electrónico; simplemente configura la exportación a un tamaño compatible con correo electrónico y los guarda en una ubicación de su elección en su disco duro.

Los preajustes preinstalados no son increíblemente sofisticados, pero pueden ser buenos puntos de partida y pueden ayudarlo a ver las posibilidades. Por ejemplo, si desea enviar fotos por correo electrónico a amigos y familiares, puede tomar el ajuste preestablecido Para correo electrónico como punto de partida y personalizarlo a su gusto. He aquí cómo hacerlo:

Haga clic en el ajuste preestablecido Para correo electrónico para cargar su configuración en el cuadro de diálogo Exportar.

Expanda el panel Configuración de archivo.
Si prefiere una configuración de calidad más alta, establézcala en 70.

Expanda el panel Tamaño de imagen.
Si prefiere una dimensión de píxeles más grande, establezca en 1000 píxeles.

Expanda el panel Nitidez de salida.
Marque la casilla Afilar para y seleccione Pantalla en una cantidad estándar.

Deje los ajustes en los paneles restantes como están.

Haga clic en el botón Agregar en la parte inferior izquierda del panel Ajustes preestablecidos.
Esto abre el cuadro de diálogo Nuevo ajuste preestablecido.

Ingrese un nombre descriptivo en el campo Nombre preestablecido.

(Opcional) Cree una nueva carpeta en el proceso de guardar su ajuste preestablecido.

Puede hacer clic en la lista desplegable Carpeta y elegir una carpeta preestablecida existente o crear una nueva.

Haga clic en el botón Crear para completar el proceso y agregar el ajuste preestablecido al panel Preestablecido.

Puede eliminar carpetas y ajustes preestablecidos personalizados resaltándolos y haciendo clic en el botón Eliminar. Sin embargo, tenga en cuenta que al eliminar una carpeta se eliminan todos los ajustes preestablecidos dentro de ella.

Puede actualizar los ajustes preestablecidos personalizados con nuevas configuraciones ajustando la configuración como desee, haciendo clic con el botón derecho en el ajuste preestablecido y luego eligiendo Actualizar con la configuración actual.

Leave a Comment

Cómo utilizar Kuler para buscar y compartir temas de color en Photoshop CS6

Cómo utilizar Kuler para buscar y compartir temas de color en Photoshop CS6

Aprende a utilizar Kuler para buscar y compartir temas de color en Photoshop CS6, una herramienta esencial para tus proyectos gráficos.

Mostrar y ocultar guías y cuadrículas de InDesign CS5

Mostrar y ocultar guías y cuadrículas de InDesign CS5

Aprenda cómo utilizar las cuadrículas y guías de InDesign CS5 para alinear elementos de manera efectiva. Maximice su diseño utilizando las funcionalidades avanzadas de esta herramienta de diseño gráfico.

Formas y polígonos en InDesign

Formas y polígonos en InDesign

Descubre cómo utilizar las herramientas de dibujo en InDesign para crear formas y polígonos con precisión. Aprende técnicas esenciales y tips para mejorar tus publicaciones.

Cómo crear y guardar una ruta en el panel de rutas en Photoshop CS6

Cómo crear y guardar una ruta en el panel de rutas en Photoshop CS6

Aprende cómo crear y guardar rutas en Adobe Photoshop CS6. Descubre la importancia de convertir tu ruta de trabajo en una ruta guardada para evitar pérdidas.

Cómo guardar un estilo de párrafo en Adobe InDesign Creative Suite 6

Cómo guardar un estilo de párrafo en Adobe InDesign Creative Suite 6

Aprenda a crear y guardar estilos de párrafo en Adobe InDesign CS6 para optimizar su flujo de trabajo y facilitar la edición de su contenido.

Cómo cambiar el ancho y el tipo de un trazo en Illustrator CC

Cómo cambiar el ancho y el tipo de un trazo en Illustrator CC

Aprende a cambiar el ancho y el tipo de trazo en Illustrator CC con este tutorial completo que incluye la personalización de tapas, uniones y líneas discontinuas.

Ver comentarios en documentos PDF de Acrobat CS5

Ver comentarios en documentos PDF de Acrobat CS5

Aprende a ver y administrar los comentarios en documentos PDF utilizando Adobe Acrobat Creative Suite 5. Descubre los métodos más efectivos y eficaces para colaborar con revisores.

Captura de pantalla de una sección de un archivo PDF

Captura de pantalla de una sección de un archivo PDF

Puede utilizar la herramienta Instantánea en Adobe Acrobat CS5 para seleccionar tanto texto como imágenes y crear una imagen de un área determinada dentro de un archivo PDF. El resultado se conoce comúnmente como una captura de pantalla de una sección dentro de un archivo PDF. El resultado es una imagen y su texto no es […]

Medición, recuento y análisis de píxeles en Photoshop CC

Medición, recuento y análisis de píxeles en Photoshop CC

Diseñado para investigadores y científicos, las capacidades de medición en Photoshop CC son bastante poderosas. Puede medir casi cualquier cosa y contar el número de lo que sea en una imagen técnica, tal vez desde un microscopio o telescopio. Si conoce el tamaño exacto de cualquier elemento en una imagen, puede descubrir casi cualquier cosa […]

Las herramientas Licuar en Adobe CS5 Illustrator

Las herramientas Licuar en Adobe CS5 Illustrator

Cuando utiliza las herramientas Licuar en Adobe Creative Suite 5 (Adobe CS5) Illustrator, puede doblar objetos (hacerlos ondulados, pegajosos o puntiagudos) creando distorsiones simples o complejas. Las herramientas Licuar pueden lograr todo tipo de distorsiones creativas o extravagantes (dependiendo de cómo se mire) en sus objetos. Usted […]