Comment exporter vos photos depuis Adobe Lightroom Classic

Après avoir traité vos photos dans Adobe Lightroom Classic (comme un pro !), vous êtes prêt à les envoyer dans le monde. Cela signifie qu'il est temps d'exporter ! L'humble boîte de dialogue Exporter est très puissante et avec un peu de pratique, vous pouvez exploiter tout ce qu'elle a à offrir.

Utilisation d'un workflow d'exportation

Lightroom Classic (comme vous l'avez probablement déjà compris) est une application de flux de travail, et dans le flux de travail plus large consistant à prendre vos photos de l'entrée à la sortie, il existe de nombreux flux de travail plus petits dans les flux de travail. L'exportation ne fait pas exception. Voici les étapes de base:

Sélectionnez les images que vous souhaitez exporter.

Lancez la commande Exporter.

Configurez les paramètres selon vos besoins pour répondre à vos besoins de sortie.

(Facultatif) Enregistrez les paramètres en tant que préréglage pour les réutiliser.

Étape 1 : Sélection des images que vous souhaitez exporter

Les photos que vous sélectionnez pour l'exportation sont déterminées par vos besoins du moment. Vous pouvez exporter des images à partir de n'importe quel module Lightroom Classic, mais le module Bibliothèque vous donne le meilleur accès à l'ensemble de votre portefeuille et l'exportation à partir de là est généralement la plus logique. Donc, si vous n'y êtes pas déjà, appuyez sur G pour passer à la vue Grille de la bibliothèque. À partir de là, vous avez accès à tous vos dossiers et collections, ainsi qu'à la barre de filtre de la bibliothèque, ce qui signifie que vous pouvez continuer et rechercher les images que vous souhaitez. (Allez-y, prenez votre temps.)

Après avoir localisé les images que vous souhaitez exporter, vous pouvez les sélectionner par l'une des méthodes suivantes :

  • Appuyez sur Commande +A (Ctrl+A pour Windows) pour sélectionner toutes les photos d'un dossier ou d'un autre groupe de photos.
  • Cliquez sur la première image d'une série, maintenez la touche Maj enfoncée et cliquez sur la dernière image de la série pour sélectionner toutes les images intermédiaires.
  • Maintenez la touche Commande enfoncée (touche Ctrl pour Windows) et cliquez sur chaque image individuellement pour effectuer une sélection non contiguë.

Étape 2 : Lancer la commande Exporter

Après avoir sélectionné les images, vous pouvez lancer une exportation à partir de n'importe quel module (sauf indication contraire) par les moyens suivants :

  • Choisissez Fichier → Lance la boîte de dialogue Exporter.
  • Choisissez Fichier → Exporter avec le précédent. Ignore la boîte de dialogue Exporter et exporte simplement les fichiers sélectionnés en utilisant les paramètres de la dernière exportation.
  • Choisissez Fichier  →  Exporter avec préréglage  →  Sélectionner un préréglage. Vous permet de sélectionner un préréglage et d'exporter sans configuration supplémentaire de la boîte de dialogue Exporter.
  • Appuyez sur Commande+Maj+E (Ctrl+Maj+E pour Windows). Raccourci clavier qui lance la boîte de dialogue Exporter.
  • Appuyez sur Commande+Option+Maj+E (Ctrl+Alt+Maj+E pour Windows). Raccourci clavier pour Exporter avec le précédent.
  • Cliquez avec le bouton droit sur une photo sélectionnée et choisissez l'une des options d'exportation mentionnées précédemment dans le menu contextuel qui apparaît.
  • Cliquez sur le bouton Exporter en bas du panneau de gauche dans le module Bibliothèque. Uniquement visible dans le module Bibliothèque, mais pratique.

Utilisez les raccourcis clavier dans votre workflow d'exportation dès que possible et aussi souvent que possible. Ils seront une seconde nature avant que vous ne le sachiez, et ils vous feront gagner beaucoup de temps.

Étape 3 : Configuration des paramètres pour répondre à vos besoins de sortie

Le premier choix que vous allez faire est si vous envisagez d'exporter vers votre disque dur, vers un graveur de CD/DVD (si vous en avez encore un !), un e-mail ou un plug-in d'exportation que vous avez installé. Votre choix le plus courant sera le disque dur. De là, vous configurez tous les panneaux relatifs au choix que vous avez fait. Bien que des panneaux supplémentaires apparaissent avec différents plug-ins d'exportation, ils sont trop spécifiques et variés pour être traités ici ; Je me concentre uniquement sur les panneaux fournis avec le disque dur, car cela couvre la plupart des options.

LE PANNEAU DE LOCALISATION D'EXPORTATION

Le panneau Emplacement d'exportation, illustré ici, est utilisé pour configurer l'emplacement où vous souhaitez enregistrer un lot de copies sur votre disque dur. Même si vous gravez finalement ces copies sur DVD ou les transférez à une autre application, Lightroom Classic doit d'abord enregistrer les copies sur votre disque dur.

Comment exporter vos photos depuis Adobe Lightroom Classic

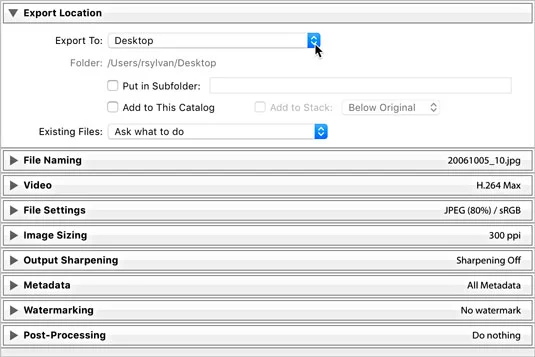
Le panneau Emplacement d'exportation s'est développé.

L'endroit où vous choisissez d'enregistrer les fichiers est déterminé par deux facteurs : la façon dont vous gérez vos fichiers et ce que vous déterminez que votre sortie doit être. Le menu déroulant Exporter vers propose quelques options pour désigner un emplacement :

  • Dossier spécifique : lorsque vous sélectionnez cette option, vous pouvez pointer Lightroom Classic vers n'importe quel dossier de votre disque. Assurez-vous simplement qu'il dispose de suffisamment d'espace libre pour contenir toutes les nouvelles copies. Cliquez sur le bouton Choisir et accédez au dossier que vous souhaitez utiliser.
  • Même dossier que la photo d'origine : cette option fait exactement ce qu'elle décrit, à savoir remettre vos copies exportées dans le même dossier que l'original.
  • Choisir le dossier plus tard : cette option est utile lorsque vous créez des préréglages et que vous ne souhaitez pas coder en dur un emplacement spécifique dans le préréglage. Lorsque vous utilisez un préréglage, Lightroom Classic vous invite à fournir un emplacement.
  • Emplacements des utilisateurs : sous ces options se trouve une liste d'emplacements d'utilisateurs courants tels que les dossiers Bureau, Documents, Accueil, Films et Images pour faciliter la sélection.

Après avoir choisi l'emplacement de l'exportation, vous avez quelques options supplémentaires à considérer :

  • Mettre dans le sous- dossier : cette option vous permet de créer un sous-dossier dans l'emplacement d'exportation désigné. Cochez la case et saisissez un nom pour le sous-dossier dans le champ de texte correspondant.
  • Ajouter à ce catalogue : Considérez cela comme une option d'importation automatique. Une fois vos copies exportées, elles apparaissent dans Lightroom Classic sans que vous ayez à passer par la boîte de dialogue Importer.
  • Ajouter à la pile : l' empilement est une fonction qui vous permet d'organiser des groupes de photos sous une seule vignette à des fins d'organisation. Cette option n'est disponible que lorsque vous exportez des copies vers le même dossier que les originaux (et que vous ne les placez pas dans un sous-dossier). Lorsque cette case est cochée, les photos exportées apparaissent empilées avec les photos source lorsque vous affichez ce dossier dans Lightroom Classic.

Because you may export photos into a folder that already contains other photos, you must tell Lightroom Classic how to handle situations where your exported copies have the same name and are the same file type as the existing photos. You have four options under the Existing Files drop-down menu:

  • Ask What to Do: This option is the safest option and the one recommended. If such a situation occurs, Lightroom Classic prompts you for further instructions and then you choose one of the other three options.
  • Choose a New Name for the Exported File: In this case, Lightroom Classic simply appends a new sequence number to the end of the exported file, so you end up with two copies of the same file but with unique names.
  • Overwrite WITHOUT WARNING: Does what it says (and it even uses all caps in the drop-down menu). Only choose this option if you are really sure it is what you want to do. Note that Lightroom Classic does not allow you to overwrite the source photos, so don’t choose this option thinking you can export copies with Lightroom Classic adjustments and save over the existing source files — it won’t work.
  • Skip: If you choose this option, no new copy is created (that is, Lightroom Classic skips the file) when an existing file with the same filename is encountered.

THE FILE NAMING PANEL

In many cases, you’ll want to maintain name consistency between your source files and your exported copies. By simply choosing the Filename template, you can achieve just that. Other times, you may want to use custom names that are completely different or perhaps some variation of the original name, as shown. In any case, because you’re always creating copies, you must tell Lightroom Classic how you want them named, and just as when you use the Import command or rename files in the Library module, Lightroom Classic uses filename templates to do it.

Comment exporter vos photos depuis Adobe Lightroom Classic

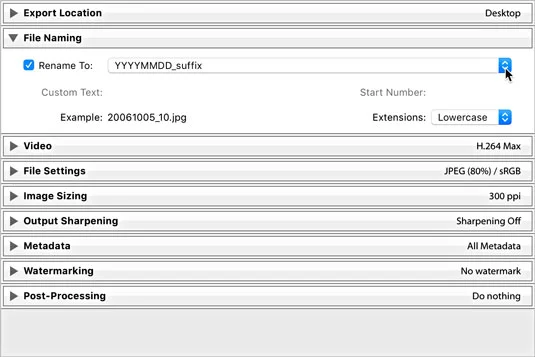
The File Naming panel.

Click the Template drop-down list and choose one of the installed templates, or you can click Edit and create a custom filename template using the good old Filename Template Editor.

THE VIDEO PANEL

If you have a video file selected for export, you need to check the Include Video Files check box to access the (limited) format options for video, as shown.

  • DPX: A lossless format suited for sending to professional video editing tools (like Adobe Premiere). Choose this only if you know it is required.
  • 264: Good for exporting compressed video files for viewing and sharing. A description of each quality setting appears under it when selected.
  • Original, unedited file: Produces an exact copy of the original.

Comment exporter vos photos depuis Adobe Lightroom Classic

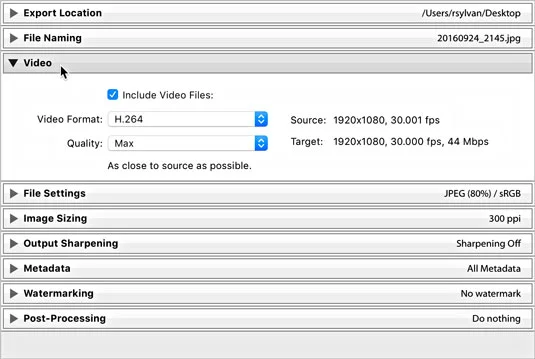
The video panel expanded.

THE FILE SETTINGS PANEL

Choose your file format based on your output needs (such as choosing JPEG for photos going on a website). Some formats require additional settings. Here’s a list of the formats and their options:

  • JPEG: When you choose the JPEG (or JPG) format, you also need to choose the level of compression to be applied to each JPEG file. You make this selection by using the Quality slider, as shown in the following figure. The higher the quality value, the less compression — and the larger the file size. JPEG compression is always a tradeoff between file size and image quality. If you’re not too concerned about file size, leave it set around 90. The Limit File Size To option is useful if you need to achieve a specific file size in bytes, but keep in mind that you may need to also reduce the pixel dimensions when exporting large files.
  • PSD: PSD is Photoshop’s native file format. You can choose between 8- and 16-bit.
  • TIFF: TIFF is a widely supported format. Use the panel’s Compression drop-down list to pick one of the lossless compression options. “None” is pretty straightforward; ZIP and LZW reduce the file size, but the length of time to open and close the file increases. (Note that not all image editors can open compressed TIFF files. Also note that only the ZIP compression option is available with 16-bit files.) If your photo contains transparent pixels and you want to keep them in the exported copy, check the Save Transparency box.
  • DNG: This is Adobe’s open format for raw (unprocessed by the camera) photos. Note that the Use Lossy Compression option is occasionally useful for situations in which you want to keep the exported copy as a DNG file while also reducing its pixel dimensions by using the options in the Image Sizing panel.
  • Original: Selecting Original from the drop-down list results in the creation of an exact copy of your source image. (Raw and DNG photos will include Lightroom Classic edits in the photo’s XMP metadata.) No additional file settings are available with this option.

Comment exporter vos photos depuis Adobe Lightroom Classic

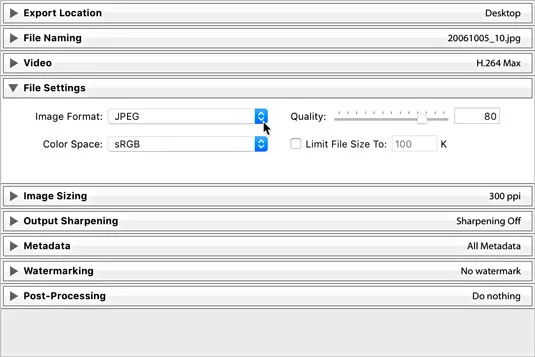
The File Settings panel expanded to show JPEG format and Quality slider.

Two additional options, which appear only when you choose JPEG, TIFF, and PSD formats, warrant a separate discussion. (Raw files are always 16-bit and don’t have a color space.)

  • Color Space: A photo’s color space is what determines the range of possible colors it can contain. You need to decide what color space you want these copies converted into during the export process. Your choice of color space is determined by the reason you are exporting these copies to begin with and where they will be used. Here’s a look at your choices:
    • sRGB: This color space contains the narrowest range of colors and is the standard for exporting photos destined for the web. It’s also used by some print services.
    • AdobeRGB (1998): Contains a wider range of colors than sRGB and is most often used when additional editing or printing is the next destination for your files.
    • ProPhoto RGB: Contains the widest range of colors and should only be used with 16-bit files. (I discuss bit depth in the next boldfaced bullet.) This is the best option when you want to retain all the color information that was in your source files. Not recommended when delivering copies destined for the web or anyone not used to working with ProPhoto color space.
    • Other: While the previous three options are the most common, there may also be advanced situations where you need to convert your files to a custom color space for printing purposes. Consult your print service to see whether it provides or requires custom profiles, and it will help you get them installed. By choosing Other, you’ll be taken to the Choose Profiles dialog, where you can select a color profile.
  • Bit Depth: Bit depth determines the amount of data a file contains. The higher the bit depth, the more data is contained in the file (which also means its file size is going to be larger too). If you’re working with raw files, you’re working with 16-bit files. If you’re working with JPEG files, you’re working with 8-bit files. During export, you have the option of saving PSD and TIFF files as 16-bit. If you choose JPG, bit depth is grayed out, but know that JPEGs are all 8-bit by default. Saving files in 16-bit only makes sense when both the source files were originally 16-bit and when the output needs require this original data (such as when you plan to archive the exported copies to DVD or edit them in some other image editor). In all other situations, 8-bit is the more common choice.

THE IMAGE SIZING PANEL

Sometimes, you need to save your exported copies in a different size from the source photos, such as when you want to email them or put them in a web page. To do so, you use options in the Image Sizing panel (see the following figure). Lightroom Classic can make the exported images smaller or larger than the original images — a process known as resampling. The six options for resizing your exports are

  • Width & Height: The values entered for width and height define the maximum amount each side can be resized to fit while maintaining original aspect ratio.
  • Dimensions: This option resizes exported images to fit within the entered dimensions while maintaining aspect ratio. When this option is selected, height and width are no longer associated with the values fields. You just enter the maximum dimensions you want the images resized to fit, and Lightroom Classic does the rest regardless of orientation.
  • Megapixels: If you need to resize to a specific total number of pixels (width times height), this is your option.
  • Long Edge and Shortest Edge: These options function in the same manner. You set the maximum value for the edge in question, and Lightroom Classic resizes all images to fit.
  • Percentage: This option is useful when you want to create exported copies that are a certain percentage smaller than the original.

Comment exporter vos photos depuis Adobe Lightroom Classic

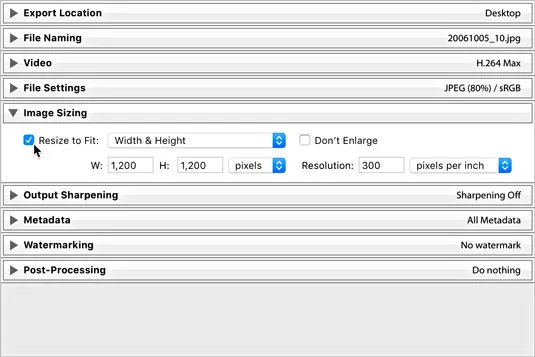
The Image Sizing panel.

Check the Don’t Enlarge box to prevent an image from being resampled larger than its original pixel dimensions. (This option is grayed out when Resize to Fit is unchecked.)

If your output needs require your photos to print at a specific size and at a specific number of pixels per inch (PPI), you can set its resolution value — the metadata tag used by software to determine how big the printed file appears. For example, the value of 300 PPI is commonly requested by print services, in which case you would enter 300 and choose pixels per inch. 300 PPI is always a safe choice, but if your photos are destined for the web only, this value is meaningless and can be ignored.

THE OUTPUT SHARPENING PANEL

I love having the ability to add sharpening tailored for the specific output destination as part of the export process. The Output Sharpening panel, shown in the following figure, is where you choose and configure your output sharpening settings. The possible output settings are defined as

  • Screen: Use this option when your photo’s final viewing destination will be on a computer screen (that is, on a web page).
  • Matte Paper: Use this option when you’re sending your photos to be printed on a type of photo paper that has a matte (non-shiny) finish.
  • Glossy Paper: Use this option when you’re sending your photos to be printed on a type of photo paper that has a glossy (shiny) finish.

Comment exporter vos photos depuis Adobe Lightroom Classic

The Output Sharpening panel.

After you identify the output you are sharpening for, you can set the amount of sharpening to apply; your choices here range from Low (almost none) to High (often too much), with Standard in the middle (just right).

THE METADATA PANEL

The Metadata panel, shown in the following figure, allows you some level of control over what metadata is included in the exported copies. Clicking the Include drop-down menu offers the following options:

  • Copyright Only: Only the metadata entered into the Copyright field of the Metadata panel is applied to copies.
  • Copyright & Contact Info Only: This is the same as the above option with the inclusion of any contact information you applied via the Metadata panel (or a metadata template).
  • All Except Camera Raw Info: Camera Raw Info means the actual slider values dialed into Lightroom Classic, written as part of the metadata (the adjustments themselves are applied to the pixels regardless of any of these settings). So, this option builds on the above option and then includes all other metadata except the slider values (Camera Raw Info).
  • All Except Camera & Camera Raw Info: This does everything that the previous option but leaves out the camera-generated EXIF metadata and the Camera Raw Info.
  • All Metadata: Nothing is left out. All EXIF metadata created by camera, plus everything added in Lightroom Classic, is applied to copies.

Comment exporter vos photos depuis Adobe Lightroom Classic

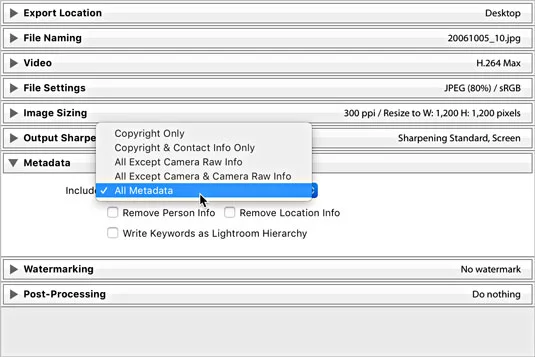
The Metadata panel expanded.

Th Metadata panel has three additional check boxes:

  • Remove Person Info: If you used People view to tag photos with the names of the people shown, you can check this box to avoid writing that information into the metadata of the exported copies.
  • Remove Location Info: If your photos have GPS information in them, you can check this box to avoid writing that information into the metadata of exported copies.
  • Write Keywords as Lightroom Hierarchy: Keywords are the descriptive terms you assign to your photos in the Library module. When you enable this option, and \ use keywords with parent/child relationships (meaning that the keywords are in a hierarchical structure), the exported copies retain that same keyword structure. This feature is useful for photos that will be imported into another Lightroom Classic catalog or managed with Adobe Bridge.

THE WATERMARKING PANEL

You can apply one of three types of watermarks to exported copies. Check the Watermark box to enable the drop-down choices. The most basic is the Simple Copyright Watermark, which pulls the information from the Copyright field of each file’s metadata and renders it as a watermark in the lower-left corner of each exported copy. This type of watermark has no configuration options.

Comment exporter vos photos depuis Adobe Lightroom Classic

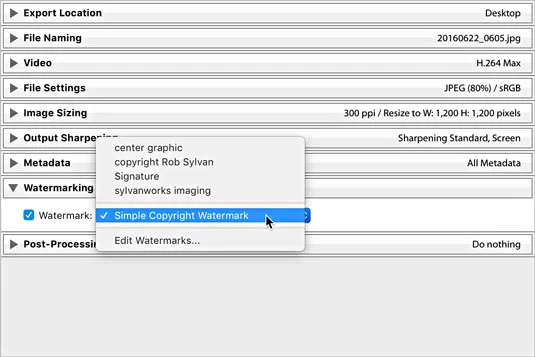
The Watermarking options.

For greater control, choose Edit Watermarks to enter the Watermark Editor, where you can create either a text-based or graphical watermark with more control and save it as a preset for easy reuse.

THE POST-PROCESSING PANEL

This is an optional panel, but it can provide a nice productivity boost to your output when you know your photos are going to be opened in some other application after they have been created (such as for additional image editing or viewing in your file browser). The Post-Processing panel (with the After Export drop-down list expanded) is shown in the following figure.

With the help of the options in this panel, you can tell Lightroom Classic to hand off your exported images to another application — in effect, having Lightroom Classic perform what is commonly referred to as an “export action” on your photos. The After Export drop-down list includes the following preinstalled options:

  • Show in Finder (Show in Explorer for Windows): Automatically opens the folder containing the exported images in your file browser.
  • Open in Photoshop: If you have Photoshop installed, you have the option to open the exported images in Photoshop after they’re saved to the export location.
  • Open in Additional Editor: If you configured an additional external editor you see it listed here as an option.
  • Open in Other Application: Selecting this option gives you the opportunity to designate another application (such as an email client, an alternative image editor, or an FTP client) that will be invoked at the end of the export. Lightroom Classic attempts to open the exported photos in that application; just keep in mind that not every application can accept images this way. Click the Choose button and navigate to the application you want to send your photos to.

Comment exporter vos photos depuis Adobe Lightroom Classic

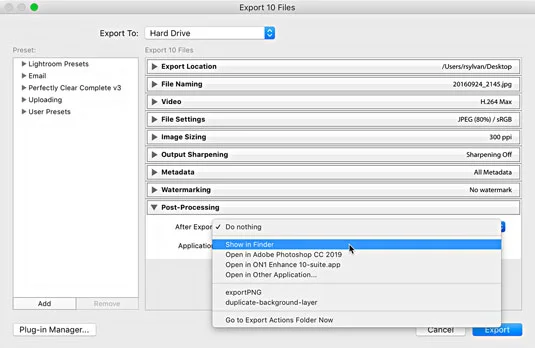
Post-Processing panel expanded to show After Export options.

At the bottom of the After Export drop-down list is the Go to Export Actions Folder Now command. Selecting this option opens Finder (or Windows Explorer for Windows) with Lightroom Classic’s Export Actions folder selected. You can place either an executable file or an alias (shortcut for Windows) to an executable file in the Export Actions folder to include it as an option in the After Export drop-down list the next time you start Lightroom Classic. This is another way to set things up so you can send your photos to a specific program or a Photoshop droplet with one quick command.

“What’s a droplet?” you say. A droplet is a Photoshop action that you manage to turn (with Photoshop’s help) into a tiny executable file. After you create a droplet, you can literally drag and drop photos on top of it to run the photos through the action automatically — a really powerful way to run a batch of images through a favorite action, such as applying a specific Photoshop filter, converting to an alternative color space, or applying a custom watermark. By including the droplet as an export action, Lightroom Classic automatically runs the exported copies through the droplet after they are created.

Saving export settings as a preset for reuse

Presets are such an awesome time-saver! Just think about it — you get to save scads of commonly used settings and then access them any time you want to directly from the Export with Preset menu (choose File → Export with Preset). Sweet!

Refer to the following figure to see the Presets panel — it’s there on the left side.
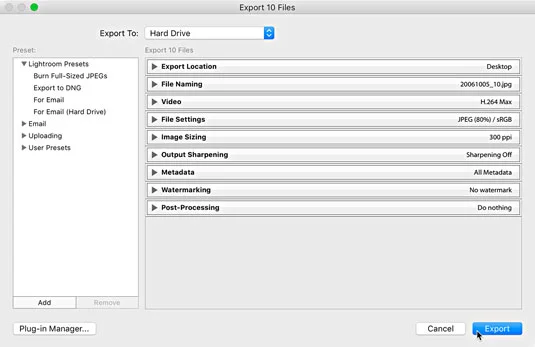
Comment exporter vos photos depuis Adobe Lightroom Classic

The Export dialog.

You get four preinstalled presets to start you off, right under the Lightroom Classic Presets heading — presets that can’t be ditched or updated, by the way. They are

  • Burn Full-Sized JPEGs: Sets JPG as the file format with the least compression and no resizing and then adds burning the exported images to a disc as an After Export step.
  • Exporter vers DNG : définit DNG comme format de fichier, ce qui signifie essentiellement que vous êtes configuré pour convertir en DNG lors de l'exportation. Notez que l'utilisation de ce préréglage n'a de sens que lorsque vos fichiers sources sont au format brut.
  • Pour les e- mails : définit JPG comme format de fichier avec une compression JPG définie sur 60 et redimensionne toutes les images pour qu'elles tiennent dans les 500 x 500 pixels. Cette option indique à Lightroom Classic de transmettre les copies exportées à votre client de messagerie par défaut lorsque vous les exportez.
  • Pour les e-mails (disque dur) : définit JPG comme format de fichier avec une compression JPG définie sur 50 et redimensionne toutes les images pour qu'elles s'adaptent à 640 x 640 pixels. Notez que ce préréglage ne transmet pas réellement les fichiers à votre client de messagerie ; il configure simplement l'exportation à une taille adaptée aux e-mails et les enregistre dans un emplacement de votre choix sur votre disque dur.

Les préréglages préinstallés ne sont pas incroyablement sophistiqués, mais ils peuvent constituer de bons points de départ et vous aider à voir les possibilités. Par exemple, si vous aimez envoyer des photos par e-mail à vos amis et à votre famille, vous pouvez utiliser le paramètre prédéfini Pour l'e-mail comme point de départ et le personnaliser à votre guise. Voici comment procéder :

Cliquez sur le préréglage Pour l'e-mail pour charger ses paramètres dans la boîte de dialogue Exporter.

Développez le panneau Paramètres de fichier.
Si vous préférez un paramètre de qualité plus élevé, définissez-le sur 70.

Développez le panneau Dimensionnement de l'image.
Si vous préférez une plus grande dimension en pixels, définissez-la sur 1000 pixels.

Développez le panneau Netteté de sortie.
Cochez la case Netteté pour et sélectionnez Écran à un montant standard.

Laissez les paramètres dans les autres panneaux tels qu'ils sont.

Cliquez sur le bouton Ajouter en bas à gauche du panneau Préréglages.
Cela ouvre la boîte de dialogue Nouveau préréglage.

Saisissez un nom descriptif dans le champ Nom prédéfini.

(Facultatif) Créez un nouveau dossier pendant le processus d'enregistrement de votre préréglage.

Vous pouvez cliquer sur la liste déroulante Dossier et choisir un dossier prédéfini existant ou en créer un nouveau.

Cliquez sur le bouton Créer pour terminer le processus et ajouter le préréglage au panneau Préréglage.

Vous pouvez supprimer des préréglages et des dossiers personnalisés en les mettant en surbrillance et en cliquant sur le bouton Supprimer. Notez cependant que la suppression d'un dossier supprime tous les préréglages qu'il contient !

Vous pouvez mettre à jour les préréglages personnalisés avec de nouveaux paramètres en ajustant les paramètres comme vous le souhaitez, en cliquant avec le bouton droit sur le préréglage, puis en choisissant Mettre à jour avec les paramètres actuels.

Leave a Comment

Surligner, souligner et barrer le texte dans les documents PDF

Surligner, souligner et barrer le texte dans les documents PDF

Apprenez à surligner, souligner et barrer le texte dans les documents PDF à l

Comment insérer une image darrière-plan dans Dreamweaver

Comment insérer une image darrière-plan dans Dreamweaver

Apprenez à insérer efficacement une image d

Comment traiter des actions par lots dans Photoshop CS6

Comment traiter des actions par lots dans Photoshop CS6

La fonction Lot de Photoshop CS6 vous permet d

Comment habiller des objets dans les documents Adobe InDesign CS6

Comment habiller des objets dans les documents Adobe InDesign CS6

Découvrez comment habiller des objets dans Adobe InDesign CS6 pour optimiser vos mises en page. L

Comment enregistrer des couleurs dans Illustrator CC

Comment enregistrer des couleurs dans Illustrator CC

Apprenez à enregistrer vos couleurs dans Illustrator CC pour maintenir la cohérence et faciliter les modifications futures. Suivez notre guide étape par étape sur l

Menus de filtres et deffets dans Adobe CS5 Illustrator

Menus de filtres et deffets dans Adobe CS5 Illustrator

Découvrez comment utiliser le menu Filtre et les effets dans Adobe CS5 Illustrator pour améliorer vos illustrations. Apprenez les techniques essentielles pour des modifications non destructives.

Capture décran dune section dun fichier PDF

Capture décran dune section dun fichier PDF

Vous pouvez utiliser l'outil Instantané d'Adobe Acrobat CS5 pour sélectionner à la fois du texte et des images et créer une image d'une certaine zone dans un fichier PDF. Le résultat est communément appelé une capture d'écran d'une section dans un fichier PDF. Le résultat est une image, et votre texte n'est pas […]

Mesurer, compter et analyser les pixels dans Photoshop CC

Mesurer, compter et analyser les pixels dans Photoshop CC

Conçues pour les chercheurs et les scientifiques, les capacités de mesure de Photoshop CC sont assez puissantes. Vous pouvez mesurer à peu près n'importe quoi et compter le nombre de n'importe quoi dans une image technique, peut-être à partir d'un microscope ou d'un télescope. Si vous connaissez la taille exacte de n'importe quel élément d'une image, vous pouvez alors découvrir à peu près n'importe quoi […]

Les outils de fluidification dans Adobe CS5 Illustrator

Les outils de fluidification dans Adobe CS5 Illustrator

Lorsque vous utilisez les outils Fluidité d'Adobe Creative Suite 5 (Adobe CS5) Illustrator, vous pouvez plier des objets (les rendre ondulés, gluants ou hérissés) en créant des distorsions simples à complexes. Les outils Liquify peuvent accomplir toutes sortes de distorsions créatives ou farfelues (selon la façon dont vous les regardez) sur vos objets. Tu […]

Comment ajuster les propriétés du texte dans Adobe XD

Comment ajuster les propriétés du texte dans Adobe XD

Lorsque vous avez du texte dans votre projet Adobe XD, vous pouvez commencer à modifier les propriétés du texte. Ces propriétés incluent la famille de polices, la taille de la police, l'épaisseur de la police, l'alignement, l'espacement des caractères (crénage et suivi), l'espacement des lignes (interlignage), le remplissage, la bordure (trait), l'ombre (ombre portée) et le flou d'arrière-plan. Voyons donc comment ces propriétés sont appliquées. À propos de la lisibilité et de la police […]