Logic Pro X를 사용하면 소유하고 있는 모든 신디사이저와 키보드를 쉽게 대체할 수 있는 다양한 악기를 얻을 수 있습니다. 강력하고 유연하며 놀라운 소리를 냅니다. 또한 Logic Pro의 신디사이저는 조정할 수 있는 모든 컨트롤과 매개변수를 볼 때 프로그래밍하기 어려워 보일 수 있습니다. 여기에서 기기 인터페이스 및 매개변수를 둘러볼 수 있습니다. 좀 더 확인 이 로직 프로 신디사이저가 무엇을 할 수 있는지 설명 비디오 데모를 하면 신디사이저 작업과 방법이 당신의 음악이 로직 프로 신디사이저를 사용하는 방법을 참조 곳.
Logic Pro 신디사이저를 재생하려면 소프트웨어 악기 트랙을 생성하고 다음과 같이 채널 스트립 악기 슬롯 에서 악기를 선택해야 합니다.
트랙 → 새 소프트웨어 악기 트랙을 선택합니다(또는 Option-⌘ -S 누르기).
새 소프트웨어 악기 트랙이 트랙 목록에 추가됩니다.
보기 → 속성 보기를 선택합니다(또는 I를 누름).
인스펙터는 트랙 목록의 왼쪽에 열립니다.
악기 슬롯의 오른쪽을 클릭하고 원하는 악기를 선택합니다.
소프트웨어 기기 인터페이스가 열립니다.
Logic Pro의 멋진 신디사이저 컬렉션 둘러보기를 시작하기 전에 몇 가지 기본 합성 용어를 이해하는 것이 중요합니다.
- 오실레이터: 신디사이저 오실레이터 는 사운드의 기초를 형성하는 연속 신호를 생성합니다. 오실레이터는 음색 품질이 다른 여러 파형 모양을 생성할 수 있습니다. 오실레이터는 다른 신디 파라미터가 형성하는 사운드를 생성하기 때문에 신디사이저에서 가장 중요한 부분입니다.
- 변조: 정적 신디사이저 사운드는 어떤 식으로든 다양할 때 관심을 얻습니다. 변조 는 신디사이저 매개변수를 변경하는 과정입니다. 비브라토는 변조의 일반적인 예입니다.
- 필터: 신디사이저 사운드는 필터를 사용하여 형성됩니다. 필터 는 주파수 스펙트럼의 일부를 제거하여 사운드의 윤곽을 잡을 수 있도록 합니다.
- 엔벨로프: 신디 엔벨로프 는 사운드의 시작, 중간 및 끝을 형성합니다. 가장 일반적인 엔벨로프는 어택, 디케이, 서스테인 및 릴리스(ADSR)를 조정합니다. 예를 들어, 피아노에는 빠른 어택, 빠른 감쇠, 중간 지속 및 빠른 릴리스가 있습니다.
- LFO : 낮은 주파수 발진기 (LFO)을 변조하는 신호, 일반적으로 가청 주파수 스펙트럼 아래 신호이다. LFO는 어떤 방식으로든 원래 신호를 변경하는 데 사용됩니다. LFO의 일반적인 용도는 비브라토를 만드는 것입니다.
Logic Pro X: EFM1 FM 신디사이저
EFM1 FM 신디사이저는 가장 인기 있는 디지털 신디사이저 중 하나인 80년대 클래식 Yamaha DX7과 같은 사운드를 제공합니다. EFM1은 FM( 주파수 변조 ) 합성을 사용하여 전자 피아노, 벨, 오르간, 베이스 및 기타 멋지고 복잡한 사운드와 같은 디지털 사운드를 얻습니다. EFM1은 16개의 동시 음색을 재생할 수 있으며 DX7과 달리 프로그래밍이 쉽습니다.
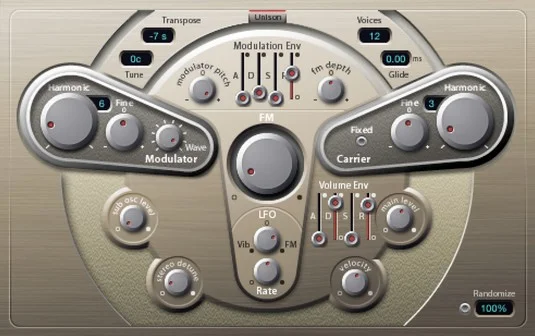
EFM1 FM 신디사이저.
FM 합성으로 사운드를 디자인하려면 변조기와 반송파 매개변수를 설정한 다음 FM 강도를 변경합니다. 변조기와 반송파 간의 튜닝 비율은 고조파 배음을 설정합니다. FM 강도는 배음의 레벨을 설정합니다. 다음은 EFM1 매개변수에 대한 설명입니다.
- 변조기 매개변수: 변조기 매개변수는 EFM1 인터페이스의 왼쪽에 있습니다. 고조파 노브를 돌려 변조기 신호의 튜닝 비율을 설정합니다. 미세 조정 노브를 돌려 고조파를 조정합니다. 웨이브 노브를 왼쪽으로 끝까지 돌려 변조기 파형을 기존 FM 사인파로 설정하거나 오른쪽으로 임의의 추가 파형을 설정합니다. 중앙의 큰 FM 노브를 돌려 FM 강도를 조정합니다.
- 캐리어 매개변수: 캐리어 매개변수는 EFM1 인터페이스의 오른쪽에 있습니다. 고조파 노브를 돌려 캐리어 신호의 튜닝 비율을 설정합니다. 미세 조정 노브를 돌려 고조파를 조정합니다. 키보드, 피치 벤드 또는 LFO에 의해 캐리어가 변조되는 것을 방지하려면 고정 캐리어 버튼을 클릭하십시오.
- 전역 매개변수: EFM1의 상단 섹션에서 전역 매개변수를 설정할 수 있습니다. EFM1의 피치를 변경하려면 Transpose 필드와 Tune 필드를 클릭하십시오. 음색 필드를 클릭하여 동시에 연주할 수 있는 음의 수를 선택합니다. Glide 필드를 클릭하여 한 피치에서 다른 피치로 슬라이드하는 데 걸리는 시간을 설정합니다. Click the Unison 버튼을 클릭하여 음성을 레이어링하고 사운드를 더 풍부하게 만들며 동시에 재생할 수 있는 음성의 수를 절반으로 줄입니다.
- 모듈레이션 매개변수: EFM1의 중앙에는 사운드의 어택, 디케이, 서스테인 및 릴리스(ADSR)를 설정하는 모듈레이션 엔벨로프 슬라이더가 있습니다. 모듈레이터 피치 노브를 돌려 모듈레이션 엔벨로프가 피치에 미치는 영향을 설정합니다. FM Depth 노브를 돌려 변조 엔벨로프가 FM 강도에 미치는 영향을 설정합니다. LFO 노브를 돌려 LFO가 FM 강도 또는 피치를 변조하는 정도를 설정합니다. 속도 노브를 돌려 LFO의 속도를 설정합니다.
- 출력 매개변수: EFM1의 하단 절반은 출력 매개변수 전용입니다. Sub Osc Level 노브를 돌려 저음 응답을 높입니다. 스테레오 디튠 노브를 돌려 사운드에 코러스 효과를 추가합니다. Velocity 노브를 돌려 MIDI 컨트롤러에 대한 응답으로 벨로시티 감도를 설정합니다. 메인 레벨 노브를 돌려 전체 볼륨을 조정합니다. 볼륨 엔벨로프 슬라이더를 조정하여 사운드의 ADSR을 설정합니다.
EFM1 인터페이스의 오른쪽 하단에 있는 Randomize 버튼을 클릭하여 임의의 사운드를 생성합니다. 무작위화 필드를 클릭하고 무작위화 비율을 설정하여 무작위화의 양을 조정합니다. 미친 디지털 사운드를 좋아한다면 100% 무작위화가 가장 좋은 친구입니다.
Logic Pro의 신디사이저에서 훌륭한 사운드를 얻기 위해 프로그래밍 천재가 될 필요는 없습니다. 모든 신디사이저에는 인터페이스 상단에 사전 설정 메뉴가 있습니다. 원하는 사운드를 불러오고 노브를 돌리고 즐기세요. 사전 설정 메뉴 아래에는 복사, 붙여넣기, 실행 취소 및 다시 실행과 같은 기타 유용한 버튼이 있습니다. 비교 버튼을 사용하면 편집한 설정을 저장된 설정과 비교할 수 있으므로 원하는 만큼 편집할 수 있지만 항상 시작 지점으로 돌아갈 수 있습니다.
Logic Pro X: ES1 감산 신디사이저
ES1 신디사이저 는 오실레이터와 서브오실레이터로 시작한 다음 사운드의 일부를 빼서 모양을 만드는 감산 합성 을 사용하여 사운드를 생성 합니다. ES1은 고전적인 아날로그 신디사이저를 모델로 하고 있으며 베이스, 리드, 패드, 심지어 타악기 사운드를 만드는 데 탁월합니다.
![Logic Pro 신디사이저 탐색]()
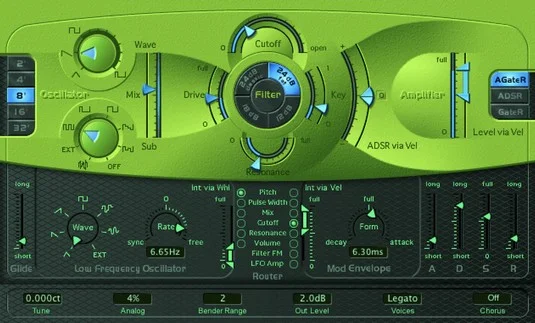
ES1 감산 신디사이저.
ES1 매개변수에 대한 설명은 다음과 같습니다.
- 오실레이터 매개변수: ES1 인터페이스의 왼쪽 절반은 기본 사운드를 정의하는 오실레이터 매개변수를 제공합니다. 왼쪽에 있는 버튼을 클릭하여 옥타브를 선택합니다. 웨이브 노브를 돌려 발진기 파형을 설정합니다. 서브 노브를 돌려 서브 오실레이터 파형을 설정합니다. 믹스 슬라이더를 조정하여 두 오실레이터 간의 믹스를 설정합니다.
- 필터 매개변수: ES1의 중앙 섹션은 두 개의 발진기 파형을 필터링합니다. 컷오프 슬라이더를 조정하여 저역 통과 필터의 컷오프 주파수를 설정합니다. Resonance 슬라이더를 조정하여 차단 주파수 주변의 주파수 품질을 설정합니다. 4개의 Slope 버튼 중 하나를 클릭하여 저역 통과 필터가 신호에 미치는 영향을 선택합니다. 드라이브 슬라이더를 조정하여 공명 설정에 영향을 미치고 필터를 오버드라이브하십시오. 키 슬라이더를 조정하여 피치가 필터를 조정하는 방법을 설정합니다. Velocity 슬라이더를 통한 ADSR을 조정하여 음의 세기가 필터에 미치는 영향을 설정합니다.
- 앰프 매개변수: ES1의 오른쪽 섹션은 볼륨 레벨과 성능을 조정합니다. 음량이 음의 속도에 영향을 받는 방식을 설정하려면 Velocity 슬라이더를 통해 레벨을 조정합니다. Amplifier Envelope 버튼을 클릭하여 ADSR 엔벨로프가 볼륨에 미치는 영향을 설정합니다.
- 변조 매개변수: ES1의 짙은 녹색 영역에서 가장 큰 부분은 사운드가 변조되는 방식을 조정합니다. Glide 매개변수는 포르타멘토의 속도를 설정합니다. Wave 및 Rate 노브를 돌려 LFO(Low Frequency Oscillator)가 시간이 지남에 따라 사운드를 자극하는 방법을 설정합니다. 변조 엔벨로프는 변조가 페이드 인 또는 페이드 아웃하는 방법을 설정합니다. 라우터 매개변수는 LFO 및 변조 엔벨로프의 대상을 설정합니다.
- 엔벨로프 매개변수: 짙은 녹색 영역의 맨 오른쪽 섹션은 ADSR 엔벨로프를 조정합니다. 슬라이더를 사용하여 어택, 디케이, 서스테인 및 릴리스(ADSR) 시간을 설정합니다.
- 전역 매개변수: 매개변수 의 맨 아래 행은 ES1 전역 매개변수를 제어합니다. 튜닝 필드를 클릭하여 전체 튜닝을 조정합니다. 열과 노화로 인해 변하는 아날로그 회로와 유사하게 튜닝 및 차단 주파수에 무작위 변경을 도입하려면 아날로그 필드를 클릭하십시오. 벤더 범위를 클릭하여 피치 벤드의 양을 조정합니다. 출력 레벨을 클릭하여 전체 볼륨을 조정합니다. 보이스 필드를 클릭하여 ES1이 동시에 재생할 수 있는 보이스 수를 설정합니다. 코러스 필드를 클릭하여 사운드를 두껍게 만들 내장 코러스 효과 유형을 선택합니다.
The ES1 is a great instrument to use for getting the feel of analog synthesis. Many of the synths that follow have similar parameters. Getting the hang of setting oscillator waveforms, filters, envelopes, and modulators will help you take command of the synths and design your own sounds.
Some of these software instruments haven’t had their interfaces updated since Apple introduced hardware Retina displays, which are capable of extremely smooth and crisp graphics. The consequence is fuzzy graphics with controls and text that can be difficult to read. At the top right of the software instrument is a View pop-up menu that can change the size of the window. If you’re having trouble seeing something, make the window bigger.
Logic Pro X: The ES2 hybrid synth
The ES2 is like a combined EFM1 and ES1 synth plus another type of synthesis called wavetable synthesis. A wavetable is made up of many different waveforms that evolve from one to another or blend at once, creating complex digital sounds. Although the ES2 can produce sounds similar to the EFM1 and ES1, it shines at creating pads, sonic textures, and synthetic sounds that evolve over time.
![Logic Pro 신디사이저 탐색]()
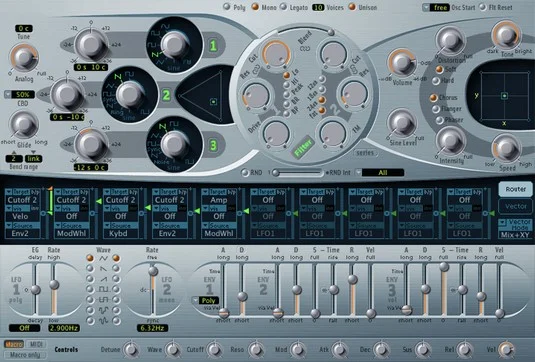
The ES2 hybrid synth.
Check out the the unique features of the ES2:
- Oscillator parameters: The three numbered oscillators on the upper-left side of the ES2 interface choose the basic sound. The triangle-shaped area to the right of the three oscillators blends them together.
- Filter parameters: The round section in the center of the ES2 adjusts the filters that shape your synth sound.
- Amplifier parameters: The top-right section contains the ES2 volume level. You can add a sine wave to the output section using the Sine Level knob.
- Effects parameters: To the right of the ES2 parameters are several built-in effects, including distortion and chorus, as well as a flanger and a phaser.
- Planar pad: The X/Y pad to the right of the amplifier parameters can control two parameters simultaneously. The planar pad parameters are chosen in the modulation router or vector envelope.
- Modulation router and vector envelope parameters: The dark-blue strip of the ES2 controls the modulation sources and targets as well as the vector envelope generator. You can toggle between the modulation router and vector envelope using the Router and Vector buttons on the right.
- Modulation parameters: Below the modulation router and vector envelope parameters are the modulation parameters. Adjust the two LFOs and three envelopes to modulate the ES2 modulation targets. You set the modulation sources and targets in the modulation router.
- Macro controls and controller assignment parameters: The bottom strip of buttons and knobs are where you set the macro controls and MIDI controller assignments. Click the Macro or MIDI button to toggle between the two types of controls. Click the Macro Only button to hide all ES2 parameters except the preprogrammed macro controls, which are useful when you went to adjust the ES2 sounds globally. The MIDI controller assignments allow you to map controls on your MIDI controller to parameters of the ES2.
- Global parameters: Found above the filter parameters and to the left of the oscillator parameters are the ES2 global parameters. You can tune the instrument, set the number of voices, adjust the portamento speed, and more.
The ES2 hybrid synth can be used in surround mode to pan your sound throughout the surround spectrum if you’re monitoring your Logic Pro project in surround sound. Logic Pro designers have seemingly thought of everything. To get to the surround parameters, click the disclosure triangle at the bottom of the ES2 interface to display the advanced parameters.
Logic Pro X: The ES E ensemble synth
The ES E synth is a lightweight, eight-voice subtractive synth. The E in its name stands for ensemble, and the ES E is great for warm pads such as analog brass and strings. Best of all, it’s much easier to program than the ES1 or ES2.
![Logic Pro 신디사이저 탐색]()
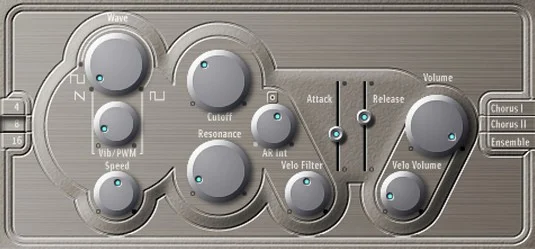
The ES E ensemble synth.
Here’s a description of the ES E parameters:
- Oscillator parameters: The left side of the ES E interface adjusts the oscillator parameters. Click the buttons on the far left to choose the octave of your sound. Rotate the Wave knob all the way to the left to generate a sawtooth wave, which is bright with strong odd and even harmonics and excels at generating rich pads. The rest of the wave range generates pulse waves, which are hollow sounding with strong odd harmonics and can create excellent reedy sounds such as woodwinds.
- LFO parameters: The knobs below the wave parameter adjust the LFO settings. The LFO modulates the oscillator waveform. Rotate the Vibrato/PWM (pulse wave modulation) knob to set the modulation intensity. Rotate the Speed knob to set the LFO speed.
- Filter parameters: To the right of the oscillator and LFO parameters are the low-pass filter parameters. A low-pass filter allows low frequencies to pass through while reducing the higher frequencies. Rotate the Cutoff knob to set the cutoff frequency, and rotate the Resonance knob to raise or lower the frequencies around the cutoff frequency. Rotate the Attack/Release Intensity knob to adjust how the envelope generator affects the filter. Rotate the Velocity Filter knob to adjust how velocity affects the filter.
- Envelope parameters: To the right of the filter parameters are the envelope parameters. Adjust the Attack and Release sliders to set the level of your sound over time. A low attack setting will result in a more immediate sound, and a higher setting will result in a slow fade up to the final volume. A high release setting will cause the sound to slowly fade when you release the key, and a lower setting will cause the sound to fade quickly.
- Output parameters: To the right of the envelope parameters are the output parameters. Rotate the Volume knob to adjust the overall ESE volume. Rotate the Velocity Volume knob to adjust the velocity sensitivity.
- Effects parameters: To the right of the envelope parameters, you can choose a built-in effect. Choose between Chorus I, Chorus II, and Ensemble to thicken your sound.
Logic Pro X: The ES M mono synth
The ES M is another lightweight subtractive synth. The M stands for mono, which means the ES M can play only one note at a time. Monophonic synths such as the ES M are perfect for bass and lead sounds. Like the ES E, the ES M is simple to program and features a stripped-down set of controls. Both the ES E and ES M are great instruments for learning the basics of synthesis.
![Logic Pro 신디사이저 탐색]()
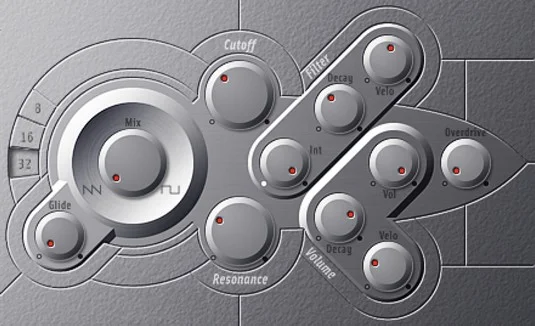
The ES M monophonic synth.
A description of the ES M parameters follows:
- Oscillator parameters: The left side of the ES M adjusts the oscillator parameters. Click the numbered buttons on the far left to choose the octave. Rotate the Mix knob all the way to the left to select a sawtooth wave and all the way to the right to select a rectangular wave. Rotate the Mix knob between the two positions to mix the sawtooth and rectangular waves. Rectangular waves, like pulse waves, are reedy and nasal and great for synth bass sounds. Rotate the Glide knob to adjust the speed of the portamento.
- Filter parameters: To the right of the oscillator parameters are the filter parameters. Rotate the Cutoff knob to adjust the cutoff frequency of the low-pass filter. Rotate the Resonance knob to boost or cut the frequencies around the cutoff frequency. Rotate the Filter Intensity knob to adjust how the envelope generator modulates the cutoff frequency. Rotate the Filter Decay knob to adjust the filter envelope decay time. Rotate the Filter Velocity knob to adjust how velocity affects the filter.
- Volume parameters: To the lower right of the filter parameters are the output parameters. Rotate the Volume knob to adjust the overall volume. Rotate the Volume Decay knob to adjust how the sound decays over time. Rotate the Volume Velocity knob to adjust how volume responds to velocity. Rotate the Overdrive knob to add distortion to your sound.
Click the disclosure triangle at the bottom of the interface to view the extended parameters. You can adjust the pitch bend amount and fine-tuning in this area.
Logic Pro X: The ES P poly synth
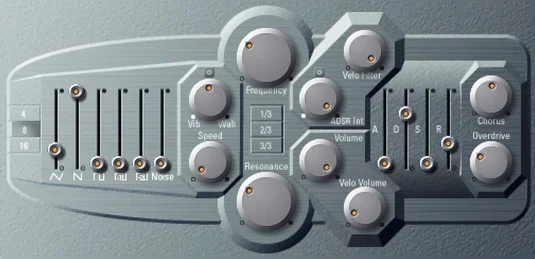
The ES P is another lightweight subtractive synth. The P stands for polyphonic; you can play eight voices at once. The ES P is modeled after classic 80s synths and does a great job of creating analog pads, bass, and brass sounds.
![Logic Pro 신디사이저 탐색]()
The ES P polyphonic synth.
Here’s a description of the ES P parameters:
- Oscillator parameters: The left side of the ES P adjusts the oscillator parameters. Click the numbered buttons to choose the octave. The Oscillator sliders are used to mix the six oscillators. From left to right, you can set the level of a triangle wave, sawtooth wave, rectangle wave, suboscillator -1 (one octave below), suboscillator -2 (two octaves below), and noise generator.
- LFO parameters: To the right of the oscillator parameters are the LFO parameters. Rotate the Vibrato/Wah knob to adjust the amount of vibrato or wah-wah effect. Rotate the Speed knob to adjust the speed of the vibrato or wah.
- 필터 매개변수: LFO 매개변수의 오른쪽에는 필터 매개변수가 있습니다. 주파수 노브를 돌려 저역 통과 필터의 차단 주파수를 설정합니다. Resonance 노브를 돌려 차단 주파수 주변의 주파수를 높이거나 낮춥니다. 피치가 차단 주파수 변조에 미치는 영향을 조정하려면 1/3, 2/3 또는 3/3 버튼을 클릭합니다. ADSR Intensity 노브를 돌려 엔벨로프 제너레이터가 차단 주파수 변조에 미치는 영향을 조정합니다. 벨로시티 필터 노브를 돌려 벨로시티가 필터에 미치는 영향을 설정합니다.
- 볼륨 매개변수: 필터 매개변수의 오른쪽 하단에는 볼륨 매개변수가 있습니다. 볼륨 노브를 돌려 전체 볼륨을 조정합니다. 벨로시티 볼륨 노브를 돌려 벨로시티가 볼륨에 미치는 영향을 조정합니다. 낮은 레벨은 벨로시티에 민감한 키보드가 없는 클래식 신디사이저를 모방합니다. 키를 더 세게 치면 레벨이 높을수록 음을 더 크게 만듭니다.
- 엔벨로프 매개변수: 볼륨 매개변수의 오른쪽에는 엔벨로프 매개변수가 있습니다. 어택, 디케이, 서스테인 및 릴리스 파라미터(ADSR)를 조정하여 ES P 엔벨로프를 조정합니다.
- 효과 매개변수: 엔벨로프 매개변수의 오른쪽에는 효과 매개변수가 있습니다. 코러스 노브를 오른쪽으로 돌려 코러스를 추가하고 사운드를 두껍게 만듭니다. 오버드라이브 노브를 오른쪽으로 돌려 왜곡을 추가하십시오.
Logic Pro X: EVOC 20 폴리 신디 보코더
EVOC 20 폴리 신디사이저는 보코더와 20보이스 신디사이저입니다. 보코더 (음성 부호기)는 입력 오디오 신호, 일반적으로 음성을 받아, 하이브리드 음성 합성기를 생성 합성기에이 신호를 적용한다. 그러나 음성만 입력으로 사용할 수 있는 것은 아닙니다. 드럼 루프나 악기를 신디사이저에 입력하거나 입력 없이 신디사이저를 독립형 신디사이저로 실행할 수 있습니다.
![Logic Pro 신디사이저 탐색]()
EVOC 20 보코더 신디사이저.
EVOC 20 PS를 클래식 보코더로 사용하려면 다음을 수행하십시오.
EVOC 20 PS 플러그인 헤더의 사이드 체인 메뉴에서 입력 소스를 선택합니다.
소스는 라이브 입력, 오디오 트랙 또는 버스일 수 있습니다. 클래식 보코더 효과는 라이브 입력 또는 사전 녹음된 보컬 트랙을 사용합니다.
EVOC 20 PS의 출력만 들을 수 있도록 입력 소스를 음소거합니다.
입력 소스와 동시에 MIDI 컨트롤러를 재생합니다.
EVOC 20 PS는 입력 소스를 합성합니다.
다음은 몇 가지 중요한 EVOC 20 PS 매개변수에 대한 간략한 설명입니다.
- 측쇄 분석 매개변수: EVOC 20 PS의 왼쪽 상단 영역은 측쇄 매개변수를 조정합니다. Attack 노브를 돌려 신디사이저가 입력 신호의 시작 부분에 반응하는 속도를 설정합니다. 릴리스 노브를 돌려 신디사이저가 입력 신호의 끝에 반응하는 속도를 조정합니다. 현재 입력 신호를 무기한 유지하려면 고정 버튼을 클릭합니다.
- U/V 감지 매개변수: EVOC 20 PS의 오른쪽은 U/V(무성음/음성) 감지 매개변수를 조정합니다. 인간의 목소리는 모음과 같은 유성음과 파열음, 마찰음, 비음과 같은 무성음으로 구성됩니다. 감도 노브를 돌려 EVOC 20 PS가 유성 및 무성 입력 신호에 대한 감도를 조정합니다. 모드 필드를 클릭하여 무성음이 합성되는 방법을 선택합니다. 레벨 노브를 돌려 무성 콘텐츠의 볼륨을 조정합니다.
입력 소스가 고주파수 콘텐츠가 많은 일정한 볼륨인 경우 좋은 결과를 얻을 수 있습니다. 입력 소스의 볼륨이 너무 많이 변하지 않는지 확인하십시오. 입력 소스를 EQ하여 고주파수 콘텐츠를 증폭할 수도 있습니다.