Como exportar suas fotos do Adobe Lightroom Classic

Como exportar suas fotos do Adobe Lightroom Classic

Depois de processar suas fotos no Adobe Lightroom Classic (como um profissional!), Você está pronto para enviá-las para o mundo. Isso significa que é hora de exportar! A humilde caixa de diálogo Exportar é muito poderosa e, com um pouco de prática, você pode aproveitar tudo o que ela tem a oferecer.

Empregando um fluxo de trabalho de exportação

O Lightroom Classic (como você provavelmente já percebeu) é um aplicativo de fluxo de trabalho e, dentro do fluxo de trabalho maior de tirar fotos da entrada para a saída, existem muitos fluxos de trabalho menores dentro dos fluxos de trabalho. Exportar não é exceção. Aqui estão as etapas básicas:

Selecione as imagens que deseja exportar.

Inicie o comando Exportar.

Defina as configurações conforme necessário para atender às suas necessidades de saída.

(Opcional) Salve as configurações como uma predefinição para reutilização.

Etapa 1: Selecionar as imagens que deseja exportar

As fotos que você seleciona para exportação são determinadas pelas suas necessidades no momento. Você pode exportar imagens de qualquer módulo do Lightroom Classic, mas o módulo Biblioteca oferece maior acesso a todo o seu portfólio e exportar de lá geralmente faz mais sentido. Portanto, se você ainda não estiver lá, pressione G para pular para a visualização em grade da biblioteca. A partir daqui, você tem acesso a todas as suas pastas e coleções, bem como à barra Filtro da Biblioteca, o que significa que você pode seguir em frente e rastrear as imagens que deseja. (Vá em frente; não tenha pressa.)

Depois de localizar as imagens que deseja exportar, você pode selecioná-las por qualquer um dos seguintes métodos:

  • Pressionando Command + A (Ctrl + A para Windows) para selecionar todas as fotos dentro de uma pasta ou outro agrupamento de fotos.
  • Clicar na primeira imagem de uma série, segurar a tecla Shift e clicar na última imagem da série para selecionar todas as imagens intermediárias.
  • Segure a tecla Command (tecla Ctrl para Windows) e clique em cada imagem individualmente para fazer uma seleção não contígua.

Etapa 2: Iniciando o comando Exportar

Depois de selecionar as imagens, você pode iniciar uma exportação de qualquer módulo (exceto onde indicado) através dos seguintes meios:

  • Escolha Arquivo → Abre a caixa de diálogo Exportar.
  • Escolha Arquivo → Exportar com anterior. Ignora a caixa de diálogo Exportar e simplesmente exporta os arquivos selecionados usando as configurações da última exportação.
  • Escolha Arquivo  →  Exportar com predefinição  →  Selecionar predefinição. Permite selecionar uma predefinição e exportar sem configuração adicional da caixa de diálogo Exportar.
  • Pressione Command + Shift + E (Ctrl + Shift + E para Windows). Atalho de teclado que abre a caixa de diálogo Exportar.
  • Pressione Command + Option + Shift + E (Ctrl + Alt + Shift + E para Windows). Atalho de teclado para Exportar com Anterior.
  • Clique com o botão direito em uma foto selecionada e escolha uma das opções de exportação mencionadas anteriormente no menu contextual que aparece.
  • Clique no botão Exportar na parte inferior do painel esquerdo no módulo Biblioteca. Visível apenas no módulo Biblioteca, mas é útil.

Use os atalhos do teclado em seu fluxo de trabalho de exportação assim que possível. Eles serão uma segunda natureza antes que você perceba e economizam muito tempo.

Etapa 3: definir as configurações para atender às suas necessidades de saída

A primeira escolha que você fará é se planeja exportar para o seu disco rígido, para um gravador de CD / DVD (se você ainda tiver um!), Um e-mail ou algum plug-in de exportação instalado. Sua escolha mais comum será o disco rígido. A partir daí, você configura todos os painéis relativos à escolha que você fez. Embora painéis adicionais apareçam com diferentes plug-ins de exportação, eles são muito específicos e variados para serem cobertos aqui; Eu me concentro apenas nos painéis que vêm com o disco rígido, pois isso cobre a maioria das opções.

O PAINEL DE LOCALIZAÇÃO DE EXPORTAÇÃO

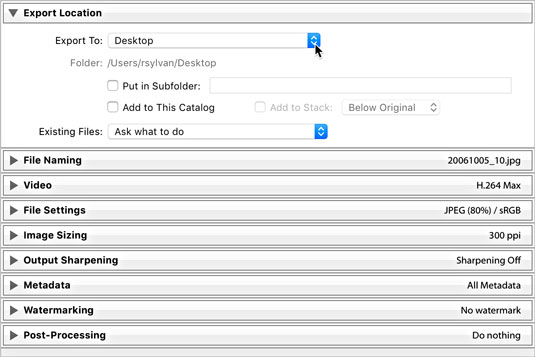
O painel Local de exportação, mostrado aqui, é usado para configurar onde você deseja salvar um lote de cópias em seu disco rígido. Mesmo se você finalmente gravar essas cópias em DVD ou transferi-las para outro aplicativo, o Lightroom Classic primeiro precisa salvar as cópias em seu disco rígido.

Como exportar suas fotos do Adobe Lightroom Classic

O painel Local de exportação se expandiu.

O local onde você escolhe salvar os arquivos é conduzido por dois fatores: como você gerencia seus arquivos e o que você determina que sua saída precisa ser. O menu suspenso Exportar para fornece algumas opções para designar um local:

  • Pasta específica: ao selecionar esta opção, você pode apontar o Lightroom Classic para qualquer pasta em seu disco. Apenas certifique-se de que haja espaço livre suficiente para armazenar todas as novas cópias. Clique no botão Escolher e navegue até a pasta que deseja usar.
  • Mesma pasta da foto original: esta opção faz exatamente o que descreve, que é colocar as cópias exportadas de volta na mesma pasta do original.
  • Escolher pasta mais tarde: esta opção é útil quando você está criando predefinições e não deseja codificar um local específico na predefinição. Quando você usa uma predefinição, o Lightroom Classic solicita que você forneça um local.
  • Localizações do usuário: abaixo dessas opções estará uma lista de localizações comuns do usuário, como as pastas Área de Trabalho, Documentos, Casa, Filmes e Imagens para facilitar a seleção.

Depois de escolher o local para a exportação, você tem algumas opções adicionais a considerar:

  • Colocar na subpasta: esta opção permite criar uma subpasta dentro do local de exportação designado. Marque a caixa e insira um nome para a subpasta no campo de texto correspondente.
  • Adicionar a este catálogo: pense nisso como uma opção de importação automática. Depois que suas cópias são exportadas, elas aparecem dentro do Lightroom Classic sem que você precise acessar a caixa de diálogo Importar.
  • Adicionar à pilha: o empilhamento é uma função que permite organizar grupos de fotos em uma única miniatura para fins organizacionais. Esta opção está disponível apenas quando você está exportando cópias de volta para a mesma pasta exata que os originais (e não colocando-as em uma subpasta). Quando marcada, as fotos exportadas aparecem empilhadas com as fotos de origem quando você visualiza essa pasta no Lightroom Classic.

Because you may export photos into a folder that already contains other photos, you must tell Lightroom Classic how to handle situations where your exported copies have the same name and are the same file type as the existing photos. You have four options under the Existing Files drop-down menu:

  • Ask What to Do: This option is the safest option and the one recommended. If such a situation occurs, Lightroom Classic prompts you for further instructions and then you choose one of the other three options.
  • Choose a New Name for the Exported File: In this case, Lightroom Classic simply appends a new sequence number to the end of the exported file, so you end up with two copies of the same file but with unique names.
  • Overwrite WITHOUT WARNING: Does what it says (and it even uses all caps in the drop-down menu). Only choose this option if you are really sure it is what you want to do. Note that Lightroom Classic does not allow you to overwrite the source photos, so don’t choose this option thinking you can export copies with Lightroom Classic adjustments and save over the existing source files — it won’t work.
  • Skip: If you choose this option, no new copy is created (that is, Lightroom Classic skips the file) when an existing file with the same filename is encountered.

THE FILE NAMING PANEL

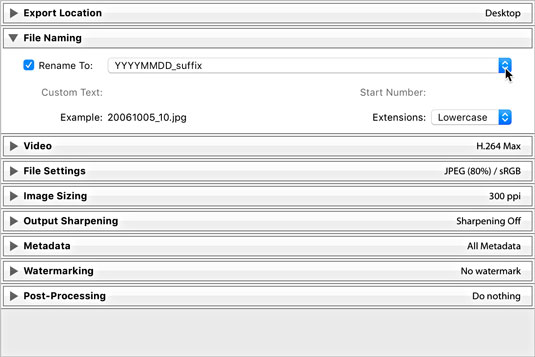
In many cases, you’ll want to maintain name consistency between your source files and your exported copies. By simply choosing the Filename template, you can achieve just that. Other times, you may want to use custom names that are completely different or perhaps some variation of the original name, as shown. In any case, because you’re always creating copies, you must tell Lightroom Classic how you want them named, and just as when you use the Import command or rename files in the Library module, Lightroom Classic uses filename templates to do it.

Como exportar suas fotos do Adobe Lightroom Classic

The File Naming panel.

Click the Template drop-down list and choose one of the installed templates, or you can click Edit and create a custom filename template using the good old Filename Template Editor.

THE VIDEO PANEL

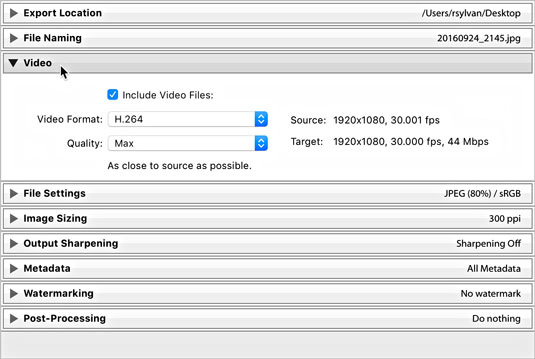
If you have a video file selected for export, you need to check the Include Video Files check box to access the (limited) format options for video, as shown.

  • DPX: A lossless format suited for sending to professional video editing tools (like Adobe Premiere). Choose this only if you know it is required.
  • 264: Good for exporting compressed video files for viewing and sharing. A description of each quality setting appears under it when selected.
  • Original, unedited file: Produces an exact copy of the original.

Como exportar suas fotos do Adobe Lightroom Classic

The video panel expanded.

THE FILE SETTINGS PANEL

Choose your file format based on your output needs (such as choosing JPEG for photos going on a website). Some formats require additional settings. Here’s a list of the formats and their options:

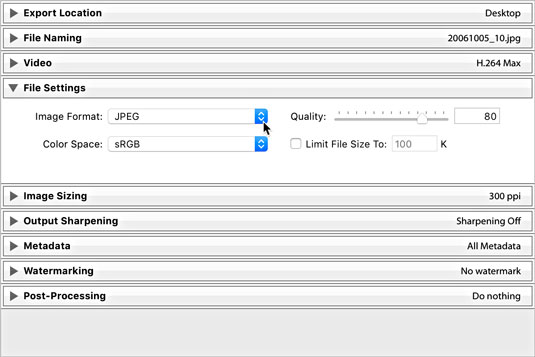
  • JPEG: When you choose the JPEG (or JPG) format, you also need to choose the level of compression to be applied to each JPEG file. You make this selection by using the Quality slider, as shown in the following figure. The higher the quality value, the less compression — and the larger the file size. JPEG compression is always a tradeoff between file size and image quality. If you’re not too concerned about file size, leave it set around 90. The Limit File Size To option is useful if you need to achieve a specific file size in bytes, but keep in mind that you may need to also reduce the pixel dimensions when exporting large files.
  • PSD: PSD is Photoshop’s native file format. You can choose between 8- and 16-bit.
  • TIFF: TIFF is a widely supported format. Use the panel’s Compression drop-down list to pick one of the lossless compression options. “None” is pretty straightforward; ZIP and LZW reduce the file size, but the length of time to open and close the file increases. (Note that not all image editors can open compressed TIFF files. Also note that only the ZIP compression option is available with 16-bit files.) If your photo contains transparent pixels and you want to keep them in the exported copy, check the Save Transparency box.
  • DNG: This is Adobe’s open format for raw (unprocessed by the camera) photos. Note that the Use Lossy Compression option is occasionally useful for situations in which you want to keep the exported copy as a DNG file while also reducing its pixel dimensions by using the options in the Image Sizing panel.
  • Original: Selecting Original from the drop-down list results in the creation of an exact copy of your source image. (Raw and DNG photos will include Lightroom Classic edits in the photo’s XMP metadata.) No additional file settings are available with this option.

Como exportar suas fotos do Adobe Lightroom Classic

The File Settings panel expanded to show JPEG format and Quality slider.

Two additional options, which appear only when you choose JPEG, TIFF, and PSD formats, warrant a separate discussion. (Raw files are always 16-bit and don’t have a color space.)

  • Color Space: A photo’s color space is what determines the range of possible colors it can contain. You need to decide what color space you want these copies converted into during the export process. Your choice of color space is determined by the reason you are exporting these copies to begin with and where they will be used. Here’s a look at your choices:
    • sRGB: This color space contains the narrowest range of colors and is the standard for exporting photos destined for the web. It’s also used by some print services.
    • AdobeRGB (1998): Contains a wider range of colors than sRGB and is most often used when additional editing or printing is the next destination for your files.
    • ProPhoto RGB: Contains the widest range of colors and should only be used with 16-bit files. (I discuss bit depth in the next boldfaced bullet.) This is the best option when you want to retain all the color information that was in your source files. Not recommended when delivering copies destined for the web or anyone not used to working with ProPhoto color space.
    • Other: While the previous three options are the most common, there may also be advanced situations where you need to convert your files to a custom color space for printing purposes. Consult your print service to see whether it provides or requires custom profiles, and it will help you get them installed. By choosing Other, you’ll be taken to the Choose Profiles dialog, where you can select a color profile.
  • Bit Depth: Bit depth determines the amount of data a file contains. The higher the bit depth, the more data is contained in the file (which also means its file size is going to be larger too). If you’re working with raw files, you’re working with 16-bit files. If you’re working with JPEG files, you’re working with 8-bit files. During export, you have the option of saving PSD and TIFF files as 16-bit. If you choose JPG, bit depth is grayed out, but know that JPEGs are all 8-bit by default. Saving files in 16-bit only makes sense when both the source files were originally 16-bit and when the output needs require this original data (such as when you plan to archive the exported copies to DVD or edit them in some other image editor). In all other situations, 8-bit is the more common choice.

THE IMAGE SIZING PANEL

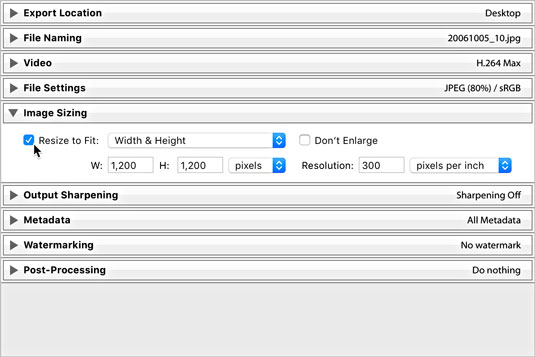
Sometimes, you need to save your exported copies in a different size from the source photos, such as when you want to email them or put them in a web page. To do so, you use options in the Image Sizing panel (see the following figure). Lightroom Classic can make the exported images smaller or larger than the original images — a process known as resampling. The six options for resizing your exports are

  • Width & Height: The values entered for width and height define the maximum amount each side can be resized to fit while maintaining original aspect ratio.
  • Dimensions: This option resizes exported images to fit within the entered dimensions while maintaining aspect ratio. When this option is selected, height and width are no longer associated with the values fields. You just enter the maximum dimensions you want the images resized to fit, and Lightroom Classic does the rest regardless of orientation.
  • Megapixels: If you need to resize to a specific total number of pixels (width times height), this is your option.
  • Long Edge and Shortest Edge: These options function in the same manner. You set the maximum value for the edge in question, and Lightroom Classic resizes all images to fit.
  • Percentage: This option is useful when you want to create exported copies that are a certain percentage smaller than the original.

Como exportar suas fotos do Adobe Lightroom Classic

The Image Sizing panel.

Check the Don’t Enlarge box to prevent an image from being resampled larger than its original pixel dimensions. (This option is grayed out when Resize to Fit is unchecked.)

If your output needs require your photos to print at a specific size and at a specific number of pixels per inch (PPI), you can set its resolution value — the metadata tag used by software to determine how big the printed file appears. For example, the value of 300 PPI is commonly requested by print services, in which case you would enter 300 and choose pixels per inch. 300 PPI is always a safe choice, but if your photos are destined for the web only, this value is meaningless and can be ignored.

THE OUTPUT SHARPENING PANEL

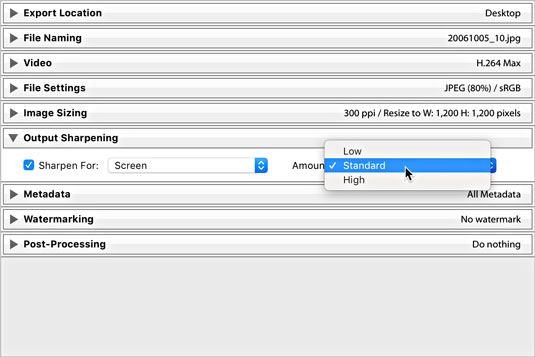
I love having the ability to add sharpening tailored for the specific output destination as part of the export process. The Output Sharpening panel, shown in the following figure, is where you choose and configure your output sharpening settings. The possible output settings are defined as

  • Screen: Use this option when your photo’s final viewing destination will be on a computer screen (that is, on a web page).
  • Matte Paper: Use this option when you’re sending your photos to be printed on a type of photo paper that has a matte (non-shiny) finish.
  • Glossy Paper: Use this option when you’re sending your photos to be printed on a type of photo paper that has a glossy (shiny) finish.

Como exportar suas fotos do Adobe Lightroom Classic

The Output Sharpening panel.

After you identify the output you are sharpening for, you can set the amount of sharpening to apply; your choices here range from Low (almost none) to High (often too much), with Standard in the middle (just right).

THE METADATA PANEL

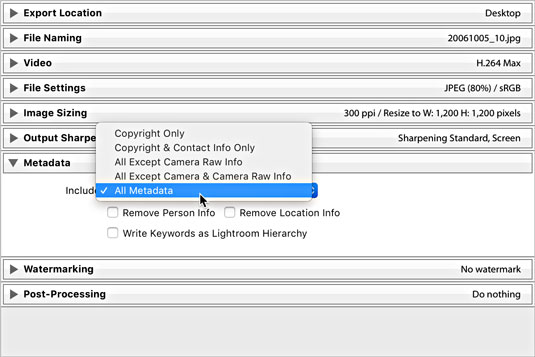
The Metadata panel, shown in the following figure, allows you some level of control over what metadata is included in the exported copies. Clicking the Include drop-down menu offers the following options:

  • Copyright Only: Only the metadata entered into the Copyright field of the Metadata panel is applied to copies.
  • Copyright & Contact Info Only: This is the same as the above option with the inclusion of any contact information you applied via the Metadata panel (or a metadata template).
  • All Except Camera Raw Info: Camera Raw Info means the actual slider values dialed into Lightroom Classic, written as part of the metadata (the adjustments themselves are applied to the pixels regardless of any of these settings). So, this option builds on the above option and then includes all other metadata except the slider values (Camera Raw Info).
  • All Except Camera & Camera Raw Info: This does everything that the previous option but leaves out the camera-generated EXIF metadata and the Camera Raw Info.
  • All Metadata: Nothing is left out. All EXIF metadata created by camera, plus everything added in Lightroom Classic, is applied to copies.

Como exportar suas fotos do Adobe Lightroom Classic

The Metadata panel expanded.

Th Metadata panel has three additional check boxes:

  • Remove Person Info: If you used People view to tag photos with the names of the people shown, you can check this box to avoid writing that information into the metadata of the exported copies.
  • Remove Location Info: If your photos have GPS information in them, you can check this box to avoid writing that information into the metadata of exported copies.
  • Write Keywords as Lightroom Hierarchy: Keywords are the descriptive terms you assign to your photos in the Library module. When you enable this option, and \ use keywords with parent/child relationships (meaning that the keywords are in a hierarchical structure), the exported copies retain that same keyword structure. This feature is useful for photos that will be imported into another Lightroom Classic catalog or managed with Adobe Bridge.

THE WATERMARKING PANEL

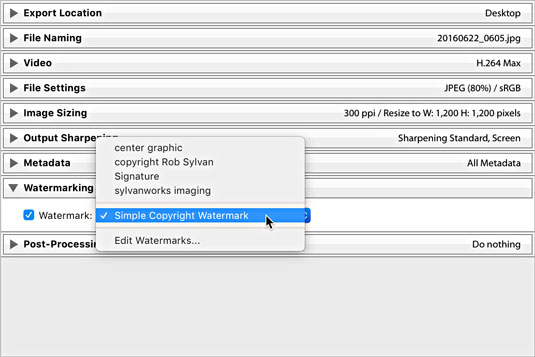
You can apply one of three types of watermarks to exported copies. Check the Watermark box to enable the drop-down choices. The most basic is the Simple Copyright Watermark, which pulls the information from the Copyright field of each file’s metadata and renders it as a watermark in the lower-left corner of each exported copy. This type of watermark has no configuration options.

Como exportar suas fotos do Adobe Lightroom Classic

The Watermarking options.

For greater control, choose Edit Watermarks to enter the Watermark Editor, where you can create either a text-based or graphical watermark with more control and save it as a preset for easy reuse.

THE POST-PROCESSING PANEL

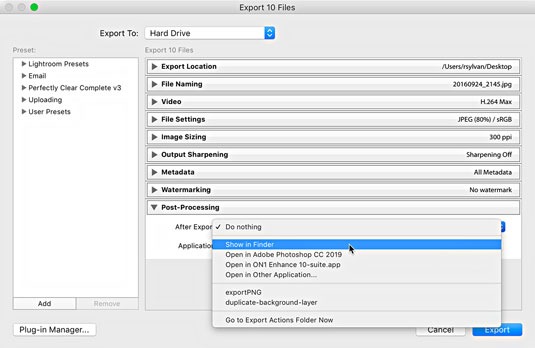
This is an optional panel, but it can provide a nice productivity boost to your output when you know your photos are going to be opened in some other application after they have been created (such as for additional image editing or viewing in your file browser). The Post-Processing panel (with the After Export drop-down list expanded) is shown in the following figure.

With the help of the options in this panel, you can tell Lightroom Classic to hand off your exported images to another application — in effect, having Lightroom Classic perform what is commonly referred to as an “export action” on your photos. The After Export drop-down list includes the following preinstalled options:

  • Show in Finder (Show in Explorer for Windows): Automatically opens the folder containing the exported images in your file browser.
  • Open in Photoshop: If you have Photoshop installed, you have the option to open the exported images in Photoshop after they’re saved to the export location.
  • Open in Additional Editor: If you configured an additional external editor you see it listed here as an option.
  • Open in Other Application: Selecting this option gives you the opportunity to designate another application (such as an email client, an alternative image editor, or an FTP client) that will be invoked at the end of the export. Lightroom Classic attempts to open the exported photos in that application; just keep in mind that not every application can accept images this way. Click the Choose button and navigate to the application you want to send your photos to.

Como exportar suas fotos do Adobe Lightroom Classic

Post-Processing panel expanded to show After Export options.

At the bottom of the After Export drop-down list is the Go to Export Actions Folder Now command. Selecting this option opens Finder (or Windows Explorer for Windows) with Lightroom Classic’s Export Actions folder selected. You can place either an executable file or an alias (shortcut for Windows) to an executable file in the Export Actions folder to include it as an option in the After Export drop-down list the next time you start Lightroom Classic. This is another way to set things up so you can send your photos to a specific program or a Photoshop droplet with one quick command.

“What’s a droplet?” you say. A droplet is a Photoshop action that you manage to turn (with Photoshop’s help) into a tiny executable file. After you create a droplet, you can literally drag and drop photos on top of it to run the photos through the action automatically — a really powerful way to run a batch of images through a favorite action, such as applying a specific Photoshop filter, converting to an alternative color space, or applying a custom watermark. By including the droplet as an export action, Lightroom Classic automatically runs the exported copies through the droplet after they are created.

Saving export settings as a preset for reuse

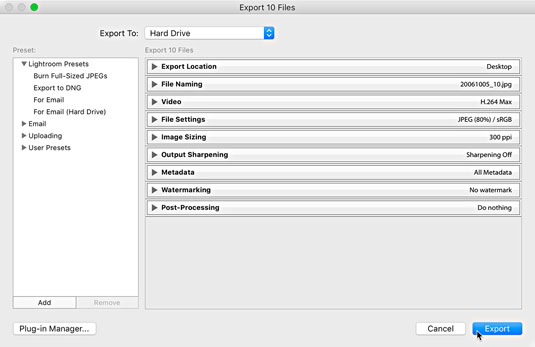
As predefinições economizam muito tempo! Basta pensar sobre isso - você pode salvar scads de configurações comumente usadas e, em seguida, acessá-los a qualquer momento que quiser diretamente do menu Exportar com Predefinição (escolha Arquivo → Exportar com Predefinição). Doce!

Consulte a figura a seguir para ver o painel Predefinições - está lá no lado esquerdo.

Como exportar suas fotos do Adobe Lightroom Classic

A caixa de diálogo Exportar.

Você obtém quatro predefinições pré-instaladas para começar, logo abaixo do título Predefinições clássicas do Lightroom - predefinições que não podem ser descartadas ou atualizadas, a propósito. Eles estão

  • Gravar JPEGs de tamanho total: define JPG como o formato de arquivo com a menor compactação e sem redimensionamento e, em seguida, adiciona a gravação das imagens exportadas em um disco como uma etapa Após a exportação.
  • Exportar para DNG: define DNG como formato de arquivo, o que essencialmente significa que você está configurado para converter para DNG na exportação. Observe que usar esta predefinição faz sentido apenas quando os arquivos de origem estão no formato bruto.
  • Para e-mail: define JPG como o formato de arquivo com compactação JPG definida como 60 e redimensiona todas as imagens para caber em 500 x 500 pixels. Esta opção informa ao Lightroom Classic para passar as cópias exportadas para o seu cliente de e-mail padrão ao exportá-las.
  • Para e-mail (disco rígido): Define JPG como o formato de arquivo com compactação JPG definida para 50 e redimensiona todas as imagens para caber em 640 x 640 pixels. Observe que esta predefinição não passa os arquivos para o seu cliente de e-mail; ele apenas configura a exportação para um tamanho amigável para e-mail e os salva em um local de sua escolha no disco rígido.

As predefinições pré-instaladas não são incrivelmente sofisticadas, mas podem ser bons pontos de partida e podem ajudá-lo a ver as possibilidades. Por exemplo, se você gosta de enviar fotos por e-mail para amigos e familiares, pode usar a predefinição Para e-mail como ponto de partida e personalizá-la de acordo com sua preferência. Veja como fazer isso:

Clique na predefinição Para e-mail para carregar suas configurações na caixa de diálogo Exportar.

Expanda o painel Configurações do arquivo.
Se você preferir uma configuração de qualidade mais alta, defina como 70.

Expanda o painel Tamanho da imagem.
Se você preferir uma dimensão de pixel maior, defina como 1000 pixels.

Expanda o painel Nitidez de saída.
Marque a caixa Nitidez para e selecione Tela em um valor padrão.

Deixe as configurações nos painéis restantes como estão.

Clique no botão Adicionar na parte inferior esquerda do painel Predefinições.
Isso abre a caixa de diálogo Nova predefinição.

Insira um nome descritivo no campo Preset Name.

(Opcional) Crie uma nova pasta no processo de salvar sua predefinição.

Você pode clicar na lista suspensa Pasta e escolher uma pasta predefinida existente ou criar uma nova.

Clique no botão Criar para concluir o processo e adicionar a predefinição ao painel Predefinição.

Você pode excluir predefinições e pastas personalizadas realçando-as e clicando no botão Remover. Observe, entretanto, que remover uma pasta exclui todas as predefinições dentro dela!

Você pode atualizar predefinições personalizadas com novas configurações ajustando as configurações como desejar, clicando com o botão direito na predefinição e, em seguida, escolhendo Atualizar com as configurações atuais.


Captura de tela uma seção de um arquivo PDF

Captura de tela uma seção de um arquivo PDF

Você pode usar a ferramenta Snapshot no Adobe Acrobat CS5 para selecionar texto e imagens e criar uma imagem de uma determinada área em um arquivo PDF. O resultado é comumente referido como uma captura de tela de uma seção em um arquivo PDF. O resultado é uma imagem, e seu texto não é [...]

Medindo, contando e analisando pixels no Photoshop CC

Medindo, contando e analisando pixels no Photoshop CC

Projetado para pesquisadores e cientistas, os recursos de medição do Photoshop CC são bastante poderosos. Você pode medir qualquer coisa e contar o número de qualquer coisa em uma imagem técnica, talvez de um microscópio ou telescópio. Se você sabe o tamanho exato de qualquer elemento em uma imagem, você pode descobrir quase tudo [...]

As ferramentas Liquify no Adobe CS5 Illustrator

As ferramentas Liquify no Adobe CS5 Illustrator

Ao usar as ferramentas Liquify no Adobe Creative Suite 5 (Adobe CS5) Illustrator, você pode dobrar objetos - torná-los ondulados, pegajosos ou pontiagudos - criando distorções simples a complexas. As ferramentas Liquify podem realizar todos os tipos de distorções criativas ou malucas (dependendo de como você as encara) em seus objetos. Vocês […]

Como ajustar as propriedades do texto no Adobe XD

Como ajustar as propriedades do texto no Adobe XD

Quando você tem texto em seu projeto Adobe XD, pode começar a alterar as propriedades do texto. Essas propriedades incluem Família da fonte, Tamanho da fonte, Peso da fonte, Alinhamento, Espaçamento entre caracteres (kerning e rastreamento), Espaçamento entre linhas (entrelinha), Preenchimento, Borda (traço), Sombra (sombra) e Desfoque de fundo. Então, vamos revisar como essas propriedades são aplicadas. Sobre legibilidade e fonte [...]

Como criar códigos QR no InDesign CC

Como criar códigos QR no InDesign CC

Você pode usar o InDesign para criar e modificar gráficos de código QR. Os códigos QR são uma forma de código de barras que pode armazenar informações como palavras, números, URLs ou outras formas de dados. A usuária escaneia o código QR usando sua câmera e software em um dispositivo, como um smartphone, e o software faz uso [...]

Trabalhando com pranchetas no Photoshop CC
Trabalhando com pranchetas no Photoshop CC

Assim como no Adobe Illustrator, as pranchetas do Photoshop oferecem a capacidade de criar páginas ou telas separadas em um documento. Isso pode ser especialmente útil se você estiver criando telas para um aplicativo móvel ou um pequeno folheto. Você pode pensar em uma prancheta como um tipo especial de grupo de camadas criado com o painel Camadas. Seu […]

Quebrar texto em Adobe Illustrator CC

Quebrar texto em Adobe Illustrator CC

Empacotar texto no Adobe Illustrator CC não é exatamente o mesmo que embrulhar um presente - é mais fácil! Uma quebra automática de texto força o texto a envolver um gráfico, conforme mostrado nesta figura. Esse recurso pode adicionar um pouco de criatividade a qualquer peça. O gráfico está forçando o texto a envolvê-lo. Primeiro, crie [...]


Como redimensionar formas no Illustrator

Como redimensionar formas no Illustrator

Ao projetar no Adobe Illustrator CC, geralmente você precisa que uma forma tenha um tamanho exato (por exemplo, 2 x 3 polegadas). Depois de criar uma forma, a melhor maneira de redimensioná-la para medidas exatas é usar o painel Transformar, mostrado nesta figura. Selecione o objeto e escolha Janela → Transformar para […]

Como aplicar transparência a SVGs

Como aplicar transparência a SVGs

Aprenda como aplicar transparência a gráficos SVG no Illustrator. Explore como gerar SVGs com fundos transparentes e aplicar efeitos de transparência.

Trabalho com imagens no Adobe XD

Trabalho com imagens no Adobe XD

Depois de importar suas imagens para o Adobe XD, você não tem muito controle de edição, mas pode redimensionar e girar as imagens como faria com qualquer outra forma. Você também pode arredondar facilmente os cantos de uma imagem importada usando os widgets de canto. Mascarando suas imagens, definindo uma forma fechada [...]