當你處理你的照片在Adobe的Lightroom經典(像親!),你準備送他們外面的世界。這意味著現在是出口時間!簡陋的導出對話框具有強大的功能,只需稍加練習,您就可以利用它提供的所有功能。
使用導出工作流
Lightroom Classic(您現在可能已經知道了)是一個工作流應用程序,在將照片從輸入拍攝到輸出的較大工作流中,工作流中存在許多較小的工作流。出口也不例外。以下是基本步驟:
選擇要導出的圖像。
啟動導出命令。
根據需要配置設置以滿足您的輸出需求。
(可選)將設置保存為預設以供重複使用。
第 1 步:選擇要導出的圖像
您選擇導出的照片由您當時的需求決定。您可以從任何 Lightroom Classic 模塊中導出圖像,但庫模塊為您提供了對整個投資組合的最大訪問權限,並且從那裡導出通常最有意義。因此,如果您還沒有在那裡,請按 G 跳到圖書館的網格視圖。從這裡,您可以訪問所有文件夾和收藏夾,以及庫過濾器欄,這意味著您可以繼續跟踪所需的圖像。(繼續;慢慢來。)
找到要導出的圖像後,可以通過以下任一方法進行選擇:
- 按 Command +A(Windows 為 Ctrl+A)可選擇文件夾或其他照片組中的所有照片。
- 單擊系列中的第一個圖像,按住 Shift 鍵,然後單擊系列中的最後一個圖像以選擇中間的所有圖像。
- 按住 Command 鍵(Windows 為 Ctrl 鍵)並單獨單擊每個圖像以進行非連續選擇。
步驟 2:啟動導出命令
選擇圖像後,您可以通過以下方式從任何模塊(除非另有說明)啟動導出:
- 選擇文件→啟動導出對話框。
- 選擇“文件”→“使用上一個導出”。跳過“導出”對話框並使用上次導出的設置簡單地導出所選文件。
- 選擇文件 → 使用預設導出 → 選擇預設。允許您選擇預設並導出,而無需額外配置“導出”對話框。
- 按 Command +Shift+E(對於 Windows,Ctrl+Shift+E)。啟動導出對話框的鍵盤快捷鍵。
- 按 Command +Option+Shift+E(對於 Windows,Ctrl+Alt+Shift+E)。使用上一個導出的鍵盤快捷鍵。
- 右鍵單擊選定的照片,然後從出現的上下文菜單中選擇前面提到的導出選項之一。
- 單擊庫模塊左側面板底部的導出按鈕。僅在庫模塊中可見,但派上用場。
盡快並儘可能頻繁地在導出工作流程中使用鍵盤快捷鍵。在您意識到之前,它們將成為第二天性,而且它們非常節省時間。
步驟 3:配置設置以滿足您的輸出需求
您要做的第一個選擇是,您是否打算導出到硬盤驅動器、CD/DVD 刻錄機(如果您還有一個!)、電子郵件或已安裝的某些導出插件。您最常見的選擇是硬盤。從那裡,您可以配置與您所做的選擇相關的所有面板。雖然額外的面板會隨不同的導出插件一起出現,但它們過於具體和多樣,無法在此涵蓋;我只關注硬盤驅動器附帶的面板,因為它涵蓋了大多數選項。
出口位置面板
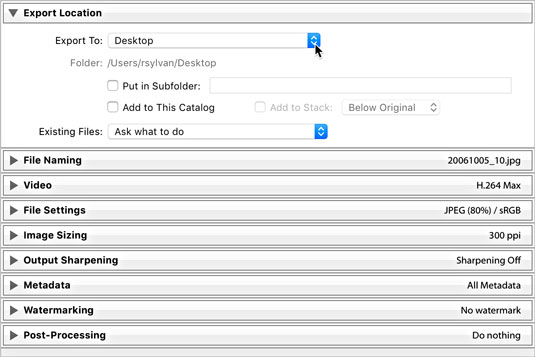
此處顯示的“導出位置”面板用於配置要在硬盤驅動器上保存一批副本的位置。即使您最終將這些副本刻錄到 DVD 或將它們交給另一個應用程序,Lightroom Classic 首先需要將副本保存到您的硬盤驅動器。

“導出位置”面板展開。
您選擇保存文件的位置由兩個因素決定:您如何管理您的文件以及您確定您的輸出需要是什麼。導出到下拉菜單提供了幾個用於指定位置的選項:
- 特定文件夾:選擇此選項後,您可以將 Lightroom Classic 指向磁盤上的任何文件夾。只要確保它有足夠的可用空間來保存所有新副本。單擊“選擇”按鈕並導航到要使用的文件夾。
- 與原始照片相同的文件夾:此選項完全符合它的描述,即將導出的副本放回與原始照片相同的文件夾中。
- 稍後選擇文件夾:當您創建預設並且不想將特定位置硬編碼到預設中時,此選項很有用。當您使用預設時,Lightroom Classic 會提示您提供一個位置。
- 用戶位置:這些選項下方將列出常見用戶位置,例如桌面、文檔、主頁、電影和圖片文件夾,以便於選擇。
選擇導出位置後,您還有一些其他選項需要考慮:
- 放入子文件夾:此選項允許您在指定的導出位置創建子文件夾。選中該框並在相應的文本字段中輸入子文件夾的名稱。
- 添加到此目錄:將此視為自動導入選項。導出副本後,它們會顯示在 Lightroom Classic 中,您無需通過“導入”對話框。
- 添加到堆棧: 堆棧是一項功能,允許您出於組織目的在單個縮略圖下排列照片組。此選項僅在您將副本導出回與原件完全相同的文件夾時才可用(而不是將它們放在子文件夾中)。選中後,當您在 Lightroom Classic 中查看該文件夾時,導出的照片會與源照片堆疊在一起。
由於您可能將照片導出到已經包含其他照片的文件夾中,因此您必須告訴 Lightroom Classic 如何處理導出的副本與現有照片具有相同名稱和相同文件類型的情況。在現有文件下拉菜單下有四個選項:
- 詢問該做什麼:此選項是最安全的選項,也是推薦的選項。如果發生這種情況,Lightroom Classic 會提示您提供進一步的說明,然後您選擇其他三個選項之一。
- 為導出的文件選擇一個新名稱:在這種情況下,Lightroom Classic 只是在導出文件的末尾附加一個新的序列號,因此您最終會得到相同文件的兩個副本,但名稱是唯一的。
- 無警告覆蓋:按照它說的做(它甚至使用下拉菜單中的所有大寫字母)。僅當您確實確定這是您想要執行的操作時才選擇此選項。請注意,Lightroom Classic 不允許您覆蓋源照片,因此不要選擇此選項,認為您可以使用 Lightroom Classic 調整導出副本並保存現有源文件 - 它不起作用。
- 跳過:如果選擇此選項,則在遇到具有相同文件名的現有文件時,不會創建新副本(即 Lightroom Classic 跳過該文件)。
文件命名面板
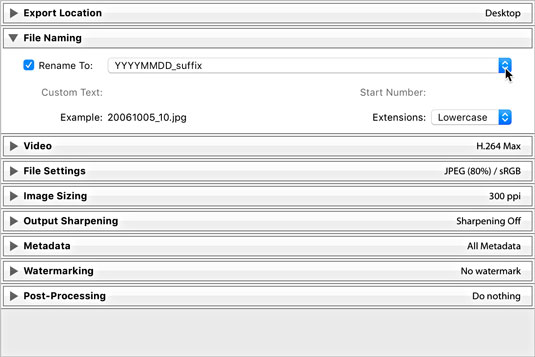
在許多情況下,您需要保持源文件和導出副本之間的名稱一致性。通過簡單地選擇文件名模板,您就可以實現這一點。其他時候,您可能希望使用與原始名稱完全不同的自定義名稱,或者可能是原始名稱的某些變體,如圖所示。在任何情況下,因為您總是在創建副本,所以您必須告訴 Lightroom Classic 您希望它們如何命名,就像在庫模塊中使用導入命令或重命名文件一樣,Lightroom Classic 使用文件名模板來執行此操作。

文件命名面板。
單擊模板下拉列表並選擇已安裝的模板之一,或者您可以單擊編輯並使用舊的文件名模板編輯器創建自定義文件名模板。
視頻面板
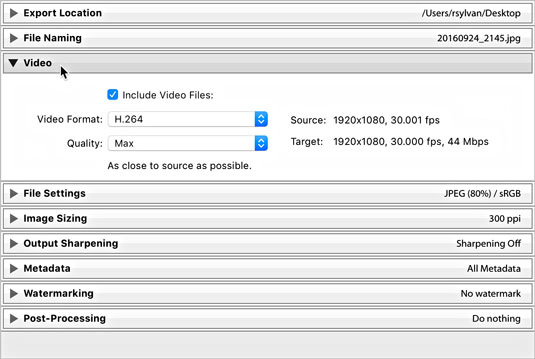
如果您選擇了要導出的視頻文件,則需要選中“包含視頻文件”複選框以訪問視頻的(有限)格式選項,如圖所示。
- DPX:適合發送到專業視頻編輯工具(如 Adobe Premiere)的無損格式。僅當您知道它是必需的時才選擇它。
- 264:適合導出用於查看和共享的壓縮視頻文件。選擇後,每個質量設置的描述都會出現在其下方。
- 原始、未經編輯的文件:生成原始文件的精確副本。

視頻面板展開。
文件設置面板
根據您的輸出需求選擇您的文件格式(例如為網站上的照片選擇 JPEG)。某些格式需要額外的設置。以下是格式及其選項的列表:
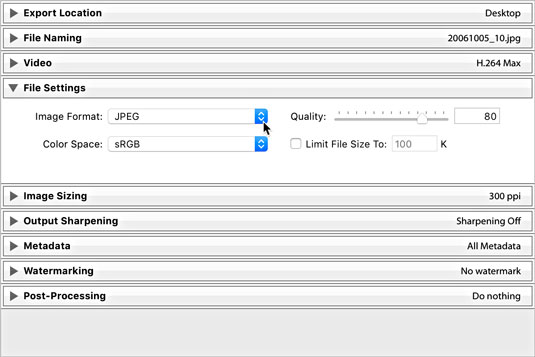
- JPEG: When you choose the JPEG (or JPG) format, you also need to choose the level of compression to be applied to each JPEG file. You make this selection by using the Quality slider, as shown in the following figure. The higher the quality value, the less compression — and the larger the file size. JPEG compression is always a tradeoff between file size and image quality. If you’re not too concerned about file size, leave it set around 90. The Limit File Size To option is useful if you need to achieve a specific file size in bytes, but keep in mind that you may need to also reduce the pixel dimensions when exporting large files.
- PSD: PSD is Photoshop’s native file format. You can choose between 8- and 16-bit.
- TIFF: TIFF is a widely supported format. Use the panel’s Compression drop-down list to pick one of the lossless compression options. “None” is pretty straightforward; ZIP and LZW reduce the file size, but the length of time to open and close the file increases. (Note that not all image editors can open compressed TIFF files. Also note that only the ZIP compression option is available with 16-bit files.) If your photo contains transparent pixels and you want to keep them in the exported copy, check the Save Transparency box.
- DNG: This is Adobe’s open format for raw (unprocessed by the camera) photos. Note that the Use Lossy Compression option is occasionally useful for situations in which you want to keep the exported copy as a DNG file while also reducing its pixel dimensions by using the options in the Image Sizing panel.
- Original: Selecting Original from the drop-down list results in the creation of an exact copy of your source image. (Raw and DNG photos will include Lightroom Classic edits in the photo’s XMP metadata.) No additional file settings are available with this option.

The File Settings panel expanded to show JPEG format and Quality slider.
Two additional options, which appear only when you choose JPEG, TIFF, and PSD formats, warrant a separate discussion. (Raw files are always 16-bit and don’t have a color space.)
- Color Space: A photo’s color space is what determines the range of possible colors it can contain. You need to decide what color space you want these copies converted into during the export process. Your choice of color space is determined by the reason you are exporting these copies to begin with and where they will be used. Here’s a look at your choices:
- sRGB: This color space contains the narrowest range of colors and is the standard for exporting photos destined for the web. It’s also used by some print services.
- AdobeRGB (1998): Contains a wider range of colors than sRGB and is most often used when additional editing or printing is the next destination for your files.
- ProPhoto RGB: Contains the widest range of colors and should only be used with 16-bit files. (I discuss bit depth in the next boldfaced bullet.) This is the best option when you want to retain all the color information that was in your source files. Not recommended when delivering copies destined for the web or anyone not used to working with ProPhoto color space.
- Other: While the previous three options are the most common, there may also be advanced situations where you need to convert your files to a custom color space for printing purposes. Consult your print service to see whether it provides or requires custom profiles, and it will help you get them installed. By choosing Other, you’ll be taken to the Choose Profiles dialog, where you can select a color profile.
- Bit Depth: Bit depth determines the amount of data a file contains. The higher the bit depth, the more data is contained in the file (which also means its file size is going to be larger too). If you’re working with raw files, you’re working with 16-bit files. If you’re working with JPEG files, you’re working with 8-bit files. During export, you have the option of saving PSD and TIFF files as 16-bit. If you choose JPG, bit depth is grayed out, but know that JPEGs are all 8-bit by default. Saving files in 16-bit only makes sense when both the source files were originally 16-bit and when the output needs require this original data (such as when you plan to archive the exported copies to DVD or edit them in some other image editor). In all other situations, 8-bit is the more common choice.
THE IMAGE SIZING PANEL
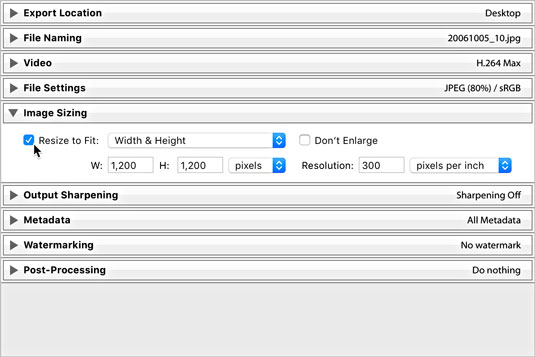
Sometimes, you need to save your exported copies in a different size from the source photos, such as when you want to email them or put them in a web page. To do so, you use options in the Image Sizing panel (see the following figure). Lightroom Classic can make the exported images smaller or larger than the original images — a process known as resampling. The six options for resizing your exports are
- Width & Height: The values entered for width and height define the maximum amount each side can be resized to fit while maintaining original aspect ratio.
- Dimensions: This option resizes exported images to fit within the entered dimensions while maintaining aspect ratio. When this option is selected, height and width are no longer associated with the values fields. You just enter the maximum dimensions you want the images resized to fit, and Lightroom Classic does the rest regardless of orientation.
- Megapixels: If you need to resize to a specific total number of pixels (width times height), this is your option.
- Long Edge and Shortest Edge: These options function in the same manner. You set the maximum value for the edge in question, and Lightroom Classic resizes all images to fit.
- Percentage: This option is useful when you want to create exported copies that are a certain percentage smaller than the original.

The Image Sizing panel.
Check the Don’t Enlarge box to prevent an image from being resampled larger than its original pixel dimensions. (This option is grayed out when Resize to Fit is unchecked.)
If your output needs require your photos to print at a specific size and at a specific number of pixels per inch (PPI), you can set its resolution value — the metadata tag used by software to determine how big the printed file appears. For example, the value of 300 PPI is commonly requested by print services, in which case you would enter 300 and choose pixels per inch. 300 PPI is always a safe choice, but if your photos are destined for the web only, this value is meaningless and can be ignored.
THE OUTPUT SHARPENING PANEL
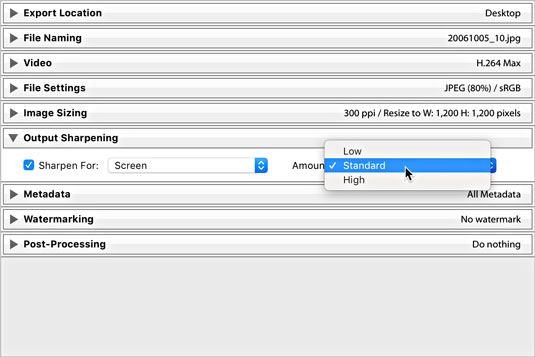
I love having the ability to add sharpening tailored for the specific output destination as part of the export process. The Output Sharpening panel, shown in the following figure, is where you choose and configure your output sharpening settings. The possible output settings are defined as
- Screen: Use this option when your photo’s final viewing destination will be on a computer screen (that is, on a web page).
- Matte Paper: Use this option when you’re sending your photos to be printed on a type of photo paper that has a matte (non-shiny) finish.
- Glossy Paper: Use this option when you’re sending your photos to be printed on a type of photo paper that has a glossy (shiny) finish.

The Output Sharpening panel.
After you identify the output you are sharpening for, you can set the amount of sharpening to apply; your choices here range from Low (almost none) to High (often too much), with Standard in the middle (just right).
THE METADATA PANEL
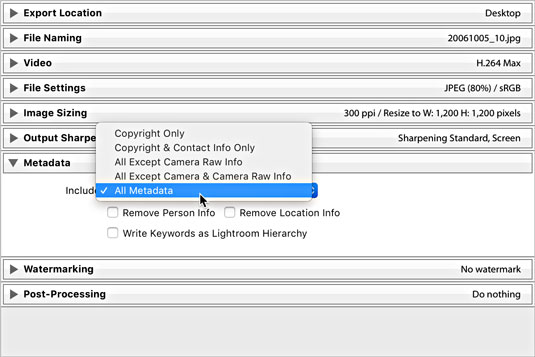
The Metadata panel, shown in the following figure, allows you some level of control over what metadata is included in the exported copies. Clicking the Include drop-down menu offers the following options:
- Copyright Only: Only the metadata entered into the Copyright field of the Metadata panel is applied to copies.
- Copyright & Contact Info Only: This is the same as the above option with the inclusion of any contact information you applied via the Metadata panel (or a metadata template).
- All Except Camera Raw Info: Camera Raw Info means the actual slider values dialed into Lightroom Classic, written as part of the metadata (the adjustments themselves are applied to the pixels regardless of any of these settings). So, this option builds on the above option and then includes all other metadata except the slider values (Camera Raw Info).
- All Except Camera & Camera Raw Info: This does everything that the previous option but leaves out the camera-generated EXIF metadata and the Camera Raw Info.
- All Metadata: Nothing is left out. All EXIF metadata created by camera, plus everything added in Lightroom Classic, is applied to copies.

The Metadata panel expanded.
Th Metadata panel has three additional check boxes:
- Remove Person Info: If you used People view to tag photos with the names of the people shown, you can check this box to avoid writing that information into the metadata of the exported copies.
- Remove Location Info: If your photos have GPS information in them, you can check this box to avoid writing that information into the metadata of exported copies.
- Write Keywords as Lightroom Hierarchy: Keywords are the descriptive terms you assign to your photos in the Library module. When you enable this option, and \ use keywords with parent/child relationships (meaning that the keywords are in a hierarchical structure), the exported copies retain that same keyword structure. This feature is useful for photos that will be imported into another Lightroom Classic catalog or managed with Adobe Bridge.
THE WATERMARKING PANEL
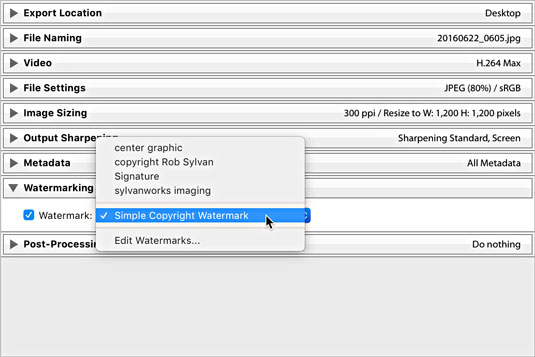
You can apply one of three types of watermarks to exported copies. Check the Watermark box to enable the drop-down choices. The most basic is the Simple Copyright Watermark, which pulls the information from the Copyright field of each file’s metadata and renders it as a watermark in the lower-left corner of each exported copy. This type of watermark has no configuration options.

The Watermarking options.
For greater control, choose Edit Watermarks to enter the Watermark Editor, where you can create either a text-based or graphical watermark with more control and save it as a preset for easy reuse.
THE POST-PROCESSING PANEL
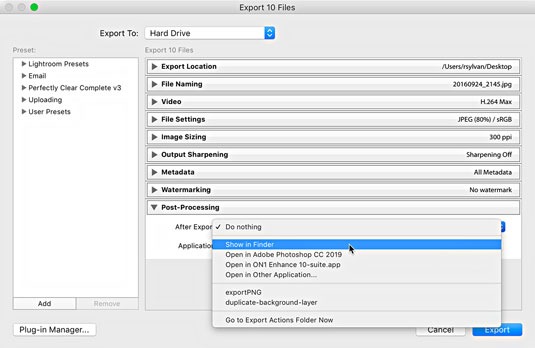
This is an optional panel, but it can provide a nice productivity boost to your output when you know your photos are going to be opened in some other application after they have been created (such as for additional image editing or viewing in your file browser). The Post-Processing panel (with the After Export drop-down list expanded) is shown in the following figure.
With the help of the options in this panel, you can tell Lightroom Classic to hand off your exported images to another application — in effect, having Lightroom Classic perform what is commonly referred to as an “export action” on your photos. The After Export drop-down list includes the following preinstalled options:
- Show in Finder (Show in Explorer for Windows): Automatically opens the folder containing the exported images in your file browser.
- Open in Photoshop: If you have Photoshop installed, you have the option to open the exported images in Photoshop after they’re saved to the export location.
- Open in Additional Editor: If you configured an additional external editor you see it listed here as an option.
- Open in Other Application: Selecting this option gives you the opportunity to designate another application (such as an email client, an alternative image editor, or an FTP client) that will be invoked at the end of the export. Lightroom Classic attempts to open the exported photos in that application; just keep in mind that not every application can accept images this way. Click the Choose button and navigate to the application you want to send your photos to.

Post-Processing panel expanded to show After Export options.
At the bottom of the After Export drop-down list is the Go to Export Actions Folder Now command. Selecting this option opens Finder (or Windows Explorer for Windows) with Lightroom Classic’s Export Actions folder selected. You can place either an executable file or an alias (shortcut for Windows) to an executable file in the Export Actions folder to include it as an option in the After Export drop-down list the next time you start Lightroom Classic. This is another way to set things up so you can send your photos to a specific program or a Photoshop droplet with one quick command.
“什麼是水滴?” 你說。一小滴是Photoshop的動作,你設法把(與Photoshop的幫助下)到一個很小的可執行文件。創建 Droplet 後,您可以直接將照片拖放到它上面,以自動通過動作運行照片——這是通過最喜歡的動作運行一批圖像的真正強大的方式,例如應用特定的 Photoshop 濾鏡、轉換到替代色彩空間,或應用自定義水印。通過將 Droplet 作為導出操作包含在內,Lightroom Classic 會在創建導出副本後通過 Droplet 自動運行導出的副本。
將導出設置保存為預設以供重複使用
預設真是太棒了,可以節省時間!想想看——您可以保存大量常用設置,然後隨時從“使用預設導出”菜單(選擇“文件”→“使用預設導出”)直接訪問它們。甜的!
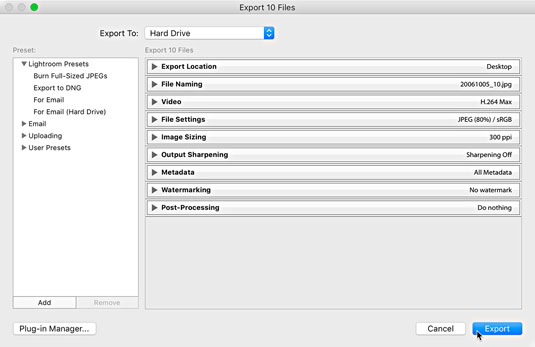
請參閱下圖以查看預設面板 - 它位於左側。

導出對話框。
您可以在 Lightroom Classic Presets 標題下獲得四個預安裝的預設,順便說一下,這些預設無法放棄或更新。他們是
- 刻錄全尺寸 JPEG:將JPG 設置為壓縮最少且不調整大小的文件格式,然後添加將導出的圖像刻錄到光盤作為導出後步驟。
- 導出為 DNG:將 DNG設置為文件格式,這實質上意味著您已設置為在導出時轉換為 DNG。請注意,僅當您的源文件是原始格式時,使用此預設才有意義。
- 對於電子郵件:將JPG 設置為文件格式,JPG 壓縮設置為 60,並調整所有圖像的大小以適合 500 x 500 像素。此選項會告訴 Lightroom Classic 在您導出副本時將導出的副本傳遞到您的默認郵件客戶端。
- 對於電子郵件(硬盤):將JPG 設置為文件格式,JPG 壓縮設置為 50,並調整所有圖像的大小以適合 640 x 640 像素。請注意,此預設實際上並未將文件傳遞到您的電子郵件客戶端;它只是將導出配置為適合電子郵件的大小,並將它們保存到您在硬盤驅動器上選擇的位置。
預裝的預設並不是非常複雜,但它們可以作為很好的起點,並可以幫助您看到可能性。例如,如果您想通過電子郵件將照片發送給朋友和家人,您可以將 For Email 預設作為起點並根據您的喜好對其進行自定義。以下是如何做到這一點:
單擊 For Email 預設將其設置加載到“導出”對話框中。
展開文件設置面板。
如果您喜歡更高的質量設置,請設置為 70。
展開圖像大小調整面板。
如果您喜歡更大的像素尺寸,請設置為 1000 像素。
展開輸出銳化面板。
選中銳化框並選擇標準量的屏幕。
保留其餘面板中的設置。
單擊“預設”面板左下角的“添加”按鈕。
這將打開“新建預設”對話框。
在預設名稱字段中輸入描述性名稱。
(可選)在保存預設的過程中創建一個新文件夾。
您可以單擊文件夾下拉列表並選擇現有的預設文件夾或創建一個新文件夾。
單擊“創建”按鈕完成該過程並將預設添加到“預設”面板。
您可以通過突出顯示自定義預設和文件夾並單擊刪除按鈕來刪除它們。但是請注意,刪除文件夾會刪除其中的所有預設!
通過根據需要調整設置,右鍵單擊預設,然後選擇使用當前設置更新,您可以使用新設置更新自定義預設。
