Adobe Lightroom Classic에서 사진 을 처리하고 나면 (전문가처럼!) 사진 을 세상에 보낼 준비가 된 것입니다. 즉, 수출 시간입니다! 겸손한 내보내기 대화 상자는 엄청난 힘을 발휘하며 약간의 연습으로 제공해야 하는 모든 것을 활용할 수 있습니다.
내보내기 워크플로 사용
Lightroom Classic(지금쯤이면 이해하셨겠지만)은 워크플로 응용 프로그램이며, 사진을 입력에서 출력으로 가져오는 더 큰 워크플로 내에는 워크플로 내에서 더 작은 워크플로가 많이 있습니다. 수출도 예외는 아니다. 다음은 기본 단계입니다.
내보낼 이미지를 선택합니다.
내보내기 명령을 시작합니다.
출력 요구 사항을 충족하기 위해 필요에 따라 설정을 구성합니다.
(선택 사항) 재사용을 위해 사전 설정으로 설정을 저장합니다.
1단계: 내보낼 이미지 선택
내보내기를 위해 선택한 사진은 당시의 필요에 따라 결정됩니다. Lightroom Classic 모듈 내에서 이미지를 내보낼 수 있지만 라이브러리 모듈을 사용하면 전체 포트폴리오에 최대한 액세스할 수 있으며 일반적으로 여기에서 내보내는 것이 가장 적합합니다. 따라서 아직 없는 경우 G를 눌러 라이브러리의 격자 보기로 이동합니다. 여기에서 모든 폴더와 컬렉션, 라이브러리 필터 표시줄에 액세스할 수 있습니다. 즉, 원하는 이미지를 추적할 수 있습니다. (가서, 시간을 내십시오.)
내보낼 이미지를 찾은 후 다음 방법 중 하나로 선택할 수 있습니다.
- Command +A(Windows의 경우 Ctrl+A)를 눌러 폴더 또는 기타 사진 그룹 내의 모든 사진을 선택합니다.
- 시리즈의 첫 번째 이미지를 클릭하고 Shift 키를 누른 상태에서 시리즈의 마지막 이미지를 클릭하여 중간에 있는 모든 이미지를 선택합니다.
- Command 키(Windows의 경우 Ctrl 키)를 누른 상태에서 각 이미지를 개별적으로 클릭하여 비연속적으로 선택합니다.
2단계: 내보내기 명령 시작
이미지를 선택한 후 다음 방법을 통해 모든 모듈(표시된 경우 제외)에서 내보내기를 시작할 수 있습니다.
- 파일 선택 → 내보내기 대화 상자를 시작합니다.
- 파일 → 이전 항목과 함께 내보내기를 선택하십시오 . 내보내기 대화 상자를 건너뛰고 마지막 내보내기의 설정을 사용하여 선택한 파일을 간단히 내보냅니다.
- 파일 → 사전 설정으로 내보내기 → 사전 설정 선택을 선택합니다. 내보내기 대화 상자의 추가 구성 없이 사전 설정을 선택하고 내보낼 수 있습니다.
- Command +Shift+E(Windows의 경우 Ctrl+Shift+E)를 누릅니다. 내보내기 대화 상자를 시작하는 키보드 단축키입니다.
- Command +Option+Shift+E(Windows의 경우 Ctrl+Alt+Shift+E)를 누릅니다. 이전 항목으로 내보내기에 대한 키보드 단축키입니다.
- 선택한 사진을 마우스 오른쪽 버튼으로 클릭하고 나타나는 상황에 맞는 메뉴에서 앞서 언급한 내보내기 옵션 중 하나를 선택합니다.
- 라이브러리 모듈의 왼쪽 패널 하단에 있는 내보내기 버튼을 클릭합니다. 라이브러리 모듈에서만 볼 수 있지만 편리합니다.
가능한 한 빨리 그리고 자주 내보내기 워크플로에서 키보드 단축키 를 사용하십시오 . 그들은 당신이 그것을 알기 전에 제 2의 천성이 될 것이며 시간을 크게 절약합니다.
3단계: 출력 요구 사항을 충족하도록 설정 구성
첫 번째 선택은 하드 드라이브, CD/DVD 버너(아직 하나라도 있는 경우!), 이메일 또는 설치한 내보내기 플러그인으로 내보낼 계획이라면 선택하는 것입니다. 가장 일반적인 선택은 하드 드라이브입니다. 여기에서 선택한 항목과 관련된 모든 패널을 구성합니다. 다른 내보내기 플러그인과 함께 추가 패널이 표시되지만 여기에서 다루기에는 너무 구체적이고 다양합니다. 대부분의 옵션을 다루는 하드 드라이브와 함께 제공되는 패널에만 초점을 맞춥니다.
내보내기 위치 패널
여기에 표시된 내보내기 위치 패널은 하드 드라이브에서 복사본 배치를 저장할 위치를 구성하는 데 사용됩니다. 이러한 복사본을 궁극적으로 DVD로 굽거나 다른 응용 프로그램에 양도하더라도 Lightroom Classic은 먼저 복사본을 하드 드라이브에 저장해야 합니다.
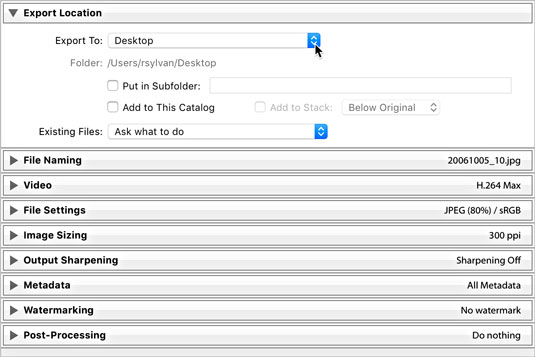
내보내기 위치 패널이 확장되었습니다.
파일을 저장하기로 선택하는 위치는 두 가지 요소, 즉 파일을 관리하는 방법과 필요한 출력을 결정하는 방법에 따라 결정됩니다. 내보내기 대상 드롭다운 메뉴는 위치 지정을 위한 몇 가지 옵션을 제공합니다.
- 특정 폴더: 이 옵션을 선택하면 Lightroom Classic에서 디스크의 모든 폴더를 가리킬 수 있습니다. 모든 새 복사본을 저장할 수 있는 충분한 여유 공간이 있는지 확인하십시오. 선택 버튼을 클릭하고 사용할 폴더로 이동합니다.
- 원본 사진과 동일한 폴더: 이 옵션은 내보낸 복사본을 원본과 동일한 폴더에 다시 넣는 기능을 설명합니다.
- 나중에 폴더 선택: 이 옵션은 사전 설정을 만들 때 특정 위치를 사전 설정에 하드 코딩하지 않으려는 경우에 유용합니다. 사전 설정을 사용하면 Lightroom Classic에서 위치를 제공하라는 메시지를 표시합니다.
- 사용자 위치: 해당 옵션 아래에는 데스크탑, 문서, 홈, 영화 및 사진 폴더와 같은 일반적인 사용자 위치 목록이 있어 쉽게 선택할 수 있습니다.
내보내기 위치를 선택한 후 고려해야 할 몇 가지 추가 옵션이 있습니다.
- 하위 폴더에 넣기: 이 옵션을 사용하면 지정된 내보내기 위치 내에 하위 폴더를 만들 수 있습니다. 확인란을 선택하고 해당 텍스트 필드에 하위 폴더의 이름을 입력합니다.
- 이 카탈로그에 추가: 이것을 자동 가져오기 옵션으로 생각하십시오. 복사본을 내보낸 후에는 가져오기 대화 상자를 거치지 않고도 Lightroom Classic에 나타납니다.
- 스택에 추가: 스택은 정리 목적으로 단일 축소판 아래에 사진 그룹을 정렬할 수 있는 기능입니다. 이 옵션은 복사본을 원본과 동일한 폴더로 다시 내보낼 때만 사용할 수 있습니다(하위 폴더에는 넣지 않음). 이 옵션을 선택하면 Lightroom Classic에서 해당 폴더를 볼 때 내보낸 사진 이 소스 사진과 함께 누적 되어 나타납니다 .
이미 다른 사진이 포함된 폴더로 사진을 내보낼 수 있으므로 내보낸 복사본이 기존 사진과 이름과 파일 유형이 같은 상황을 처리하는 방법을 Lightroom Classic에 알려야 합니다. 기존 파일 드롭다운 메뉴에는 네 가지 옵션이 있습니다.
- 무엇을 할 것인지 묻기: 이 옵션은 가장 안전한 옵션이며 권장되는 옵션입니다. 이러한 상황이 발생하면 Lightroom Classic에서 추가 지침을 묻는 메시지를 표시한 다음 다른 세 가지 옵션 중 하나를 선택합니다.
- 내보낸 파일의 새 이름 선택: 이 경우 Lightroom Classic은 내보낸 파일 끝에 새 시퀀스 번호를 추가하기만 하면 고유한 이름을 가진 동일한 파일의 복사본 두 개가 남게 됩니다.
- 경고 없이 덮어쓰기: 표시된 대로 수행합니다(드롭다운 메뉴에서 모두 대문자를 사용하기도 함). 원하는 작업이 맞는지 확신하는 경우에만 이 옵션을 선택하십시오. Lightroom Classic에서는 원본 사진을 덮어쓸 수 없으므로 Lightroom Classic 조정으로 복사본을 내보내고 기존 원본 파일 위에 저장할 수 있다고 생각하여 이 옵션을 선택하지 마십시오. 작동하지 않습니다.
- 건너뛰기: 이 옵션을 선택하면 동일한 파일 이름을 가진 기존 파일이 발견될 때 새 복사본이 만들어지지 않습니다(즉, Lightroom Classic에서 파일을 건너뜁니다).
파일 이름 지정 패널
대부분의 경우 소스 파일과 내보낸 복사본 간에 이름 일관성을 유지하려고 합니다. 파일 이름 템플릿을 선택하기만 하면 이를 달성할 수 있습니다. 다른 경우에는 그림과 같이 원래 이름과 완전히 다르거나 약간 변형된 사용자 지정 이름을 사용할 수 있습니다. 어떤 경우든 항상 복사본을 생성하기 때문에 Lightroom Classic에 원하는 이름을 지정해야 하며, 라이브러리 모듈에서 가져오기 명령을 사용하거나 파일 이름을 바꿀 때와 마찬가지로 Lightroom Classic은 파일 이름 템플릿을 사용하여 이를 수행합니다.
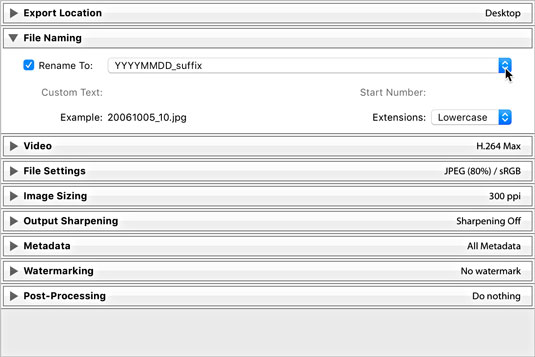
파일 이름 지정 패널.
템플릿 드롭다운 목록을 클릭하고 설치된 템플릿 중 하나를 선택하거나 편집을 클릭하고 좋은 이전 파일 이름 템플릿 편집기를 사용하여 사용자 지정 파일 이름 템플릿을 만들 수 있습니다.
비디오 패널
If you have a video file selected for export, you need to check the Include Video Files check box to access the (limited) format options for video, as shown.
- DPX: A lossless format suited for sending to professional video editing tools (like Adobe Premiere). Choose this only if you know it is required.
- 264: Good for exporting compressed video files for viewing and sharing. A description of each quality setting appears under it when selected.
- Original, unedited file: Produces an exact copy of the original.
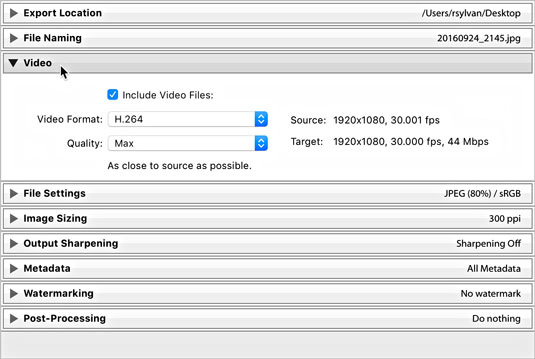
The video panel expanded.
THE FILE SETTINGS PANEL
Choose your file format based on your output needs (such as choosing JPEG for photos going on a website). Some formats require additional settings. Here’s a list of the formats and their options:
- JPEG: When you choose the JPEG (or JPG) format, you also need to choose the level of compression to be applied to each JPEG file. You make this selection by using the Quality slider, as shown in the following figure. The higher the quality value, the less compression — and the larger the file size. JPEG compression is always a tradeoff between file size and image quality. If you’re not too concerned about file size, leave it set around 90. The Limit File Size To option is useful if you need to achieve a specific file size in bytes, but keep in mind that you may need to also reduce the pixel dimensions when exporting large files.
- PSD: PSD is Photoshop’s native file format. You can choose between 8- and 16-bit.
- TIFF: TIFF is a widely supported format. Use the panel’s Compression drop-down list to pick one of the lossless compression options. “None” is pretty straightforward; ZIP and LZW reduce the file size, but the length of time to open and close the file increases. (Note that not all image editors can open compressed TIFF files. Also note that only the ZIP compression option is available with 16-bit files.) If your photo contains transparent pixels and you want to keep them in the exported copy, check the Save Transparency box.
- DNG: This is Adobe’s open format for raw (unprocessed by the camera) photos. Note that the Use Lossy Compression option is occasionally useful for situations in which you want to keep the exported copy as a DNG file while also reducing its pixel dimensions by using the options in the Image Sizing panel.
- Original: Selecting Original from the drop-down list results in the creation of an exact copy of your source image. (Raw and DNG photos will include Lightroom Classic edits in the photo’s XMP metadata.) No additional file settings are available with this option.
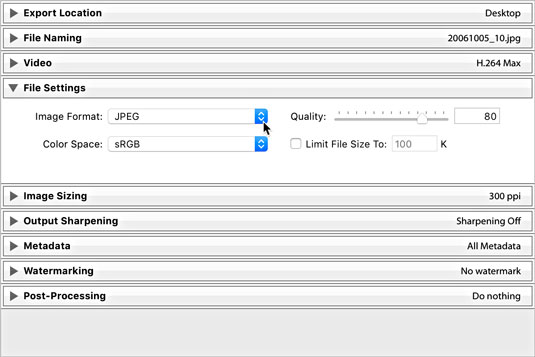
The File Settings panel expanded to show JPEG format and Quality slider.
Two additional options, which appear only when you choose JPEG, TIFF, and PSD formats, warrant a separate discussion. (Raw files are always 16-bit and don’t have a color space.)
- Color Space: A photo’s color space is what determines the range of possible colors it can contain. You need to decide what color space you want these copies converted into during the export process. Your choice of color space is determined by the reason you are exporting these copies to begin with and where they will be used. Here’s a look at your choices:
- sRGB: This color space contains the narrowest range of colors and is the standard for exporting photos destined for the web. It’s also used by some print services.
- AdobeRGB (1998): Contains a wider range of colors than sRGB and is most often used when additional editing or printing is the next destination for your files.
- ProPhoto RGB: Contains the widest range of colors and should only be used with 16-bit files. (I discuss bit depth in the next boldfaced bullet.) This is the best option when you want to retain all the color information that was in your source files. Not recommended when delivering copies destined for the web or anyone not used to working with ProPhoto color space.
- Other: While the previous three options are the most common, there may also be advanced situations where you need to convert your files to a custom color space for printing purposes. Consult your print service to see whether it provides or requires custom profiles, and it will help you get them installed. By choosing Other, you’ll be taken to the Choose Profiles dialog, where you can select a color profile.
- Bit Depth: Bit depth determines the amount of data a file contains. The higher the bit depth, the more data is contained in the file (which also means its file size is going to be larger too). If you’re working with raw files, you’re working with 16-bit files. If you’re working with JPEG files, you’re working with 8-bit files. During export, you have the option of saving PSD and TIFF files as 16-bit. If you choose JPG, bit depth is grayed out, but know that JPEGs are all 8-bit by default. Saving files in 16-bit only makes sense when both the source files were originally 16-bit and when the output needs require this original data (such as when you plan to archive the exported copies to DVD or edit them in some other image editor). In all other situations, 8-bit is the more common choice.
THE IMAGE SIZING PANEL
Sometimes, you need to save your exported copies in a different size from the source photos, such as when you want to email them or put them in a web page. To do so, you use options in the Image Sizing panel (see the following figure). Lightroom Classic can make the exported images smaller or larger than the original images — a process known as resampling. The six options for resizing your exports are
- Width & Height: The values entered for width and height define the maximum amount each side can be resized to fit while maintaining original aspect ratio.
- Dimensions: This option resizes exported images to fit within the entered dimensions while maintaining aspect ratio. When this option is selected, height and width are no longer associated with the values fields. You just enter the maximum dimensions you want the images resized to fit, and Lightroom Classic does the rest regardless of orientation.
- Megapixels: If you need to resize to a specific total number of pixels (width times height), this is your option.
- Long Edge and Shortest Edge: These options function in the same manner. You set the maximum value for the edge in question, and Lightroom Classic resizes all images to fit.
- Percentage: This option is useful when you want to create exported copies that are a certain percentage smaller than the original.
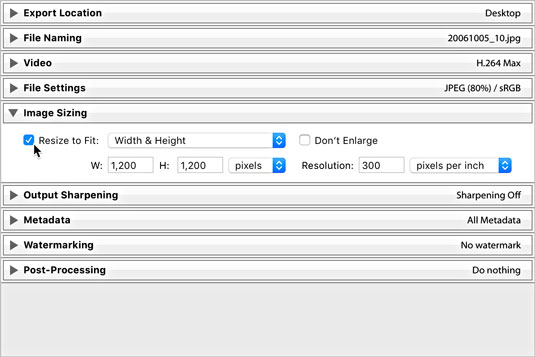
The Image Sizing panel.
Check the Don’t Enlarge box to prevent an image from being resampled larger than its original pixel dimensions. (This option is grayed out when Resize to Fit is unchecked.)
If your output needs require your photos to print at a specific size and at a specific number of pixels per inch (PPI), you can set its resolution value — the metadata tag used by software to determine how big the printed file appears. For example, the value of 300 PPI is commonly requested by print services, in which case you would enter 300 and choose pixels per inch. 300 PPI is always a safe choice, but if your photos are destined for the web only, this value is meaningless and can be ignored.
THE OUTPUT SHARPENING PANEL
I love having the ability to add sharpening tailored for the specific output destination as part of the export process. The Output Sharpening panel, shown in the following figure, is where you choose and configure your output sharpening settings. The possible output settings are defined as
- Screen: Use this option when your photo’s final viewing destination will be on a computer screen (that is, on a web page).
- Matte Paper: Use this option when you’re sending your photos to be printed on a type of photo paper that has a matte (non-shiny) finish.
- Glossy Paper: Use this option when you’re sending your photos to be printed on a type of photo paper that has a glossy (shiny) finish.
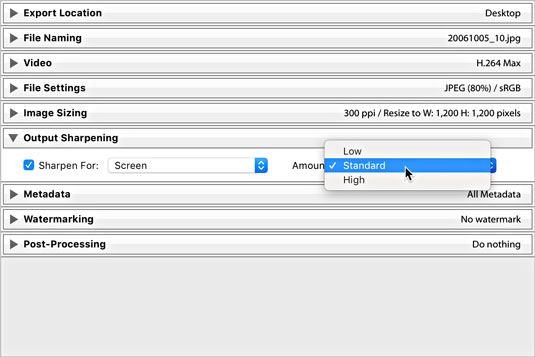
The Output Sharpening panel.
After you identify the output you are sharpening for, you can set the amount of sharpening to apply; your choices here range from Low (almost none) to High (often too much), with Standard in the middle (just right).
THE METADATA PANEL
The Metadata panel, shown in the following figure, allows you some level of control over what metadata is included in the exported copies. Clicking the Include drop-down menu offers the following options:
- Copyright Only: Only the metadata entered into the Copyright field of the Metadata panel is applied to copies.
- Copyright & Contact Info Only: This is the same as the above option with the inclusion of any contact information you applied via the Metadata panel (or a metadata template).
- All Except Camera Raw Info: Camera Raw Info means the actual slider values dialed into Lightroom Classic, written as part of the metadata (the adjustments themselves are applied to the pixels regardless of any of these settings). So, this option builds on the above option and then includes all other metadata except the slider values (Camera Raw Info).
- All Except Camera & Camera Raw Info: This does everything that the previous option but leaves out the camera-generated EXIF metadata and the Camera Raw Info.
- All Metadata: Nothing is left out. All EXIF metadata created by camera, plus everything added in Lightroom Classic, is applied to copies.
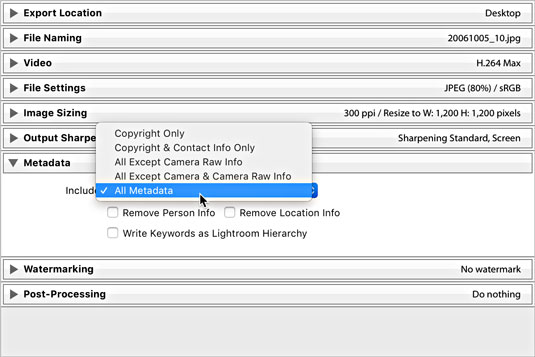
The Metadata panel expanded.
Th Metadata panel has three additional check boxes:
- Remove Person Info: If you used People view to tag photos with the names of the people shown, you can check this box to avoid writing that information into the metadata of the exported copies.
- Remove Location Info: If your photos have GPS information in them, you can check this box to avoid writing that information into the metadata of exported copies.
- Write Keywords as Lightroom Hierarchy: Keywords are the descriptive terms you assign to your photos in the Library module. When you enable this option, and \ use keywords with parent/child relationships (meaning that the keywords are in a hierarchical structure), the exported copies retain that same keyword structure. This feature is useful for photos that will be imported into another Lightroom Classic catalog or managed with Adobe Bridge.
THE WATERMARKING PANEL
You can apply one of three types of watermarks to exported copies. Check the Watermark box to enable the drop-down choices. The most basic is the Simple Copyright Watermark, which pulls the information from the Copyright field of each file’s metadata and renders it as a watermark in the lower-left corner of each exported copy. This type of watermark has no configuration options.
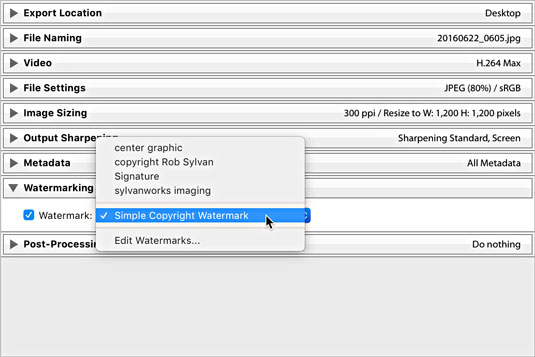
The Watermarking options.
For greater control, choose Edit Watermarks to enter the Watermark Editor, where you can create either a text-based or graphical watermark with more control and save it as a preset for easy reuse.
THE POST-PROCESSING PANEL
This is an optional panel, but it can provide a nice productivity boost to your output when you know your photos are going to be opened in some other application after they have been created (such as for additional image editing or viewing in your file browser). The Post-Processing panel (with the After Export drop-down list expanded) is shown in the following figure.
With the help of the options in this panel, you can tell Lightroom Classic to hand off your exported images to another application — in effect, having Lightroom Classic perform what is commonly referred to as an “export action” on your photos. The After Export drop-down list includes the following preinstalled options:
- Show in Finder (Show in Explorer for Windows): Automatically opens the folder containing the exported images in your file browser.
- Open in Photoshop: If you have Photoshop installed, you have the option to open the exported images in Photoshop after they’re saved to the export location.
- Open in Additional Editor: If you configured an additional external editor you see it listed here as an option.
- Open in Other Application: Selecting this option gives you the opportunity to designate another application (such as an email client, an alternative image editor, or an FTP client) that will be invoked at the end of the export. Lightroom Classic attempts to open the exported photos in that application; just keep in mind that not every application can accept images this way. Click the Choose button and navigate to the application you want to send your photos to.
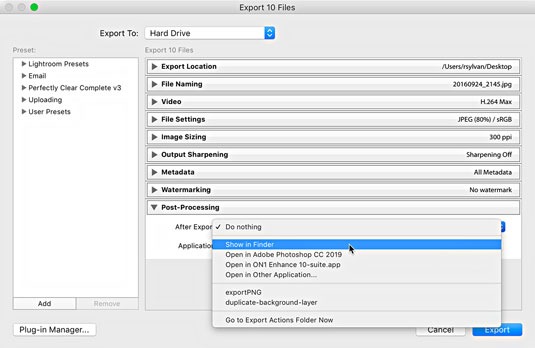
Post-Processing panel expanded to show After Export options.
At the bottom of the After Export drop-down list is the Go to Export Actions Folder Now command. Selecting this option opens Finder (or Windows Explorer for Windows) with Lightroom Classic’s Export Actions folder selected. You can place either an executable file or an alias (shortcut for Windows) to an executable file in the Export Actions folder to include it as an option in the After Export drop-down list the next time you start Lightroom Classic. This is another way to set things up so you can send your photos to a specific program or a Photoshop droplet with one quick command.
“What’s a droplet?” you say. A droplet is a Photoshop action that you manage to turn (with Photoshop’s help) into a tiny executable file. After you create a droplet, you can literally drag and drop photos on top of it to run the photos through the action automatically — a really powerful way to run a batch of images through a favorite action, such as applying a specific Photoshop filter, converting to an alternative color space, or applying a custom watermark. By including the droplet as an export action, Lightroom Classic automatically runs the exported copies through the droplet after they are created.
Saving export settings as a preset for reuse
사전 설정은 시간을 정말 절약해 줍니다! 생각해 보세요. 일반적으로 사용되는 설정을 저장한 다음 사전 설정으로 내보내기 메뉴(파일 → 사전 설정으로 내보내기 선택)에서 직접 원할 때 언제든지 액세스할 수 있습니다. 달콤한!
사전 설정 패널을 보려면 다음 그림을 참조하십시오. 왼쪽에 있습니다.
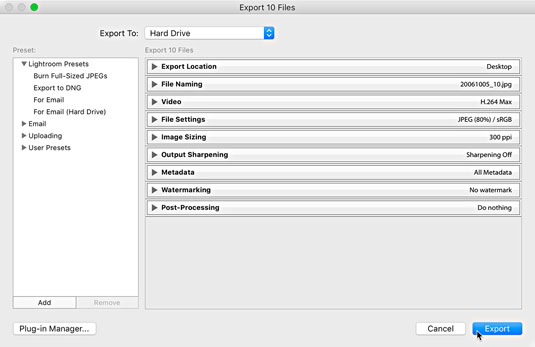
내보내기 대화 상자.
Lightroom Classic 사전 설정 제목 바로 아래에 미리 설치된 4개의 사전 설정이 제공됩니다. 즉, 버리거나 업데이트할 수 없는 사전 설정입니다. 그들은
- 전체 크기 JPEG 굽기: 압축이 최소화되고 크기 조정이 없는 파일 형식으로 JPG를 설정한 다음 내보낸 이미지를 디스크에 굽기 후 내보내기 단계를 추가합니다.
- DNG로 내보내기: DNG를 파일 형식으로 설정합니다. 즉, 기본적으로 내보낼 때 DNG로 변환하도록 설정되어 있습니다. 이 사전 설정을 사용하는 것은 소스 파일이 원시 형식인 경우에만 의미가 있습니다.
- 이메일의 경우: JPG 압축이 60으로 설정된 파일 형식으로 JPG를 설정하고 500 x 500픽셀 내에 맞도록 모든 이미지의 크기를 조정합니다. 이 옵션은 내보낸 복사본을 내보낼 때 기본 메일 클라이언트로 내보낸 복사본을 전달하도록 Lightroom Classic에 지시합니다.
- 이메일의 경우(하드 드라이브): JPG 압축이 50으로 설정된 파일 형식으로 JPG를 설정하고 640 x 640 픽셀 내에 맞도록 모든 이미지의 크기를 조정합니다. 이 사전 설정은 실제로 파일을 전자 메일 클라이언트로 전달하지 않습니다. 이메일에 적합한 크기로 내보내기를 구성하고 하드 드라이브에서 선택한 위치에 저장합니다.
사전 설치된 사전 설정은 매우 정교하지는 않지만 좋은 출발점이 될 수 있고 가능성을 확인하는 데 도움이 될 수 있습니다. 예를 들어 사진을 친구와 가족에게 이메일로 보내고 싶다면 이메일용 사전 설정을 시작점으로 삼아 원하는 대로 사용자 지정할 수 있습니다. 방법은 다음과 같습니다.
이메일 사전 설정을 클릭하여 해당 설정을 내보내기 대화 상자로 로드합니다.
파일 설정 패널을 확장합니다.
더 높은 품질 설정을 선호하는 경우 70으로 설정하십시오.
이미지 크기 조정 패널을 확장합니다.
더 큰 픽셀 치수를 선호하는 경우 1000픽셀로 설정하십시오.
출력 선명화 패널을 확장합니다.
Sharpen For 상자를 선택하고 Screen at Standard amount를 선택하십시오.
나머지 패널의 설정은 그대로 두십시오.
사전 설정 패널의 왼쪽 하단에 있는 추가 버튼을 클릭합니다.
그러면 새 사전 설정 대화 상자가 열립니다.
사전 설정 이름 필드에 설명이 포함된 이름을 입력합니다.
(선택 사항) 사전 설정을 저장하는 과정에서 새 폴더를 만듭니다.
폴더 드롭다운 목록을 클릭하고 기존 사전 설정 폴더를 선택하거나 새 폴더를 만들 수 있습니다.
만들기 버튼을 클릭하여 프로세스를 완료하고 사전 설정 패널에 사전 설정을 추가합니다.
사용자 정의 사전 설정 및 폴더를 강조 표시하고 제거 버튼을 클릭하여 삭제할 수 있습니다. 그러나 폴더를 제거하면 그 안에 있는 모든 사전 설정이 삭제된다는 점에 유의하십시오!
원하는 대로 설정을 조정하고 사전 설정을 마우스 오른쪽 버튼으로 클릭한 다음 현재 설정으로 업데이트를 선택하여 사용자 정의 사전 설정을 새 설정으로 업데이트할 수 있습니다.
