Adobe LightroomClassicから写真をエクスポートする方法

あなたがした後、あなたの写真を処理するのAdobe Lightroomのクラシック(プロ!のような)に、あなたは世界にそれらを送信する準備が整いました。つまり、エクスポート時間です!謙虚なエクスポートダイアログは大きな力を発揮し、少し練習するだけで、それが提供するすべてを活用することができます。

エクスポートワークフローの採用

Lightroom Classic(おそらく今までに理解しているように)はワークフローアプリケーションであり、入力から出力まで写真を撮るというより大きなワークフロー内には、ワークフロー内に多くの小さなワークフローが存在します。輸出も例外ではありません。基本的な手順は次のとおりです。

エクスポートする画像を選択します。

エクスポートコマンドを開始します。

出力のニーズを満たすために、必要に応じて設定を構成します。

(オプション)再利用のために設定をプリセットとして保存します。

ステップ1:エクスポートする画像を選択する

エクスポート用に選択する写真は、その時点でのニーズによって決まります。Lightroom Classicモジュール内から画像をエクスポートできますが、ライブラリモジュールを使用すると、ポートフォリオ全体に最大限にアクセスでき、通常、そこからエクスポートするのが最も理にかなっています。したがって、まだそこにいない場合は、Gを押してライブラリのグリッドビューにジャンプします。ここから、すべてのフォルダーとコレクション、およびライブラリフィルターバーにアクセスできます。つまり、先に進んで必要な画像を追跡できます。(どうぞ、時間をかけてください。)

エクスポートする画像を見つけたら、次のいずれかの方法で画像を選択できます。

  • Command + A(Windowsの場合はCtrl + A)を押して、フォルダーまたはその他の写真のグループ内のすべての写真を選択します。
  • シリーズの最初の画像をクリックし、Shiftキーを押しながら、シリーズの最後の画像をクリックして、その間のすべての画像を選択します。
  • コマンドキー(Windowsの場合はCtrlキー)を押しながら、各画像を個別にクリックして、連続しない選択を行います。

ステップ2:エクスポートコマンドを開始する

イメージを選択した後、次の方法で任意のモジュール(特に明記されている場合を除く)からエクスポートを開始できます。

  • [ファイル] [エクスポート]ダイアログを起動します。
  • [ファイル]→[前にエクスポート]を選択します[エクスポート]ダイアログをスキップし、最後のエクスポートの設定を使用して、選択したファイルをエクスポートするだけです。
  • [ファイル]  →  [プリセット付きでエクスポート]  →  [プリセットを選択]を選択します。[エクスポート]ダイアログを追加で構成しなくても、プリセットを選択してエクスポートできます。
  • Command + Shift + E(Windowsの場合はCtrl + Shift + E)を押します。[エクスポート]ダイアログを起動するキーボードショートカット。
  • Command + Option + Shift + E(Windowsの場合はCtrl + Alt + Shift + E)を押します。以前と一緒にエクスポートするためのキーボードショートカット。
  • 選択した写真を右クリックし、表示されるコンテキストメニューから前述のエクスポートオプションの1つを選択します。
  • ライブラリモジュールの左側のパネルの下部にある[エクスポート]ボタンをクリックします。ライブラリモジュールにのみ表示されますが、便利です。

エクスポートワークフローで、できるだけ早く、できるだけ頻繁にキーボードショートカットを使用してください。彼らはあなたがそれを知る前に第二の性質になるでしょう、そして彼らは素晴らしい時間の節約になります。

ステップ3:出力のニーズを満たすように設定を構成する

最初に選択するのは、ハードドライブ、CD / DVDバーナー(まだ持っている場合)、電子メール、またはインストールしたエクスポートプラグインにエクスポートする場合です。最も一般的な選択はハードドライブです。そこから、選択に関連するすべてのパネルを構成します。追加のパネルはさまざまなエクスポートプラグインで表示されますが、具体的で多様であるため、ここで説明することはできません。ほとんどのオプションをカバーしているので、私はハードドライブに付属しているパネルだけに焦点を当てています。

輸出場所パネル

ここに示す[エクスポート場所]パネルは、コピーのバッチをハードドライブのどこに保存するかを構成するために使用されます。最終的にこれらのコピーをDVDに書き込んだり、別のアプリケーションに渡したりした場合でも、LightroomClassicは最初にコピーをハードドライブに保存する必要があります。

Adobe LightroomClassicから写真をエクスポートする方法

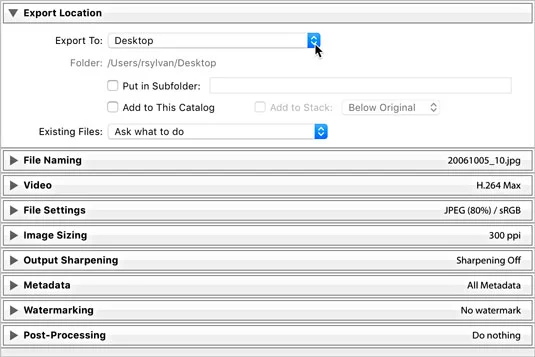
[エクスポート場所]パネルが展開されました。

ファイルを保存する場所は、ファイルの管理方法と出力の必要性を判断する方法の2つの要因によって決まります。[エクスポート先]ドロップダウンメニューには、場所を指定するためのいくつかのオプションがあります。

  • 特定のフォルダー:このオプションを選択すると、LightroomClassicをディスク上の任意のフォルダーにポイントできます。すべての新しいコピーを保持するのに十分な空き容量があることを確認してください。[選択]ボタンをクリックして、使用するフォルダーに移動します。
  • 元の写真と同じフォルダ:このオプションは、エクスポートされたコピーを元の写真と同じフォルダに戻すという、説明どおりに機能します。
  • 後でフォルダを選択:このオプションは、プリセットを作成していて、特定の場所をプリセットにハードコーディングしたくない場合に便利です。プリセットを使用すると、LightroomClassicは場所を指定するように求めます。
  • ユーザーの場所:これらのオプションの下には、デスクトップ、ドキュメント、ホーム、ムービー、写真の各フォルダーなどの一般的なユーザーの場所のリストが表示され、簡単に選択できます。

エクスポートする場所を選択した後、考慮すべきいくつかの追加オプションがあります。

  • サブフォルダーに入れる:このオプションを使用すると、指定したエクスポート場所内にサブフォルダーを作成できます。チェックボックスをオンにして、対応するテキストフィールドにサブフォルダの名前を入力します。
  • このカタログに追加:これを自動インポートオプションと考えてください。コピーをエクスポートすると、[インポート]ダイアログを経由せずにLightroomClassic内に表示されます。
  • スタックに追加:スタックは、整理のために写真のグループを1つのサムネイルの下に配置できる機能です。このオプションは、コピーを元のフォルダーとまったく同じフォルダーにエクスポートして戻す場合にのみ使用できます(サブフォルダーには入れません)。オンにすると、Lightroom Classicでそのフォルダーを表示すると、エクスポートされた写真がソース写真とスタックして表示されます。

すでに他の写真が含まれているフォルダーに写真をエクスポートできるため、エクスポートしたコピーの名前が既存の写真と同じファイルタイプである状況を処理する方法をLightroomClassicに指示する必要があります。[既存のファイル]ドロップダウンメニューには、次の4つのオプションがあります。

  • 何をすべきかを尋ねる:このオプションは最も安全なオプションであり、推奨されるオプションです。このような状況が発生した場合、Lightroom Classicはさらに指示を求めるプロンプトを表示し、他の3つのオプションのいずれかを選択します。
  • エクスポートされたファイルの新しい名前を選択する:この場合、Lightroom Classicは、エクスポートされたファイルの末尾に新しいシーケンス番号を追加するだけなので、同じファイルの2つのコピーが一意の名前で作成されます。
  • 警告なしで上書き:それが言うことを行います(そしてドロップダウンメニューのすべての大文字を使用します)。このオプションを選択するのは、それが自分のやりたいことであると本当に確信している場合のみにしてください。Lightroom Classicではソース写真を上書きできないため、Lightroom Classicを調整してコピーをエクスポートし、既存のソースファイルを上書きできると考えて、このオプションを選択しないでください。機能しません。
  • スキップ:このオプションを選択すると、同じファイル名の既存のファイルが検出されたときに、新しいコピーは作成されません(つまり、Lightroom Classicはファイルをスキップします)。

ファイル名パネル

多くの場合、ソースファイルとエクスポートされたコピーの間で名前の一貫性を維持する必要があります。ファイル名テンプレートを選択するだけで、まさにそれを実現できます。また、示されているように、完全に異なるカスタム名、または元の名前のバリエーションを使用したい場合もあります。いずれの場合も、常にコピーを作成するため、Lightroom Classicに名前の付け方を指示する必要があります。また、ライブラリモジュールで[インポート]コマンドを使用したりファイルの名前を変更したりする場合と同様に、LightroomClassicはファイル名テンプレートを使用してコピーを作成します。
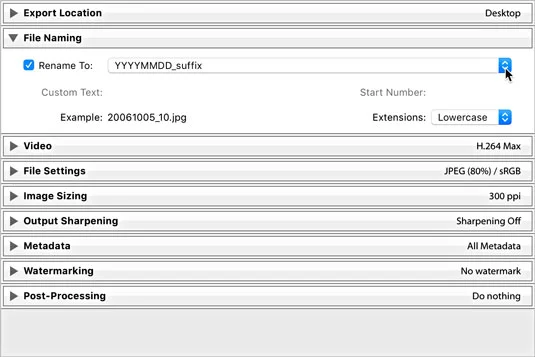
Adobe LightroomClassicから写真をエクスポートする方法

[ファイル名]パネル。

[テンプレート]ドロップダウンリストをクリックして、インストールされているテンプレートの1つを選択するか、[編集]をクリックして、古き良きファイル名テンプレートエディターを使用してカスタムファイル名テンプレートを作成できます。

ビデオパネル

エクスポートするビデオファイルを選択している場合は、図に示すように、ビデオの(制限された)形式オプションにアクセスするために、[ビデオファイルを含める]チェックボックスをオンにする必要があります。
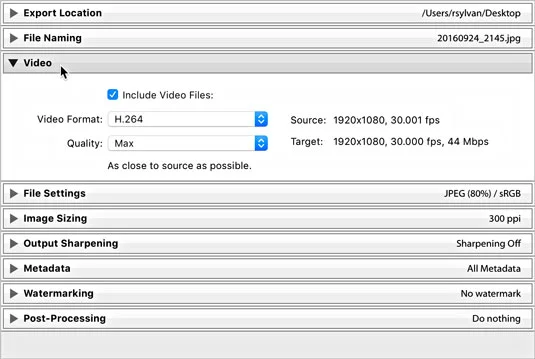
  • DPX:プロのビデオ編集ツール(Adobe Premiereなど)に送信するのに適したロスレスフォーマット。必要であることがわかっている場合にのみ、これを選択してください。
  • 264:表示および共有するために圧縮されたビデオファイルをエクスポートするのに適しています。選択すると、各品質設定の説明がその下に表示されます。
  • オリジナルの編集されていないファイル:オリジナルの正確なコピーを作成します。

Adobe LightroomClassicから写真をエクスポートする方法

ビデオパネルが拡大しました。

ファイル設定パネル

出力のニーズに基づいてファイル形式を選択します(Webサイトに掲載される写真にJPEGを選択するなど)。一部の形式では、追加の設定が必要です。フォーマットとそのオプションのリストは次のとおりです。

  • JPEG: When you choose the JPEG (or JPG) format, you also need to choose the level of compression to be applied to each JPEG file. You make this selection by using the Quality slider, as shown in the following figure. The higher the quality value, the less compression — and the larger the file size. JPEG compression is always a tradeoff between file size and image quality. If you’re not too concerned about file size, leave it set around 90. The Limit File Size To option is useful if you need to achieve a specific file size in bytes, but keep in mind that you may need to also reduce the pixel dimensions when exporting large files.
  • PSD: PSD is Photoshop’s native file format. You can choose between 8- and 16-bit.
  • TIFF: TIFF is a widely supported format. Use the panel’s Compression drop-down list to pick one of the lossless compression options. “None” is pretty straightforward; ZIP and LZW reduce the file size, but the length of time to open and close the file increases. (Note that not all image editors can open compressed TIFF files. Also note that only the ZIP compression option is available with 16-bit files.) If your photo contains transparent pixels and you want to keep them in the exported copy, check the Save Transparency box.
  • DNG: This is Adobe’s open format for raw (unprocessed by the camera) photos. Note that the Use Lossy Compression option is occasionally useful for situations in which you want to keep the exported copy as a DNG file while also reducing its pixel dimensions by using the options in the Image Sizing panel.
  • Original: Selecting Original from the drop-down list results in the creation of an exact copy of your source image. (Raw and DNG photos will include Lightroom Classic edits in the photo’s XMP metadata.) No additional file settings are available with this option.

Adobe LightroomClassicから写真をエクスポートする方法

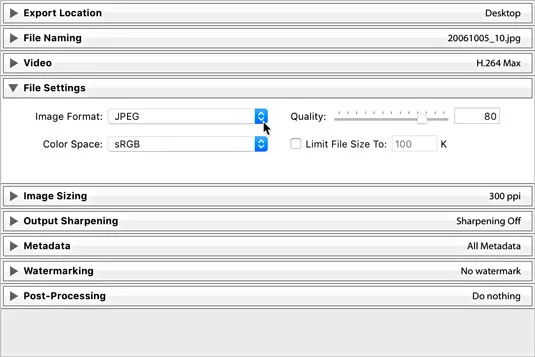
The File Settings panel expanded to show JPEG format and Quality slider.

Two additional options, which appear only when you choose JPEG, TIFF, and PSD formats, warrant a separate discussion. (Raw files are always 16-bit and don’t have a color space.)

  • Color Space: A photo’s color space is what determines the range of possible colors it can contain. You need to decide what color space you want these copies converted into during the export process. Your choice of color space is determined by the reason you are exporting these copies to begin with and where they will be used. Here’s a look at your choices:
    • sRGB: This color space contains the narrowest range of colors and is the standard for exporting photos destined for the web. It’s also used by some print services.
    • AdobeRGB (1998): Contains a wider range of colors than sRGB and is most often used when additional editing or printing is the next destination for your files.
    • ProPhoto RGB: Contains the widest range of colors and should only be used with 16-bit files. (I discuss bit depth in the next boldfaced bullet.) This is the best option when you want to retain all the color information that was in your source files. Not recommended when delivering copies destined for the web or anyone not used to working with ProPhoto color space.
    • Other: While the previous three options are the most common, there may also be advanced situations where you need to convert your files to a custom color space for printing purposes. Consult your print service to see whether it provides or requires custom profiles, and it will help you get them installed. By choosing Other, you’ll be taken to the Choose Profiles dialog, where you can select a color profile.
  • Bit Depth: Bit depth determines the amount of data a file contains. The higher the bit depth, the more data is contained in the file (which also means its file size is going to be larger too). If you’re working with raw files, you’re working with 16-bit files. If you’re working with JPEG files, you’re working with 8-bit files. During export, you have the option of saving PSD and TIFF files as 16-bit. If you choose JPG, bit depth is grayed out, but know that JPEGs are all 8-bit by default. Saving files in 16-bit only makes sense when both the source files were originally 16-bit and when the output needs require this original data (such as when you plan to archive the exported copies to DVD or edit them in some other image editor). In all other situations, 8-bit is the more common choice.

THE IMAGE SIZING PANEL

Sometimes, you need to save your exported copies in a different size from the source photos, such as when you want to email them or put them in a web page. To do so, you use options in the Image Sizing panel (see the following figure). Lightroom Classic can make the exported images smaller or larger than the original images — a process known as resampling. The six options for resizing your exports are

  • Width & Height: The values entered for width and height define the maximum amount each side can be resized to fit while maintaining original aspect ratio.
  • Dimensions: This option resizes exported images to fit within the entered dimensions while maintaining aspect ratio. When this option is selected, height and width are no longer associated with the values fields. You just enter the maximum dimensions you want the images resized to fit, and Lightroom Classic does the rest regardless of orientation.
  • Megapixels: If you need to resize to a specific total number of pixels (width times height), this is your option.
  • Long Edge and Shortest Edge: These options function in the same manner. You set the maximum value for the edge in question, and Lightroom Classic resizes all images to fit.
  • Percentage: This option is useful when you want to create exported copies that are a certain percentage smaller than the original.

Adobe LightroomClassicから写真をエクスポートする方法

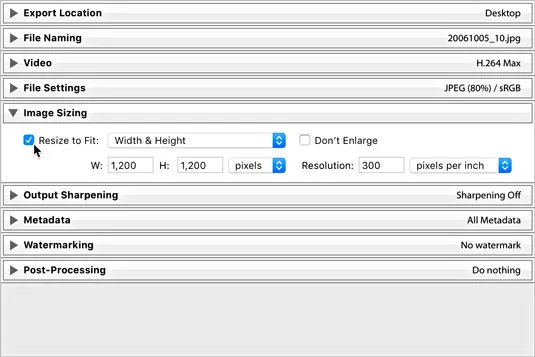
The Image Sizing panel.

Check the Don’t Enlarge box to prevent an image from being resampled larger than its original pixel dimensions. (This option is grayed out when Resize to Fit is unchecked.)

If your output needs require your photos to print at a specific size and at a specific number of pixels per inch (PPI), you can set its resolution value — the metadata tag used by software to determine how big the printed file appears. For example, the value of 300 PPI is commonly requested by print services, in which case you would enter 300 and choose pixels per inch. 300 PPI is always a safe choice, but if your photos are destined for the web only, this value is meaningless and can be ignored.

THE OUTPUT SHARPENING PANEL

I love having the ability to add sharpening tailored for the specific output destination as part of the export process. The Output Sharpening panel, shown in the following figure, is where you choose and configure your output sharpening settings. The possible output settings are defined as

  • Screen: Use this option when your photo’s final viewing destination will be on a computer screen (that is, on a web page).
  • Matte Paper: Use this option when you’re sending your photos to be printed on a type of photo paper that has a matte (non-shiny) finish.
  • Glossy Paper: Use this option when you’re sending your photos to be printed on a type of photo paper that has a glossy (shiny) finish.

Adobe LightroomClassicから写真をエクスポートする方法

The Output Sharpening panel.

After you identify the output you are sharpening for, you can set the amount of sharpening to apply; your choices here range from Low (almost none) to High (often too much), with Standard in the middle (just right).

THE METADATA PANEL

The Metadata panel, shown in the following figure, allows you some level of control over what metadata is included in the exported copies. Clicking the Include drop-down menu offers the following options:

  • Copyright Only: Only the metadata entered into the Copyright field of the Metadata panel is applied to copies.
  • Copyright & Contact Info Only: This is the same as the above option with the inclusion of any contact information you applied via the Metadata panel (or a metadata template).
  • All Except Camera Raw Info: Camera Raw Info means the actual slider values dialed into Lightroom Classic, written as part of the metadata (the adjustments themselves are applied to the pixels regardless of any of these settings). So, this option builds on the above option and then includes all other metadata except the slider values (Camera Raw Info).
  • All Except Camera & Camera Raw Info: This does everything that the previous option but leaves out the camera-generated EXIF metadata and the Camera Raw Info.
  • All Metadata: Nothing is left out. All EXIF metadata created by camera, plus everything added in Lightroom Classic, is applied to copies.

Adobe LightroomClassicから写真をエクスポートする方法

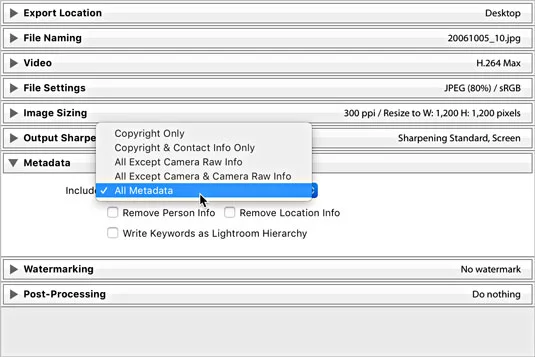
The Metadata panel expanded.

Th Metadata panel has three additional check boxes:

  • Remove Person Info: If you used People view to tag photos with the names of the people shown, you can check this box to avoid writing that information into the metadata of the exported copies.
  • Remove Location Info: If your photos have GPS information in them, you can check this box to avoid writing that information into the metadata of exported copies.
  • Write Keywords as Lightroom Hierarchy: Keywords are the descriptive terms you assign to your photos in the Library module. When you enable this option, and \ use keywords with parent/child relationships (meaning that the keywords are in a hierarchical structure), the exported copies retain that same keyword structure. This feature is useful for photos that will be imported into another Lightroom Classic catalog or managed with Adobe Bridge.

THE WATERMARKING PANEL

You can apply one of three types of watermarks to exported copies. Check the Watermark box to enable the drop-down choices. The most basic is the Simple Copyright Watermark, which pulls the information from the Copyright field of each file’s metadata and renders it as a watermark in the lower-left corner of each exported copy. This type of watermark has no configuration options.

Adobe LightroomClassicから写真をエクスポートする方法

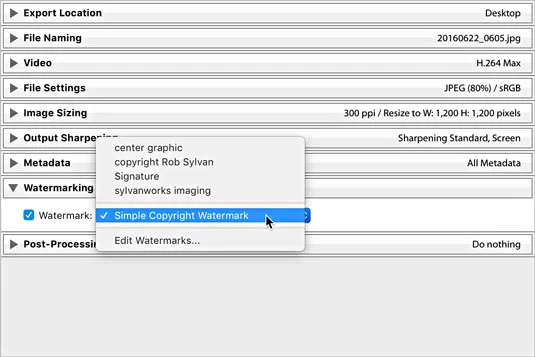
The Watermarking options.

For greater control, choose Edit Watermarks to enter the Watermark Editor, where you can create either a text-based or graphical watermark with more control and save it as a preset for easy reuse.

THE POST-PROCESSING PANEL

This is an optional panel, but it can provide a nice productivity boost to your output when you know your photos are going to be opened in some other application after they have been created (such as for additional image editing or viewing in your file browser). The Post-Processing panel (with the After Export drop-down list expanded) is shown in the following figure.

With the help of the options in this panel, you can tell Lightroom Classic to hand off your exported images to another application — in effect, having Lightroom Classic perform what is commonly referred to as an “export action” on your photos. The After Export drop-down list includes the following preinstalled options:

  • Show in Finder (Show in Explorer for Windows): Automatically opens the folder containing the exported images in your file browser.
  • Open in Photoshop: If you have Photoshop installed, you have the option to open the exported images in Photoshop after they’re saved to the export location.
  • Open in Additional Editor: If you configured an additional external editor you see it listed here as an option.
  • Open in Other Application: Selecting this option gives you the opportunity to designate another application (such as an email client, an alternative image editor, or an FTP client) that will be invoked at the end of the export. Lightroom Classic attempts to open the exported photos in that application; just keep in mind that not every application can accept images this way. Click the Choose button and navigate to the application you want to send your photos to.

Adobe LightroomClassicから写真をエクスポートする方法

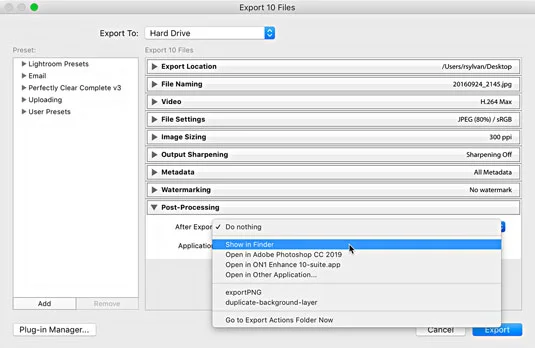
Post-Processing panel expanded to show After Export options.

At the bottom of the After Export drop-down list is the Go to Export Actions Folder Now command. Selecting this option opens Finder (or Windows Explorer for Windows) with Lightroom Classic’s Export Actions folder selected. You can place either an executable file or an alias (shortcut for Windows) to an executable file in the Export Actions folder to include it as an option in the After Export drop-down list the next time you start Lightroom Classic. This is another way to set things up so you can send your photos to a specific program or a Photoshop droplet with one quick command.

「液滴とは何ですか?」あなたは言う。小滴は小さな実行可能ファイルに(Photoshopの助けを借りて)あなたが有効に管理することをPhotoshopのアクションです。ドロップレットを作成したら、文字通りその上に写真をドラッグアンドドロップして、アクションを自動的に実行できます。これは、特定のPhotoshopフィルターの適用、変換など、お気に入りのアクションで画像のバッチを実行する非常に強力な方法です。別の色空間に、またはカスタム透かしを適用します。エクスポートアクションとしてドロップレットを含めることにより、Lightroom Classicは、エクスポートされたコピーが作成された後、ドロップレットを介して自動的に実行されます。

再利用のためのプリセットとしてエクスポート設定を保存する

プリセットはとても素晴らしい時間の節約になります!考えてみてください。一般的に使用される設定のスカッドを保存し、[プリセットを使用してエクスポート]メニュー([ファイル]→[プリセットを使用してエクスポート]を選択)からいつでも直接アクセスできます。甘い!

次の図を参照して、[プリセット]パネルを確認してください。左側にあります。
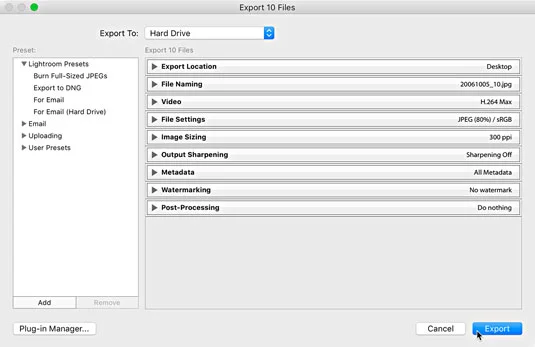
Adobe LightroomClassicから写真をエクスポートする方法

[エクスポート]ダイアログ。

Lightroomのクラシックプリセットの見出しのすぐ下に、4つのプリセットがプリインストールされています。ちなみに、プリセットは破棄したり更新したりすることはできません。彼らです

  • フルサイズのJPEGの書き込み: JPGを圧縮が最小でサイズ変更のないファイル形式として設定し、エクスポート後の手順としてエクスポートされた画像の書き込みをディスクに追加します。
  • DNGへのエクスポート:ファイル形式としてDNGを設定します。これは、基本的に、エクスポート時にDNGに変換するように設定されていることを意味します。このプリセットの使用は、ソースファイルがraw形式の場合にのみ意味があることに注意してください。
  • 電子メールの場合: JPG圧縮を60に設定したファイル形式としてJPGを設定し、500 x500ピクセル内に収まるようにすべての画像のサイズを変更します。このオプションは、エクスポートしたコピーをエクスポートするときに、エクスポートしたコピーをデフォルトのメールクライアントに渡すようにLightroomClassicに指示します。
  • 電子メール(ハードドライブ)の場合: JPG圧縮を50に設定したファイル形式としてJPGを設定し、640 x640ピクセル内に収まるようにすべての画像のサイズを変更します。このプリセットは実際にはファイルを電子メールクライアントに渡さないことに注意してください。エクスポートを電子メールに適したサイズに構成し、ハードドライブ上の選択した場所に保存するだけです。

プレインストールされたプリセットはそれほど洗練されていませんが、良い出発点になり、可能性を理解するのに役立ちます。たとえば、写真を友人や家族に電子メールで送信したい場合は、[電子メール用]プリセットを開始点として使用し、好みに合わせてカスタマイズできます。その方法は次のとおりです。

[電子メール用]プリセットをクリックして、その設定を[エクスポート]ダイアログにロードします。

[ファイル設定]パネルを展開します。
より高い品質設定が必要な場合は、70に設定します。

[画像サイズ]パネルを展開します。
より大きなピクセルサイズが必要な場合は、1000ピクセルに設定します。

[出力シャープニング]パネルを展開します。
[シャープ]チェックボックスをオンにし、[画面]を標準量で選択します。

残りのパネルの設定はそのままにしておきます。

[プリセット]パネルの左下にある[追加]ボタンをクリックします。
これにより、[新しいプリセット]ダイアログが開きます。

[プリセット名]フィールドにわかりやすい名前を入力します。

(オプション)プリセットを保存する過程で新しいフォルダーを作成します。

[フォルダ]ドロップダウンリストをクリックして、既存のプリセットフォルダを選択するか、新しいフォルダを作成できます。

[作成]ボタンをクリックしてプロセスを完了し、プリセットを[プリセット]パネルに追加します。

カスタムプリセットとフォルダを強調表示して[削除]ボタンをクリックすると、それらを削除できます。ただし、フォルダを削除すると、その中のプリセットがすべて削除されることに注意してください。

必要に応じて設定を調整し、プリセットを右クリックして、[現在の設定で更新]を選択すると、カスタムプリセットを新しい設定で更新できます。

Leave a Comment

PDFファイルのセクションをスクリーンショットする

PDFファイルのセクションをスクリーンショットする

Adobe Acrobat CS5のスナップショットツールを使用して、テキストと画像の両方を選択し、PDFファイル内の特定の領域の画像を作成できます。結果は通常、PDFファイル内のセクションのスクリーングラブと呼ばれます。結果は画像であり、あなたのテキストはありません[…]

Photoshop CCでのピクセルの測定、カウント、分析

Photoshop CCでのピクセルの測定、カウント、分析

研究者や科学者向けに設計されたPhotoshopCCの測定機能は非常に強力です。おそらく顕微鏡や望遠鏡から、ほぼすべてを測定し、技術的な画像に含まれるものの数を数えることができます。画像内の要素の正確なサイズがわかっている場合は、ほぼすべてのものを見つけることができます[…]

Adobe CS5Illustratorの液化ツール

Adobe CS5Illustratorの液化ツール

Adobe Creative Suite 5(Adobe CS5)IllustratorのLiquifyツールを使用すると、単純な歪みから複雑な歪みを作成することで、オブジェクトを曲げたり、波打ったり、ねばねばしたり、とがったりさせることができます。Liquifyツールは、オブジェクトに対してあらゆる種類の創造的または奇抜な(見方によって)歪みを実現できます。君は […]

AdobeXDでテキストのプロパティを調整する方法

AdobeXDでテキストのプロパティを調整する方法

Adobe XDプロジェクトにテキストがある場合は、テキストのプロパティの変更を開始できます。これらのプロパティには、フォントファミリ、フォントサイズ、フォントの太さ、配置、文字間隔(カーニングとトラッキング)、行間隔(先頭)、塗りつぶし、境界線(ストローク)、シャドウ(ドロップシャドウ)、および背景のぼかしが含まれます。それでは、これらのプロパティがどのように適用されるかを確認しましょう。読みやすさとフォントについて[…]

InDesignCCでQRコードを作成する方法

InDesignCCでQRコードを作成する方法

InDesignを使用して、QRコードグラフィックを作成および変更できます。QRコードは、単語、数字、URL、その他の形式のデータなどの情報を保存できるバーコードの形式です。ユーザーはスマートフォンなどのデバイスでカメラとソフトウェアを使用してQRコードをスキャンし、ソフトウェアはそれを利用します[…]

PhotoshopCCでアートボードを操作する

PhotoshopCCでアートボードを操作する

Adobe Illustratorと同様に、Photoshopアートボードは、1つのドキュメント内に個別のページまたは画面を作成する機能を提供します。これは、モバイルアプリケーションや小さなパンフレットの画面を作成する場合に特に役立ちます。アートボードは、レイヤーパネルを使用して作成された特別なタイプのレイヤーグループと考えることができます。これは […]

Adobe IllustratorCCでテキストを折り返す

Adobe IllustratorCCでテキストを折り返す

Adobe Illustrator CCでテキストを折り返すことは、プレゼントを折り返すこととまったく同じではありません。簡単です。この図に示すように、テキストの折り返しは、テキストをグラフィックの周りに強制的に折り返します。この機能は、どんな作品にも少し創造性を加えることができます。グラフィックは、テキストを強制的に折り返しています。まず、[…]を作成します

Illustratorで図形のサイズを変更する方法

Illustratorで図形のサイズを変更する方法

Adobe Illustrator CCでデザインする場合、正確なサイズ(たとえば、2 x 3インチ)の形状が必要になることがよくあります。シェイプを作成した後、正確な測定値にサイズ変更する最良の方法は、この図に示すように、[変換]パネルを使用することです。オブジェクトを選択してから、[ウィンドウ]→[変換]を選択します[…]

SVGに透明度を適用する方法

SVGに透明度を適用する方法

IllustratorでSVGグラフィックに透明度を適用する方法を学びます。背景が透明なSVGを出力し、透明効果を適用する方法を探ります。

AdobeXDでの画像の操作

AdobeXDでの画像の操作

画像をAdobeXDにインポートした後は、編集の制御はそれほど多くありませんが、他の形状と同じように画像のサイズを変更したり回転したりできます。コーナーウィジェットを使用して、インポートした画像のコーナーを簡単に丸めることもできます。閉じた形状を定義して画像をマスキングする[…]