Nachdem Sie Ihre Fotos in Adobe Lightroom Classic verarbeitet haben (wie ein Profi!), können Sie sie in die Welt hinausschicken. Das bedeutet, es ist Exportzeit! Der bescheidene Export-Dialog bietet viel Kraft, und mit ein wenig Übung können Sie alles nutzen, was er zu bieten hat.
Verwenden eines Export-Workflows
Lightroom Classic (wie Sie wahrscheinlich inzwischen herausgefunden haben) ist eine Workflow-Anwendung, und innerhalb des größeren Workflows, bei dem Sie Ihre Fotos von der Eingabe bis zur Ausgabe aufnehmen, gibt es viele kleinere Workflows innerhalb von Workflows. Der Export ist keine Ausnahme. Hier sind die grundlegenden Schritte:
Wählen Sie die Bilder aus, die Sie exportieren möchten.
Starten Sie den Export-Befehl.
Konfigurieren Sie die Einstellungen nach Bedarf, um Ihre Ausgabeanforderungen zu erfüllen.
(Optional) Speichern Sie die Einstellungen als Voreinstellung zur Wiederverwendung.
Schritt 1: Auswählen der Bilder, die Sie exportieren möchten
Welche Fotos Sie für den Export auswählen, hängt von Ihren jeweiligen Bedürfnissen ab. Sie können Bilder aus jedem Lightroom Classic-Modul exportieren, aber das Bibliotheksmodul bietet Ihnen den besten Zugriff auf Ihr gesamtes Portfolio, und der Export von dort ist normalerweise am sinnvollsten. Wenn Sie also noch nicht dort sind, drücken Sie G, um zur Rasteransicht der Bibliothek zu springen. Von hier aus haben Sie Zugriff auf alle Ihre Ordner und Sammlungen sowie auf die Bibliotheksfilterleiste, sodass Sie die gewünschten Bilder ausfindig machen können. (Mach weiter, nimm dir Zeit.)
Nachdem Sie die zu exportierenden Bilder gefunden haben, können Sie sie mit einer der folgenden Methoden auswählen:
- Drücken Sie Befehl +A (Strg+A für Windows), um alle Fotos in einem Ordner oder einer anderen Fotogruppierung auszuwählen.
- Klicken Sie auf das erste Bild in einer Serie, halten Sie die Umschalttaste gedrückt und klicken Sie auf das letzte Bild in der Serie, um alle Bilder dazwischen auszuwählen.
- Halten Sie die Befehlstaste (Strg-Taste für Windows) gedrückt und klicken Sie jedes Bild einzeln an, um eine nicht zusammenhängende Auswahl zu treffen.
Schritt 2: Initiieren des Exportbefehls
Nachdem Sie die Bilder ausgewählt haben, können Sie einen Export aus jedem Modul (sofern nicht anders angegeben) wie folgt initiieren:
- Wählen Sie Datei→ Öffnet den Export-Dialog.
- Wählen Sie Datei→ Exportieren mit vorherigem. Überspringt den Export-Dialog und exportiert einfach ausgewählte Dateien unter Verwendung der Einstellungen des letzten Exports.
- Wählen Sie Datei → Exportieren mit Vorgabe → Vorgabe auswählen. Ermöglicht Ihnen die Auswahl einer Voreinstellung und den Export ohne zusätzliche Konfiguration des Exportdialogs.
- Drücken Sie Befehl + Umschalt + E (Strg + Umschalt + E für Windows). Tastenkombination, die den Export-Dialog startet.
- Drücken Sie Befehl + Wahl + Umschalt + E (Strg + Alt + Umschalt + E für Windows). Tastaturkürzel für Export mit vorherigem.
- Klicken Sie mit der rechten Maustaste auf ein ausgewähltes Foto und wählen Sie eine der zuvor erwähnten Exportoptionen aus dem angezeigten Kontextmenü.
- Klicken Sie im Bibliotheksmodul unten im linken Bereich auf die Schaltfläche Exportieren. Nur im Bibliotheksmodul sichtbar, aber praktisch.
Verwenden Sie die Tastenkombinationen in Ihrem Export-Workflow so schnell und so oft wie möglich. Sie werden zur zweiten Natur, bevor Sie es wissen, und sie sind große Zeitsparer.
Schritt 3: Konfigurieren der Einstellungen, um Ihre Ausgabeanforderungen zu erfüllen
Die erste Wahl, die Sie treffen werden, ist, ob Sie auf Ihre Festplatte exportieren möchten, auf einen CD/DVD-Brenner (falls Sie noch einen haben!), eine E-Mail oder ein Export-Plug-In, das Sie installiert haben. Ihre häufigste Wahl ist Festplatte. Von dort aus konfigurieren Sie alle Panels, die sich auf die von Ihnen getroffene Auswahl beziehen. Während zusätzliche Panels mit verschiedenen Export-Plug-Ins erscheinen, sind sie zu spezifisch und zu abwechslungsreich, um hier behandelt zu werden. Ich konzentriere mich nur auf die Panels, die mit der Festplatte geliefert werden, da dies die meisten Optionen abdeckt.
DAS EXPORTSTANDORT-PANEL
Das hier gezeigte Fenster Exportspeicherort wird verwendet, um zu konfigurieren, wo Sie einen Stapel von Kopien auf Ihrer Festplatte speichern möchten. Selbst wenn Sie diese Kopien letztendlich auf DVD brennen oder an eine andere Anwendung weitergeben, muss Lightroom Classic die Kopien zunächst auf Ihrer Festplatte speichern.
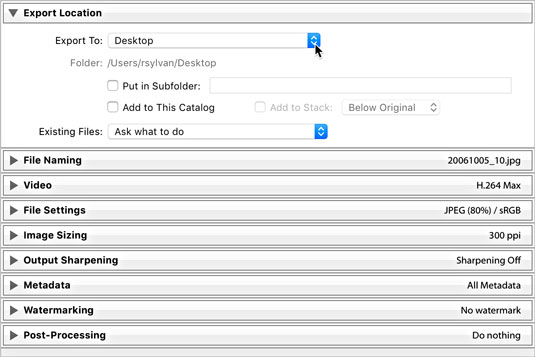
Der Bereich Exportort wurde erweitert.
Wo Sie die Dateien speichern, hängt von zwei Faktoren ab: wie Sie Ihre Dateien verwalten und wie Ihre Ausgabe aussehen soll. Das Dropdown-Menü Exportieren nach bietet einige Optionen zum Festlegen eines Speicherorts:
- Bestimmter Ordner: Wenn Sie diese Option auswählen, können Sie Lightroom Classic auf einen beliebigen Ordner auf Ihrer Festplatte verweisen. Stellen Sie nur sicher, dass genügend freier Speicherplatz für alle neuen Kopien vorhanden ist. Klicken Sie auf die Schaltfläche Auswählen und navigieren Sie zu dem Ordner, den Sie verwenden möchten.
- Gleicher Ordner wie Originalfoto: Diese Option macht genau das, was sie beschreibt, nämlich Ihre exportierten Kopien zurück in denselben Ordner wie das Original zu legen.
- Ordner später auswählen: Diese Option ist nützlich, wenn Sie Voreinstellungen erstellen und keinen bestimmten Speicherort fest in die Voreinstellung codieren möchten. Wenn Sie eine Vorgabe verwenden, fordert Lightroom Classic Sie auf, einen Standort anzugeben.
- Benutzerspeicherorte: Unter diesen Optionen befindet sich eine Liste gängiger Benutzerspeicherorte wie Ordner für Desktop, Dokumente, Home, Filme und Bilder, um die Auswahl zu erleichtern.
Nachdem Sie den Speicherort für den Export ausgewählt haben, müssen Sie einige zusätzliche Optionen berücksichtigen:
- In Unterordner legen: Mit dieser Option können Sie einen Unterordner innerhalb des angegebenen Exportspeicherorts erstellen. Aktivieren Sie das Kontrollkästchen und geben Sie im entsprechenden Textfeld einen Namen für den Unterordner ein.
- Zu diesem Katalog hinzufügen: Stellen Sie sich dies als automatische Importoption vor. Nachdem Ihre Kopien exportiert wurden, werden sie in Lightroom Classic angezeigt, ohne dass Sie das Dialogfeld „Importieren“ durchlaufen müssen.
- Zum Stapel hinzufügen : Stapeln ist eine Funktion, mit der Sie aus organisatorischen Gründen Gruppen von Fotos unter einem einzigen Miniaturbild anordnen können. Diese Option ist nur verfügbar, wenn Sie Kopien genau in denselben Ordner zurückexportieren wie die Originale (und sie nicht in einem Unterordner ablegen). Wenn diese Option aktiviert ist, werden die exportierten Fotos mit den Quellfotos gestapelt angezeigt, wenn Sie diesen Ordner in Lightroom Classic anzeigen.
Because you may export photos into a folder that already contains other photos, you must tell Lightroom Classic how to handle situations where your exported copies have the same name and are the same file type as the existing photos. You have four options under the Existing Files drop-down menu:
- Ask What to Do: This option is the safest option and the one recommended. If such a situation occurs, Lightroom Classic prompts you for further instructions and then you choose one of the other three options.
- Choose a New Name for the Exported File: In this case, Lightroom Classic simply appends a new sequence number to the end of the exported file, so you end up with two copies of the same file but with unique names.
- Overwrite WITHOUT WARNING: Does what it says (and it even uses all caps in the drop-down menu). Only choose this option if you are really sure it is what you want to do. Note that Lightroom Classic does not allow you to overwrite the source photos, so don’t choose this option thinking you can export copies with Lightroom Classic adjustments and save over the existing source files — it won’t work.
- Skip: If you choose this option, no new copy is created (that is, Lightroom Classic skips the file) when an existing file with the same filename is encountered.
THE FILE NAMING PANEL
In many cases, you’ll want to maintain name consistency between your source files and your exported copies. By simply choosing the Filename template, you can achieve just that. Other times, you may want to use custom names that are completely different or perhaps some variation of the original name, as shown. In any case, because you’re always creating copies, you must tell Lightroom Classic how you want them named, and just as when you use the Import command or rename files in the Library module, Lightroom Classic uses filename templates to do it.
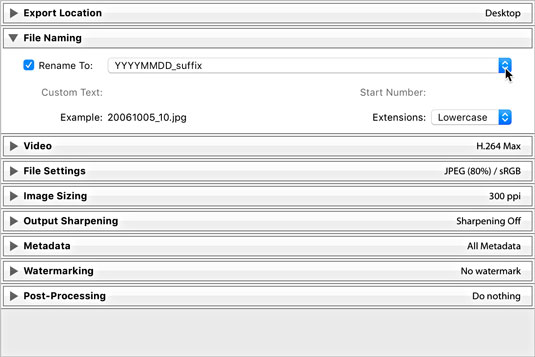
The File Naming panel.
Click the Template drop-down list and choose one of the installed templates, or you can click Edit and create a custom filename template using the good old Filename Template Editor.
THE VIDEO PANEL
If you have a video file selected for export, you need to check the Include Video Files check box to access the (limited) format options for video, as shown.
- DPX: A lossless format suited for sending to professional video editing tools (like Adobe Premiere). Choose this only if you know it is required.
- 264: Good for exporting compressed video files for viewing and sharing. A description of each quality setting appears under it when selected.
- Original, unedited file: Produces an exact copy of the original.
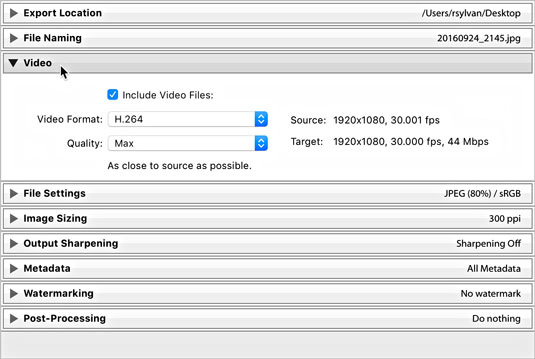
The video panel expanded.
THE FILE SETTINGS PANEL
Choose your file format based on your output needs (such as choosing JPEG for photos going on a website). Some formats require additional settings. Here’s a list of the formats and their options:
- JPEG: When you choose the JPEG (or JPG) format, you also need to choose the level of compression to be applied to each JPEG file. You make this selection by using the Quality slider, as shown in the following figure. The higher the quality value, the less compression — and the larger the file size. JPEG compression is always a tradeoff between file size and image quality. If you’re not too concerned about file size, leave it set around 90. The Limit File Size To option is useful if you need to achieve a specific file size in bytes, but keep in mind that you may need to also reduce the pixel dimensions when exporting large files.
- PSD: PSD is Photoshop’s native file format. You can choose between 8- and 16-bit.
- TIFF: TIFF is a widely supported format. Use the panel’s Compression drop-down list to pick one of the lossless compression options. “None” is pretty straightforward; ZIP and LZW reduce the file size, but the length of time to open and close the file increases. (Note that not all image editors can open compressed TIFF files. Also note that only the ZIP compression option is available with 16-bit files.) If your photo contains transparent pixels and you want to keep them in the exported copy, check the Save Transparency box.
- DNG: This is Adobe’s open format for raw (unprocessed by the camera) photos. Note that the Use Lossy Compression option is occasionally useful for situations in which you want to keep the exported copy as a DNG file while also reducing its pixel dimensions by using the options in the Image Sizing panel.
- Original: Selecting Original from the drop-down list results in the creation of an exact copy of your source image. (Raw and DNG photos will include Lightroom Classic edits in the photo’s XMP metadata.) No additional file settings are available with this option.
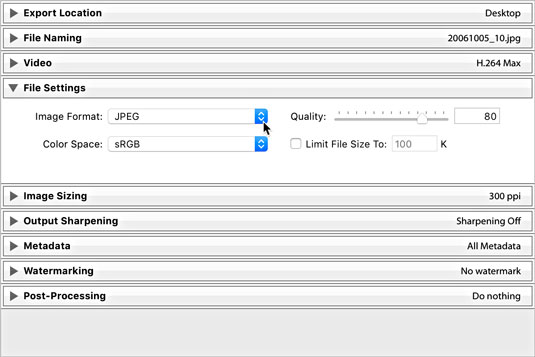
The File Settings panel expanded to show JPEG format and Quality slider.
Two additional options, which appear only when you choose JPEG, TIFF, and PSD formats, warrant a separate discussion. (Raw files are always 16-bit and don’t have a color space.)
- Color Space: A photo’s color space is what determines the range of possible colors it can contain. You need to decide what color space you want these copies converted into during the export process. Your choice of color space is determined by the reason you are exporting these copies to begin with and where they will be used. Here’s a look at your choices:
- sRGB: This color space contains the narrowest range of colors and is the standard for exporting photos destined for the web. It’s also used by some print services.
- AdobeRGB (1998): Contains a wider range of colors than sRGB and is most often used when additional editing or printing is the next destination for your files.
- ProPhoto RGB: Contains the widest range of colors and should only be used with 16-bit files. (I discuss bit depth in the next boldfaced bullet.) This is the best option when you want to retain all the color information that was in your source files. Not recommended when delivering copies destined for the web or anyone not used to working with ProPhoto color space.
- Other: While the previous three options are the most common, there may also be advanced situations where you need to convert your files to a custom color space for printing purposes. Consult your print service to see whether it provides or requires custom profiles, and it will help you get them installed. By choosing Other, you’ll be taken to the Choose Profiles dialog, where you can select a color profile.
- Bit Depth: Bit depth determines the amount of data a file contains. The higher the bit depth, the more data is contained in the file (which also means its file size is going to be larger too). If you’re working with raw files, you’re working with 16-bit files. If you’re working with JPEG files, you’re working with 8-bit files. During export, you have the option of saving PSD and TIFF files as 16-bit. If you choose JPG, bit depth is grayed out, but know that JPEGs are all 8-bit by default. Saving files in 16-bit only makes sense when both the source files were originally 16-bit and when the output needs require this original data (such as when you plan to archive the exported copies to DVD or edit them in some other image editor). In all other situations, 8-bit is the more common choice.
THE IMAGE SIZING PANEL
Sometimes, you need to save your exported copies in a different size from the source photos, such as when you want to email them or put them in a web page. To do so, you use options in the Image Sizing panel (see the following figure). Lightroom Classic can make the exported images smaller or larger than the original images — a process known as resampling. The six options for resizing your exports are
- Width & Height: The values entered for width and height define the maximum amount each side can be resized to fit while maintaining original aspect ratio.
- Dimensions: This option resizes exported images to fit within the entered dimensions while maintaining aspect ratio. When this option is selected, height and width are no longer associated with the values fields. You just enter the maximum dimensions you want the images resized to fit, and Lightroom Classic does the rest regardless of orientation.
- Megapixels: If you need to resize to a specific total number of pixels (width times height), this is your option.
- Long Edge and Shortest Edge: These options function in the same manner. You set the maximum value for the edge in question, and Lightroom Classic resizes all images to fit.
- Percentage: This option is useful when you want to create exported copies that are a certain percentage smaller than the original.
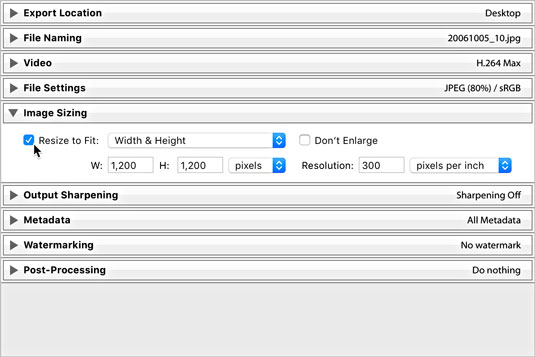
The Image Sizing panel.
Check the Don’t Enlarge box to prevent an image from being resampled larger than its original pixel dimensions. (This option is grayed out when Resize to Fit is unchecked.)
If your output needs require your photos to print at a specific size and at a specific number of pixels per inch (PPI), you can set its resolution value — the metadata tag used by software to determine how big the printed file appears. For example, the value of 300 PPI is commonly requested by print services, in which case you would enter 300 and choose pixels per inch. 300 PPI is always a safe choice, but if your photos are destined for the web only, this value is meaningless and can be ignored.
THE OUTPUT SHARPENING PANEL
I love having the ability to add sharpening tailored for the specific output destination as part of the export process. The Output Sharpening panel, shown in the following figure, is where you choose and configure your output sharpening settings. The possible output settings are defined as
- Screen: Use this option when your photo’s final viewing destination will be on a computer screen (that is, on a web page).
- Matte Paper: Use this option when you’re sending your photos to be printed on a type of photo paper that has a matte (non-shiny) finish.
- Glossy Paper: Use this option when you’re sending your photos to be printed on a type of photo paper that has a glossy (shiny) finish.
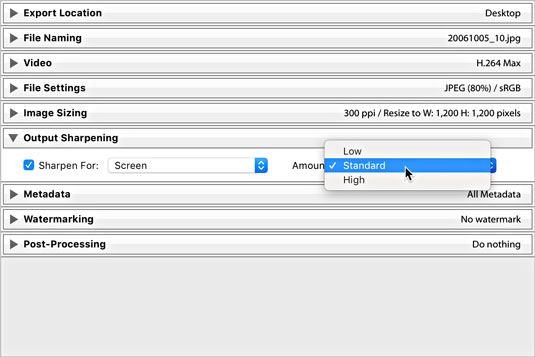
The Output Sharpening panel.
After you identify the output you are sharpening for, you can set the amount of sharpening to apply; your choices here range from Low (almost none) to High (often too much), with Standard in the middle (just right).
THE METADATA PANEL
The Metadata panel, shown in the following figure, allows you some level of control over what metadata is included in the exported copies. Clicking the Include drop-down menu offers the following options:
- Copyright Only: Only the metadata entered into the Copyright field of the Metadata panel is applied to copies.
- Copyright & Contact Info Only: This is the same as the above option with the inclusion of any contact information you applied via the Metadata panel (or a metadata template).
- All Except Camera Raw Info: Camera Raw Info means the actual slider values dialed into Lightroom Classic, written as part of the metadata (the adjustments themselves are applied to the pixels regardless of any of these settings). So, this option builds on the above option and then includes all other metadata except the slider values (Camera Raw Info).
- All Except Camera & Camera Raw Info: This does everything that the previous option but leaves out the camera-generated EXIF metadata and the Camera Raw Info.
- All Metadata: Nothing is left out. All EXIF metadata created by camera, plus everything added in Lightroom Classic, is applied to copies.
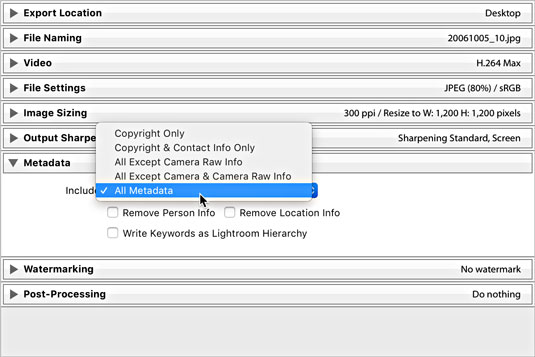
The Metadata panel expanded.
Th Metadata panel has three additional check boxes:
- Remove Person Info: If you used People view to tag photos with the names of the people shown, you can check this box to avoid writing that information into the metadata of the exported copies.
- Remove Location Info: If your photos have GPS information in them, you can check this box to avoid writing that information into the metadata of exported copies.
- Write Keywords as Lightroom Hierarchy: Keywords are the descriptive terms you assign to your photos in the Library module. When you enable this option, and \ use keywords with parent/child relationships (meaning that the keywords are in a hierarchical structure), the exported copies retain that same keyword structure. This feature is useful for photos that will be imported into another Lightroom Classic catalog or managed with Adobe Bridge.
THE WATERMARKING PANEL
You can apply one of three types of watermarks to exported copies. Check the Watermark box to enable the drop-down choices. The most basic is the Simple Copyright Watermark, which pulls the information from the Copyright field of each file’s metadata and renders it as a watermark in the lower-left corner of each exported copy. This type of watermark has no configuration options.
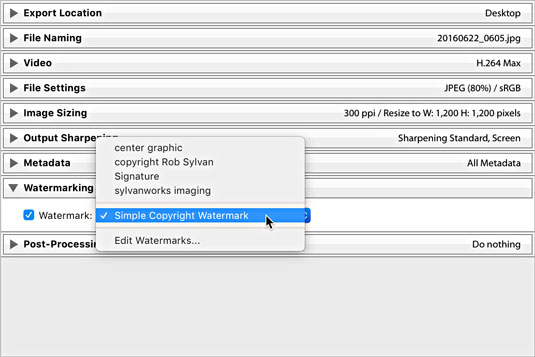
The Watermarking options.
For greater control, choose Edit Watermarks to enter the Watermark Editor, where you can create either a text-based or graphical watermark with more control and save it as a preset for easy reuse.
THE POST-PROCESSING PANEL
This is an optional panel, but it can provide a nice productivity boost to your output when you know your photos are going to be opened in some other application after they have been created (such as for additional image editing or viewing in your file browser). The Post-Processing panel (with the After Export drop-down list expanded) is shown in the following figure.
With the help of the options in this panel, you can tell Lightroom Classic to hand off your exported images to another application — in effect, having Lightroom Classic perform what is commonly referred to as an “export action” on your photos. The After Export drop-down list includes the following preinstalled options:
- Show in Finder (Show in Explorer for Windows): Automatically opens the folder containing the exported images in your file browser.
- Open in Photoshop: If you have Photoshop installed, you have the option to open the exported images in Photoshop after they’re saved to the export location.
- Open in Additional Editor: If you configured an additional external editor you see it listed here as an option.
- Open in Other Application: Selecting this option gives you the opportunity to designate another application (such as an email client, an alternative image editor, or an FTP client) that will be invoked at the end of the export. Lightroom Classic attempts to open the exported photos in that application; just keep in mind that not every application can accept images this way. Click the Choose button and navigate to the application you want to send your photos to.
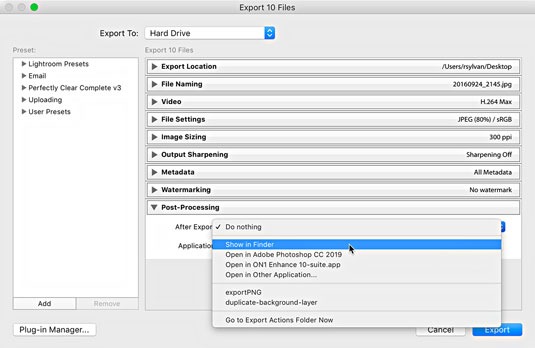
Post-Processing panel expanded to show After Export options.
At the bottom of the After Export drop-down list is the Go to Export Actions Folder Now command. Selecting this option opens Finder (or Windows Explorer for Windows) with Lightroom Classic’s Export Actions folder selected. You can place either an executable file or an alias (shortcut for Windows) to an executable file in the Export Actions folder to include it as an option in the After Export drop-down list the next time you start Lightroom Classic. This is another way to set things up so you can send your photos to a specific program or a Photoshop droplet with one quick command.
“What’s a droplet?” you say. A droplet is a Photoshop action that you manage to turn (with Photoshop’s help) into a tiny executable file. After you create a droplet, you can literally drag and drop photos on top of it to run the photos through the action automatically — a really powerful way to run a batch of images through a favorite action, such as applying a specific Photoshop filter, converting to an alternative color space, or applying a custom watermark. By including the droplet as an export action, Lightroom Classic automatically runs the exported copies through the droplet after they are created.
Saving export settings as a preset for reuse
Presets are such an awesome time-saver! Just think about it — you get to save scads of commonly used settings and then access them any time you want to directly from the Export with Preset menu (choose File → Export with Preset). Sweet!
Refer to the following figure to see the Presets panel — it’s there on the left side.
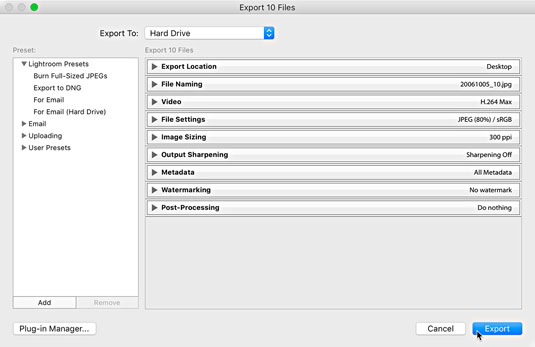
The Export dialog.
You get four preinstalled presets to start you off, right under the Lightroom Classic Presets heading — presets that can’t be ditched or updated, by the way. They are
- Burn Full-Sized JPEGs: Sets JPG as the file format with the least compression and no resizing and then adds burning the exported images to a disc as an After Export step.
- In DNG exportieren : Legt DNG als Dateiformat fest, was im Wesentlichen bedeutet, dass Sie beim Exportieren in DNG konvertieren. Beachten Sie, dass die Verwendung dieser Vorgabe nur dann sinnvoll ist, wenn Ihre Quelldateien im Rohformat vorliegen.
- Für E-Mail: Legt JPG als Dateiformat mit JPG-Komprimierung auf 60 fest und passt die Größe aller Bilder an 500 x 500 Pixel an. Diese Option weist Lightroom Classic an, exportierte Kopien beim Exportieren an Ihren Standard-E-Mail-Client zu übergeben.
- Für E-Mail (Festplatte): Legt JPG als Dateiformat mit JPG-Komprimierung auf 50 fest und passt die Größe aller Bilder auf 640 x 640 Pixel an. Beachten Sie, dass diese Vorgabe keine Dateien an Ihren E-Mail-Client übergibt; es konfiguriert nur den Export auf eine E-Mail-freundliche Größe und speichert sie an einem Ort Ihrer Wahl auf Ihrer Festplatte.
Die vorinstallierten Presets sind nicht besonders ausgefeilt, aber sie können gute Ausgangspunkte sein und Ihnen helfen, die Möglichkeiten zu erkennen. Wenn Sie beispielsweise Fotos per E-Mail an Freunde und Familie senden möchten, können Sie die Voreinstellung Für E-Mail als Ausgangspunkt nehmen und sie nach Ihren Wünschen anpassen. So geht's:
Klicken Sie auf die Voreinstellung Für E-Mail, um deren Einstellungen in das Dialogfeld Exportieren zu laden.
Erweitern Sie das Bedienfeld Dateieinstellungen.
Wenn Sie eine höhere Qualitätseinstellung bevorzugen, stellen Sie 70 ein.
Erweitern Sie das Bedienfeld Bildgröße.
Wenn Sie eine größere Pixelgröße bevorzugen, stellen Sie 1000 Pixel ein.
Erweitern Sie das Bedienfeld Ausgabeschärfung.
Aktivieren Sie das Kontrollkästchen „Schärfen für“ und wählen Sie „Bildschirm mit Standardwert“.
Belassen Sie die Einstellungen in den übrigen Panels unverändert.
Klicken Sie unten links im Bedienfeld „Vorgaben“ auf die Schaltfläche „Hinzufügen“.
Dadurch wird das Dialogfeld „Neue Vorgabe“ geöffnet.
Geben Sie einen beschreibenden Namen in das Feld Vorgabename ein.
(Optional) Erstellen Sie beim Speichern Ihrer Vorgabe einen neuen Ordner.
Sie können auf die Dropdown-Liste Ordner klicken und einen vorhandenen voreingestellten Ordner auswählen oder einen neuen erstellen.
Klicken Sie auf die Schaltfläche „Erstellen“, um den Vorgang abzuschließen und die Vorgabe zum Bedienfeld „Vorgaben“ hinzuzufügen.
Sie können benutzerdefinierte Voreinstellungen und Ordner löschen, indem Sie sie markieren und auf die Schaltfläche Entfernen klicken. Beachten Sie jedoch, dass beim Entfernen eines Ordners alle darin enthaltenen Voreinstellungen gelöscht werden!
Sie können benutzerdefinierte Voreinstellungen mit neuen Einstellungen aktualisieren, indem Sie die Einstellungen nach Ihren Wünschen anpassen, mit der rechten Maustaste auf die Vorgabe klicken und dann Mit aktuellen Einstellungen aktualisieren auswählen.
