SharePoint의 계산된 열 | 개요

SharePoint에서 계산된 열의 중요성과 목록에서 자동 계산 및 데이터 수집을 수행하는 방법을 알아보세요.
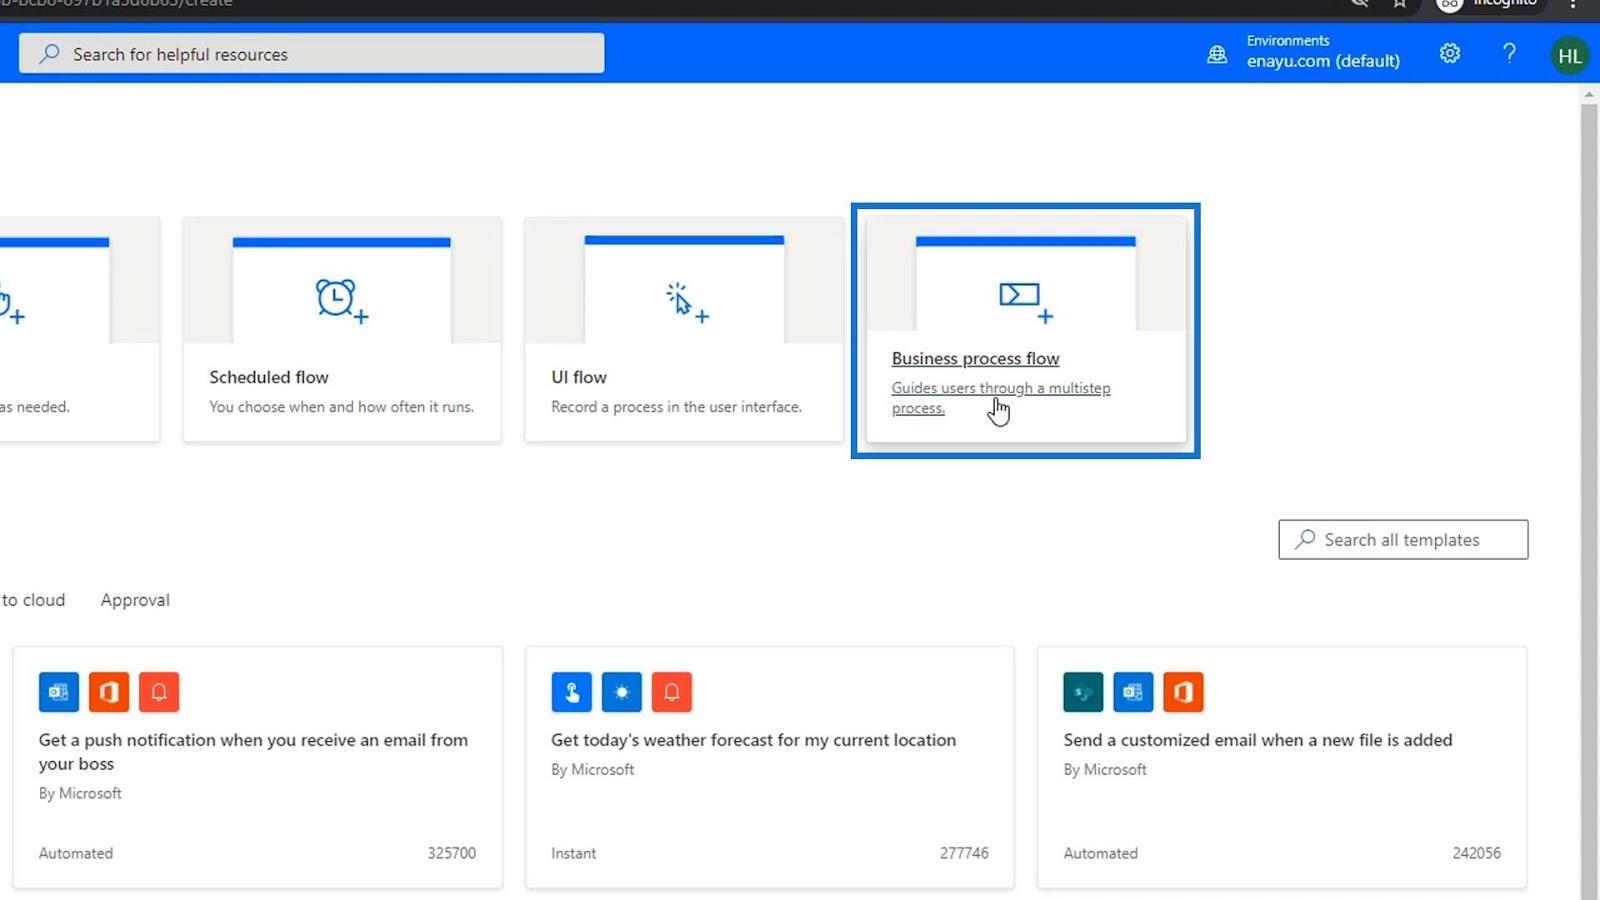
이 자습서에서는 비즈니스 프로세스 흐름이 무엇 이고 어떻게 작동하는지 에 대한 간략한 개요를 살펴봅니다 . 이것은 Power Automate 기능이 아니라 Power Apps 기능에 더 가깝습니다. 비즈니스 프로세스 흐름은 체크리스트 또는 주변 흐름을 추가하여 현재의 기존 비즈니스 프로세스를 훨씬 쉽게 만드는 방법입니다.
목차
비즈니스 프로세스 흐름 이해
온보딩하고 고용하는 비즈니스 프로세스가 있다고 가정해 보겠습니다. HR 팀이 일반적으로 따르는 프로세스가 있습니다. 그들이 고용된 후 우리는 그들이 노트북을 가지고 있는지 확인하고 필요한 회사 정보를 알고 있으며 이름, 전화 번호, 주소 등을 얻습니다. HR에는 아마도 그 사람을 위해 작성해야 하는 작은 체크리스트와 양식이 있을 것입니다.
비즈니스 프로세스 흐름을 통해 이러한 모든 것에 대해 디지털화된 프로세스를 만들 수 있습니다. 따라서 HR이 일반적인 수동 프로세스의 올바른 순서에 대해 생각하는 대신 또는 필요한 모든 정보를 실제로 얻은 경우 HR 팀이 순차적으로 따를 수 있는 프로세스를 만들 수 있습니다.
비즈니스 프로세스 흐름의 목적은 현재 비즈니스 프로세스 주변에 구조를 만들고 주변에 체크리스트를 두는 것입니다.
비즈니스 프로세스는 그것을 사용하는 사람의 손에 완전히 달려 있습니다. 그들은 단지 한 가지 일을 다른 일을 하고 있을 뿐이며, 단계별 과정처럼 계속됩니다. 이를 통해 어떤 의미에서든 자동화하지 않고도 비즈니스 프로세스를 훨씬 쉽게 만들 수 있습니다.
비즈니스 프로세스 흐름 만들기
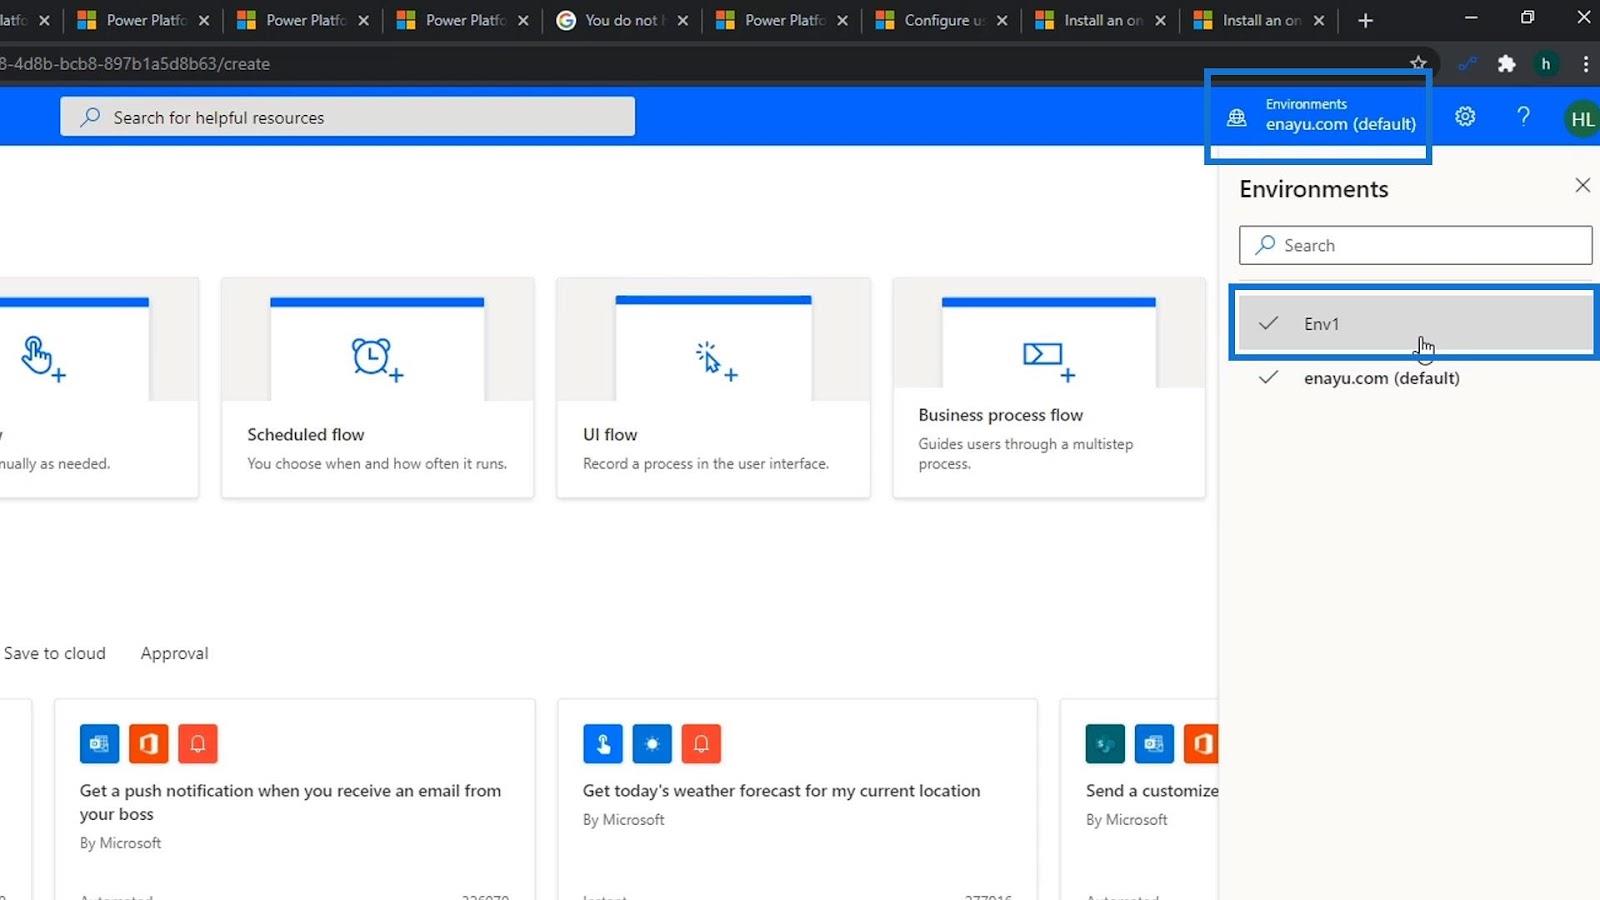
이제 샘플 비즈니스 프로세스 흐름을 만들어 보겠습니다. 먼저 엔터티가 있는 환경으로 환경을 전환해야 합니다. 따라서 먼저 환경을 생성했는지 확인하십시오. 그런 다음 환경을 클릭 하고 기본 환경에서 엔터티가 있는 새 환경으로 변경합니다.
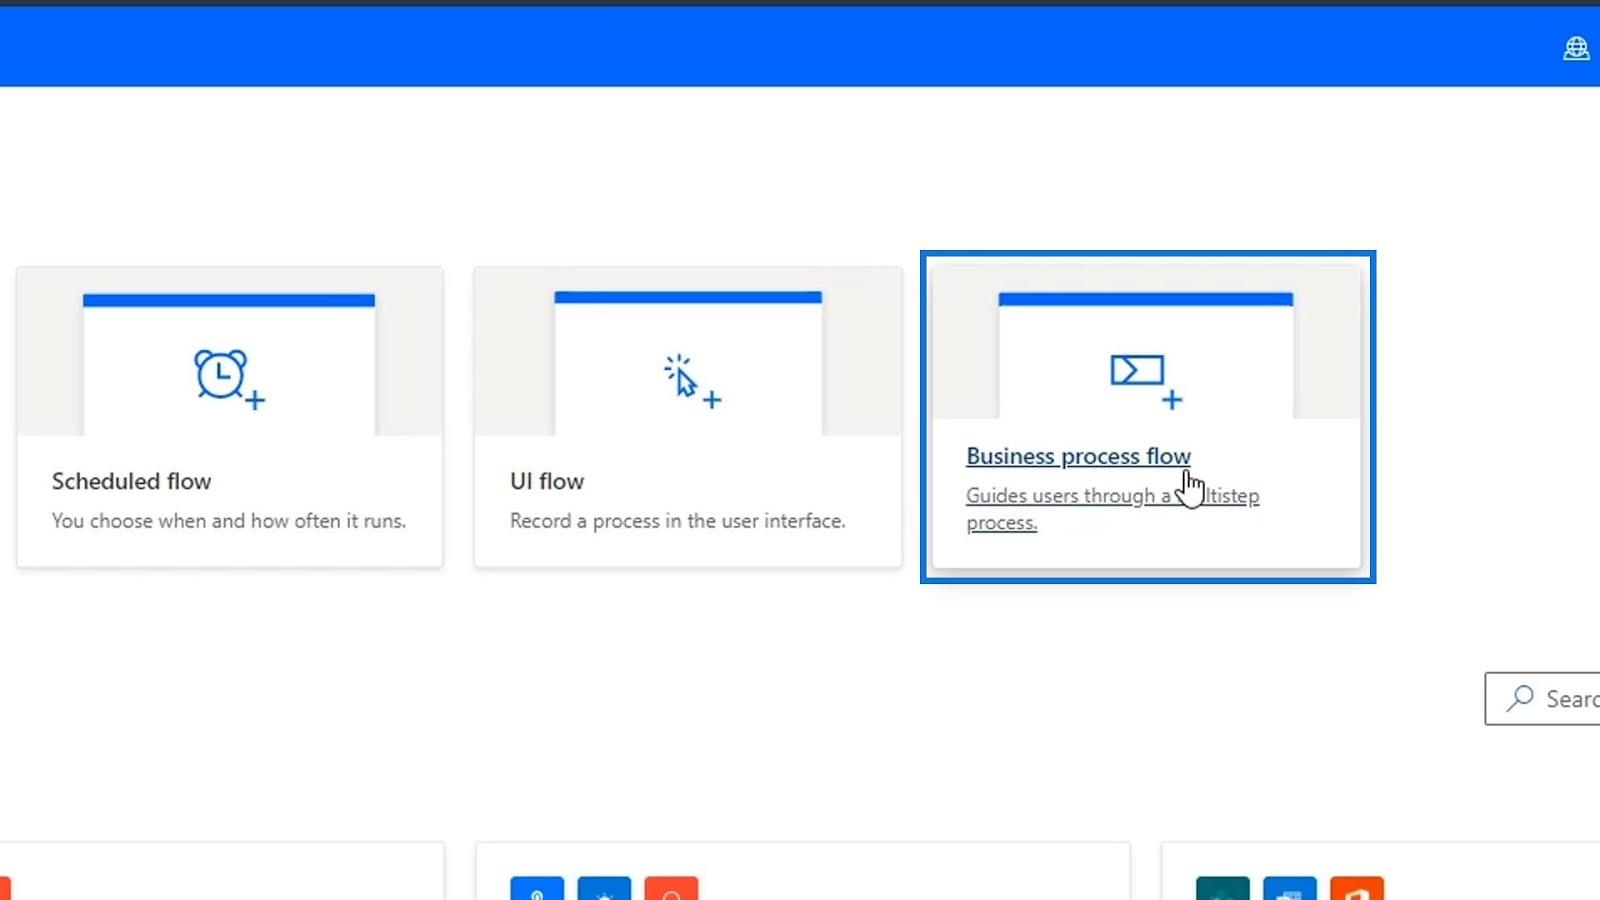
이제 비즈니스 프로세스 흐름을 클릭해 보겠습니다 .
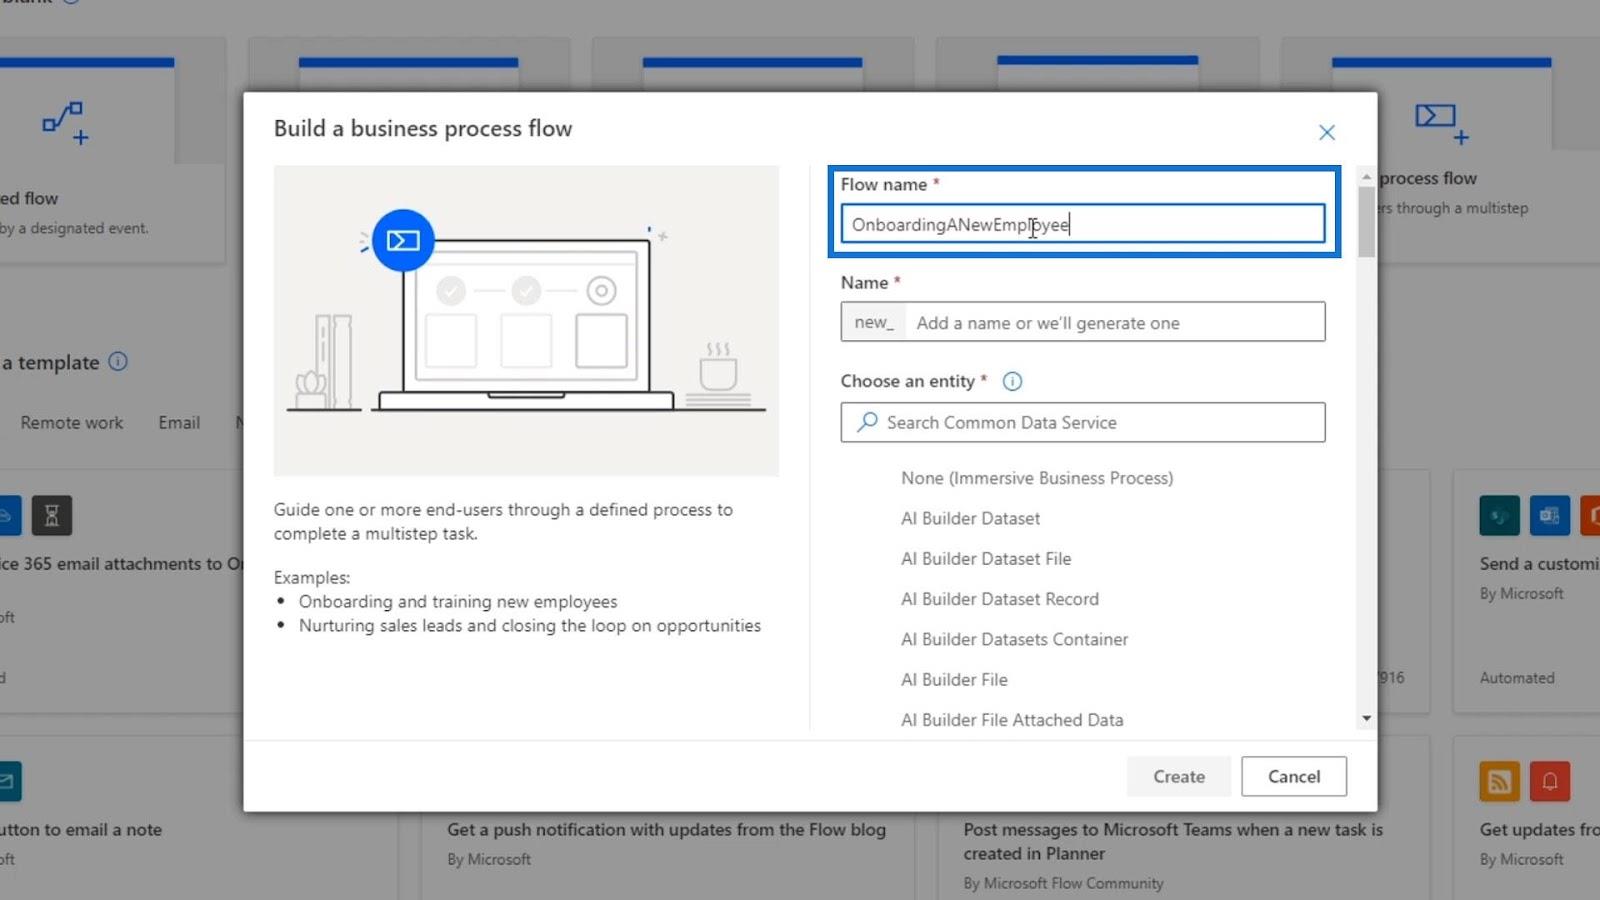
이름을 " OnboardingANewEmployee " 로 지정하겠습니다 .
엔터티 선택 텍스트 상자 의 경우 ...
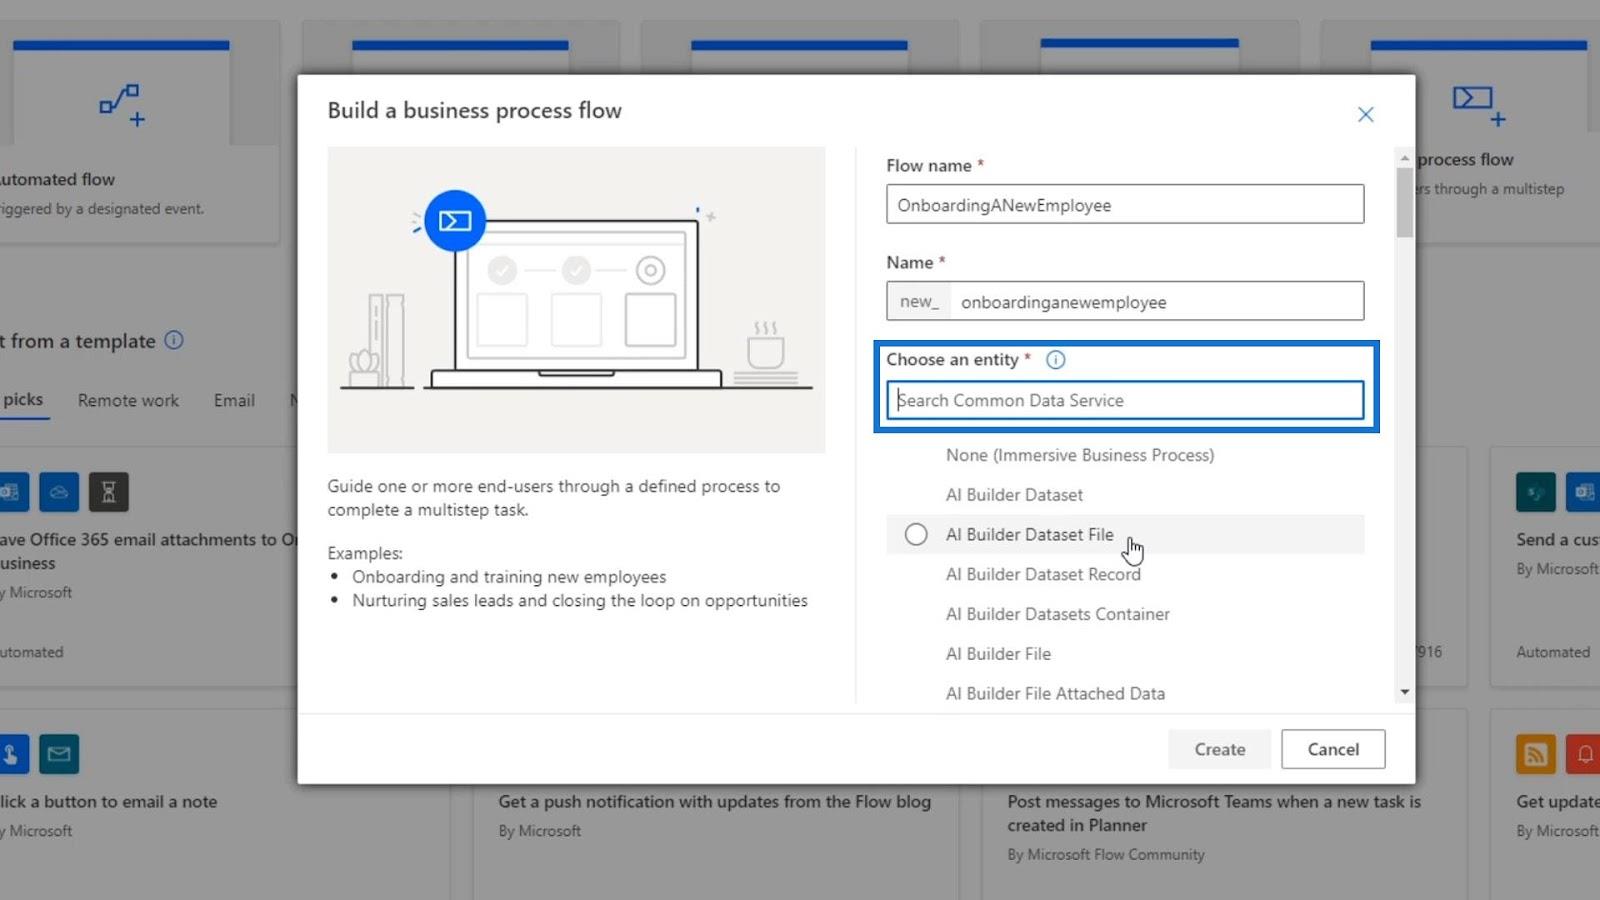
… 아래로 스크롤하여 NewEmployee 를 찾고 해당 확인란을 클릭한 다음 만들기 버튼을 클릭합니다.
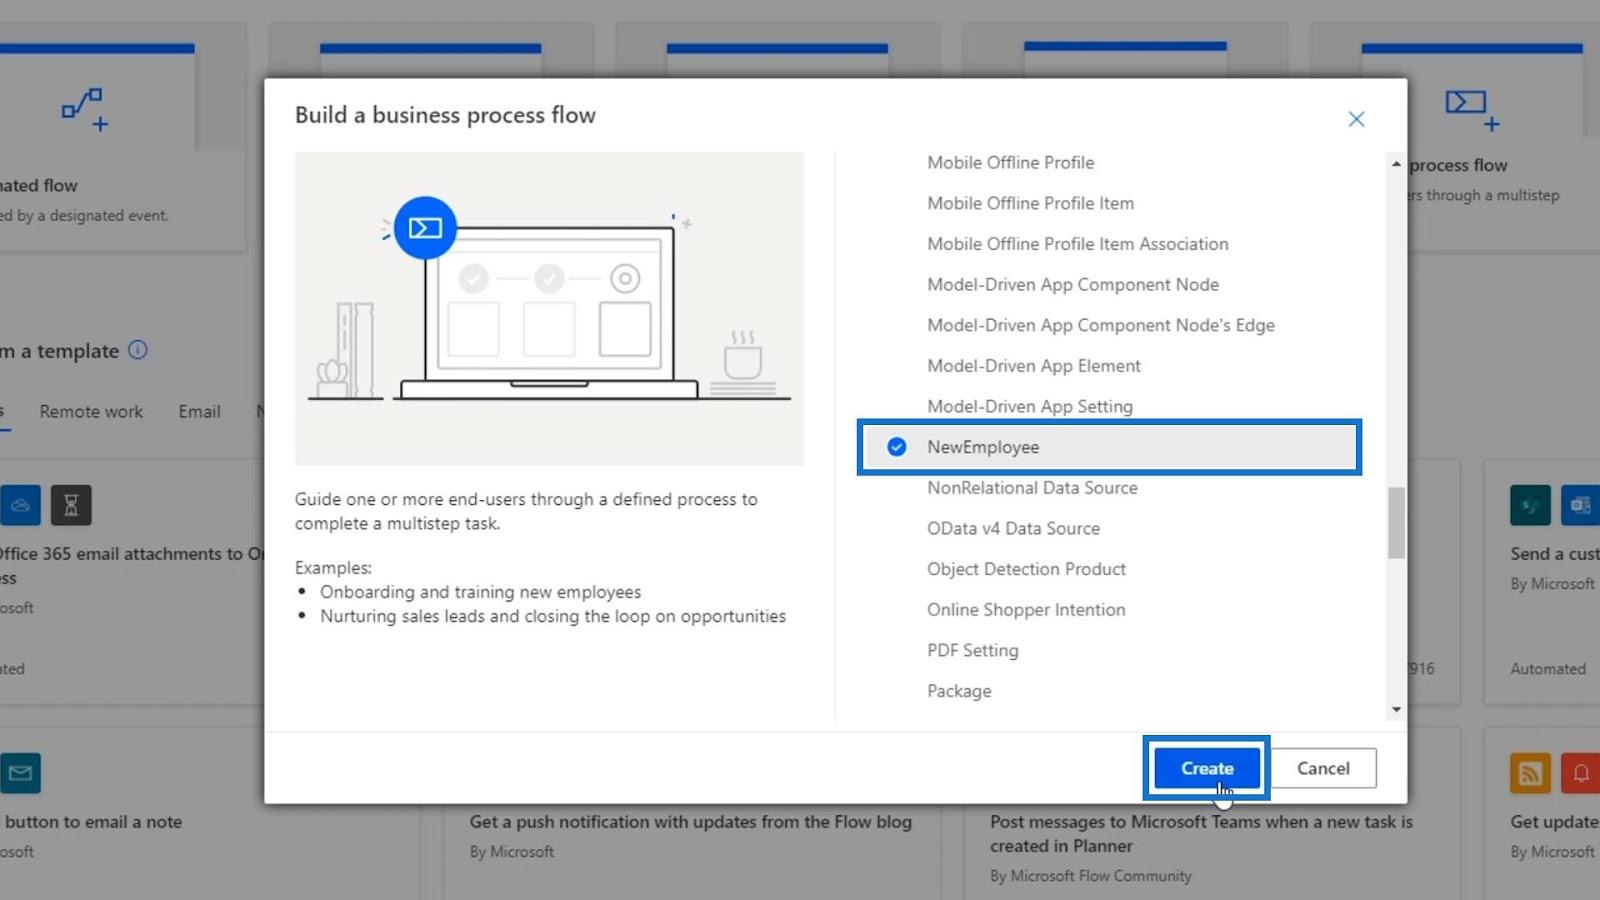
로드하는 데 몇 분 정도 걸릴 수 있지만 그러면 이 페이지로 리디렉션됩니다. 이것은 일반적인 흐름도가 아닙니다. 이것은 흐름 다이어그램과 완전히 다른 비즈니스 프로세스 다이어그램입니다.
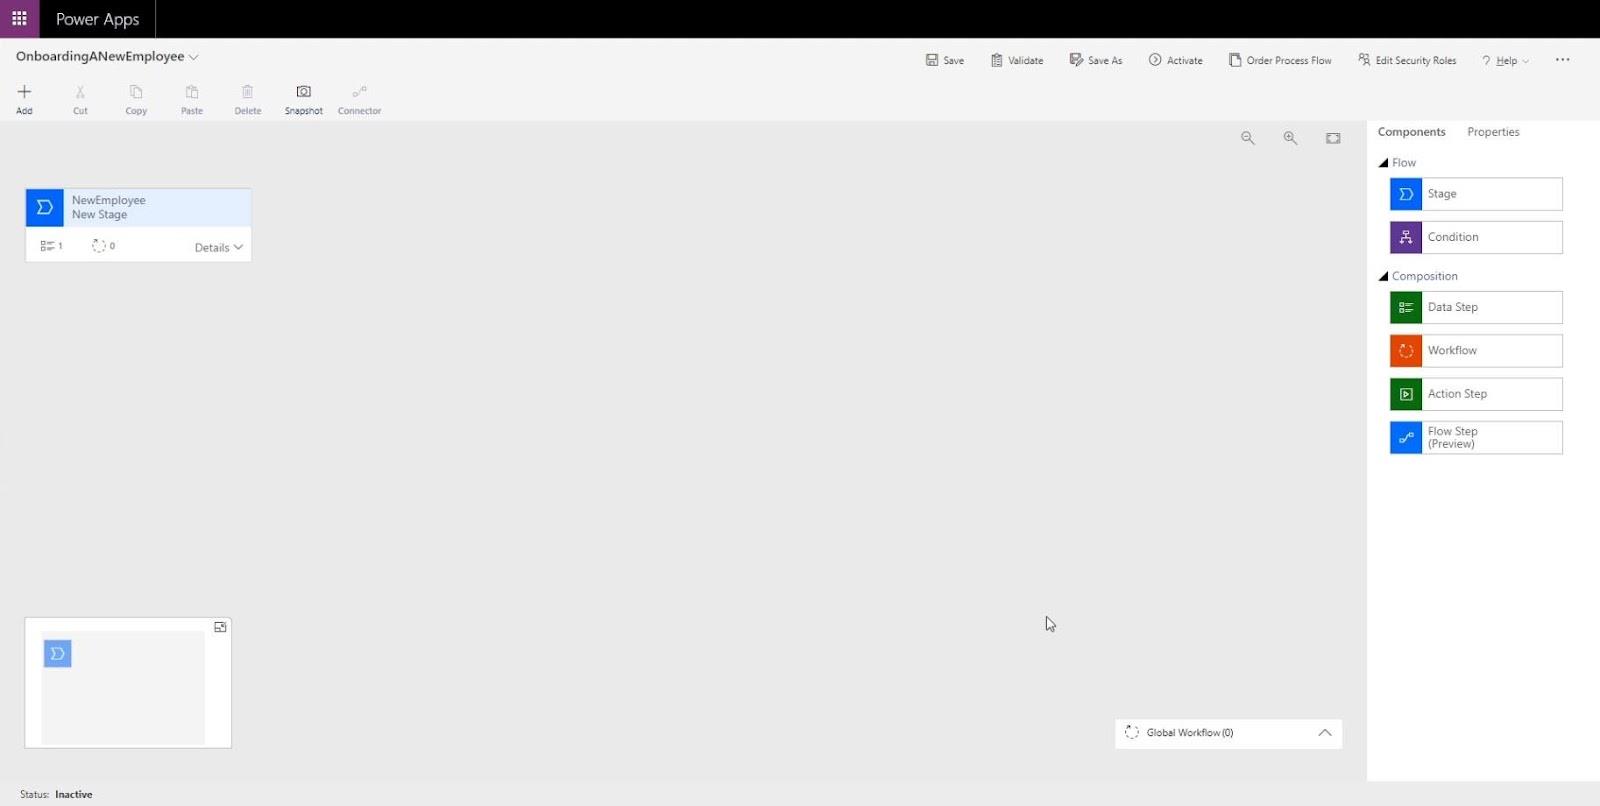
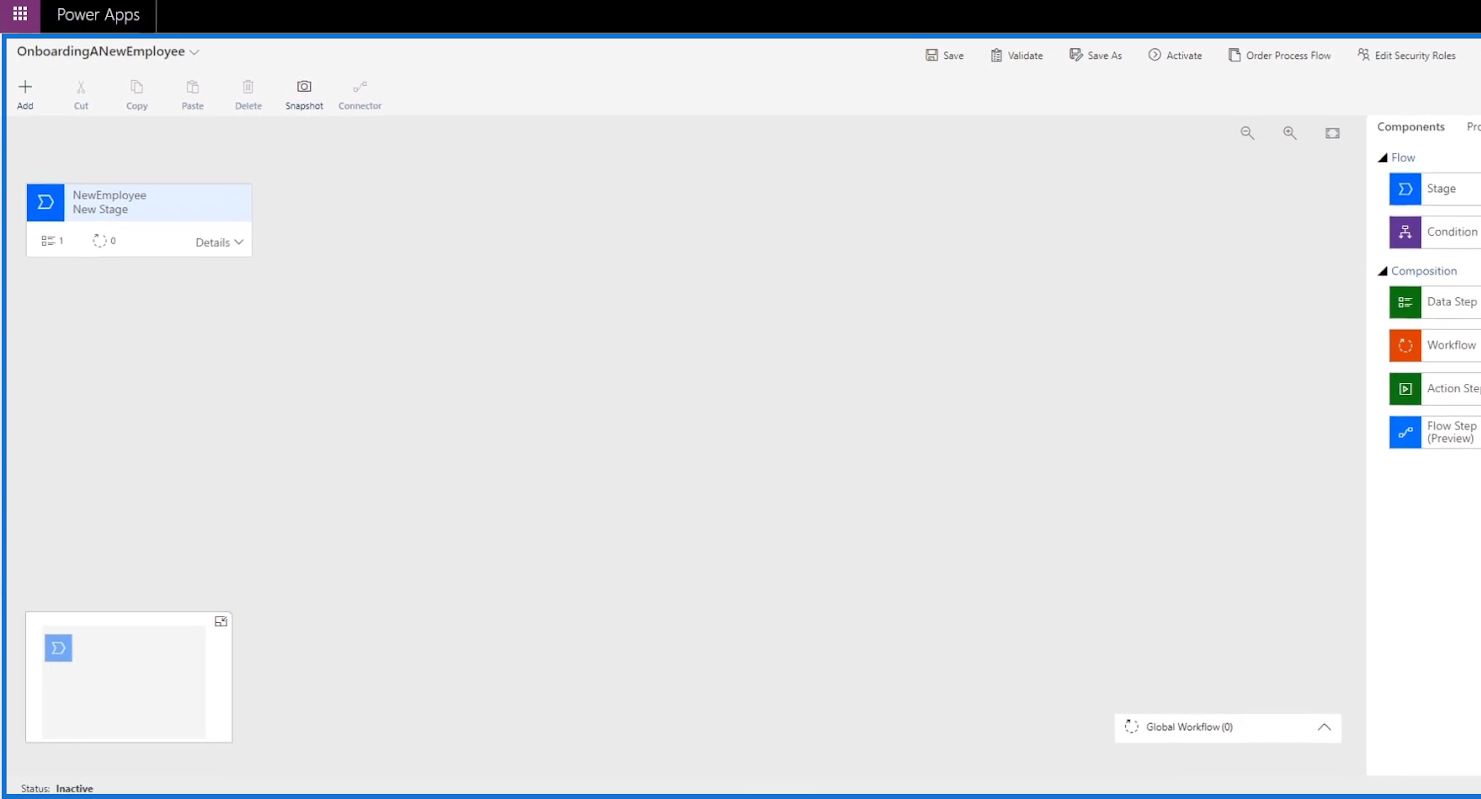
비즈니스 프로세스 흐름도
비즈니스 프로세스 흐름 다이어그램에는 일반적으로 흐름 다이어그램 에서 볼 수 있는 여러 유사한 기능이 포함되어 있습니다 .
이제 양식을 열어 보겠습니다. 그렇게 하려면 Power Apps 웹 사이트로 이동하십시오. 그런 다음 데이터 를 클릭합니다 . 그런 다음 엔티티를 클릭합니다 . 그러면 사용 가능한 양식 목록이 표시됩니다.
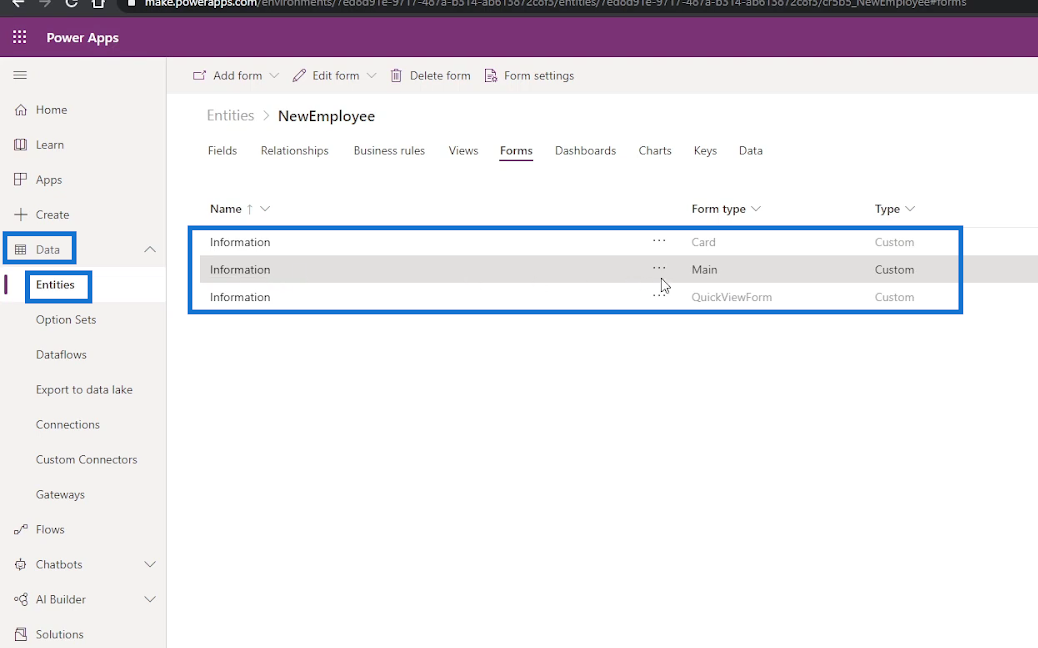
열려는 양식에서 줄임표 ( … )를 클릭합니다 . 그런 다음 양식 편집 옵션을 클릭합니다. 마지막으로 새 탭에서 양식 편집 옵션을 클릭합니다.

그러면 편집할 준비가 된 양식이 표시됩니다.
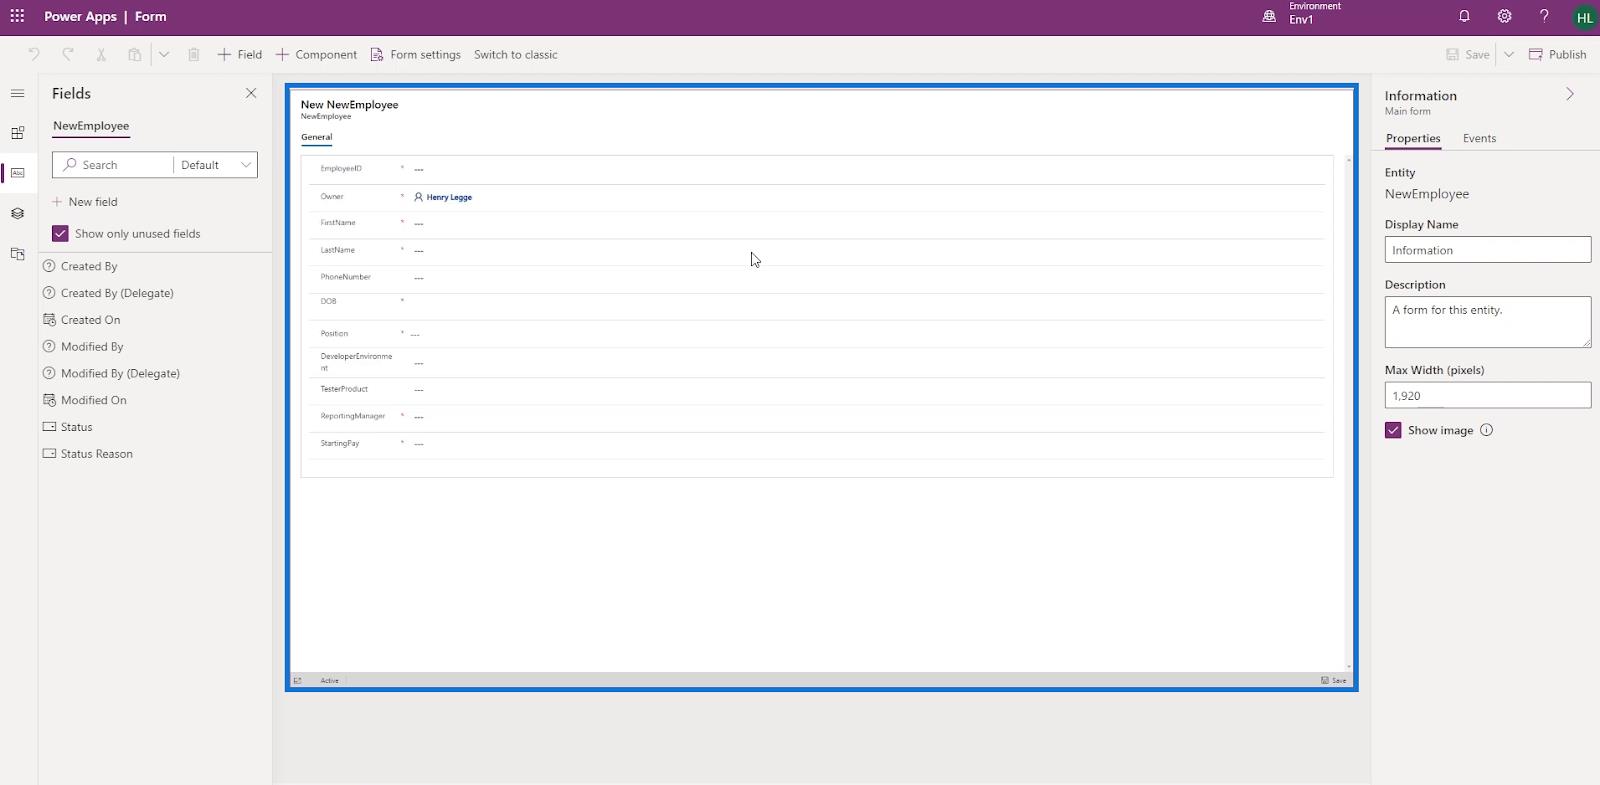
따라서 사용자가 양식을 열고 양식에 필요한 모든 세부 정보를 입력하는 모든 프로세스를 거치는 대신 비즈니스 프로세스 흐름을 생성하여 사용자가 응답하기를 원하는 필드를 안내할 수 있습니다. 예를 들어 일련의 질문 중 처음 세 가지 질문에 답하도록 할 수 있습니다. 이렇게 하면 비즈니스 프로세스의 일부로 작성해야 하는 양식을 통해 사용자를 안내할 수 있습니다.
비즈니스 프로세스 흐름 구성 요소: 단계
비즈니스 프로세스 흐름 다이어그램을 살펴보면 스테이지 버튼이 표시됩니다 . 클릭하면 단계 다이어그램이 나타납니다.
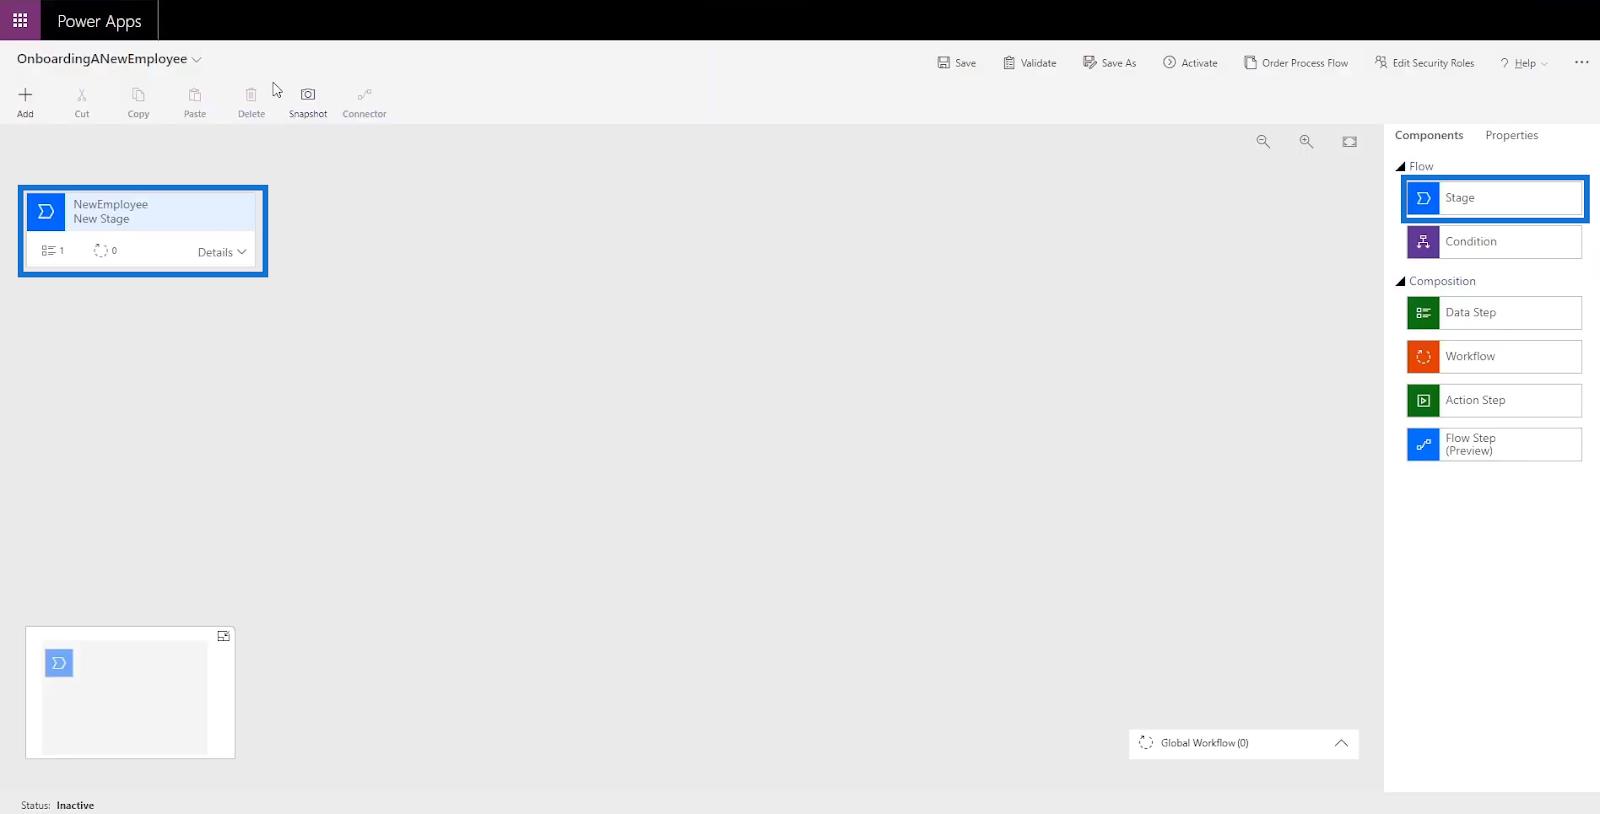
단계 는 사용자가 따르기를 원하는 단계 그룹입니다. 예를 들어, 1단계는 직원의 기본 정보를 얻는 것이고, 2단계는 급여 정보를 얻는 것이고, 3단계는 배경 조사를 하고, 4단계는 노트북을 가져오는 것입니다.
비즈니스 프로세스 흐름 구성 요소: 데이터 단계
각 단계에는 데이터 단계가 포함됩니다 . 클릭하면 다이어그램이 표시됩니다.
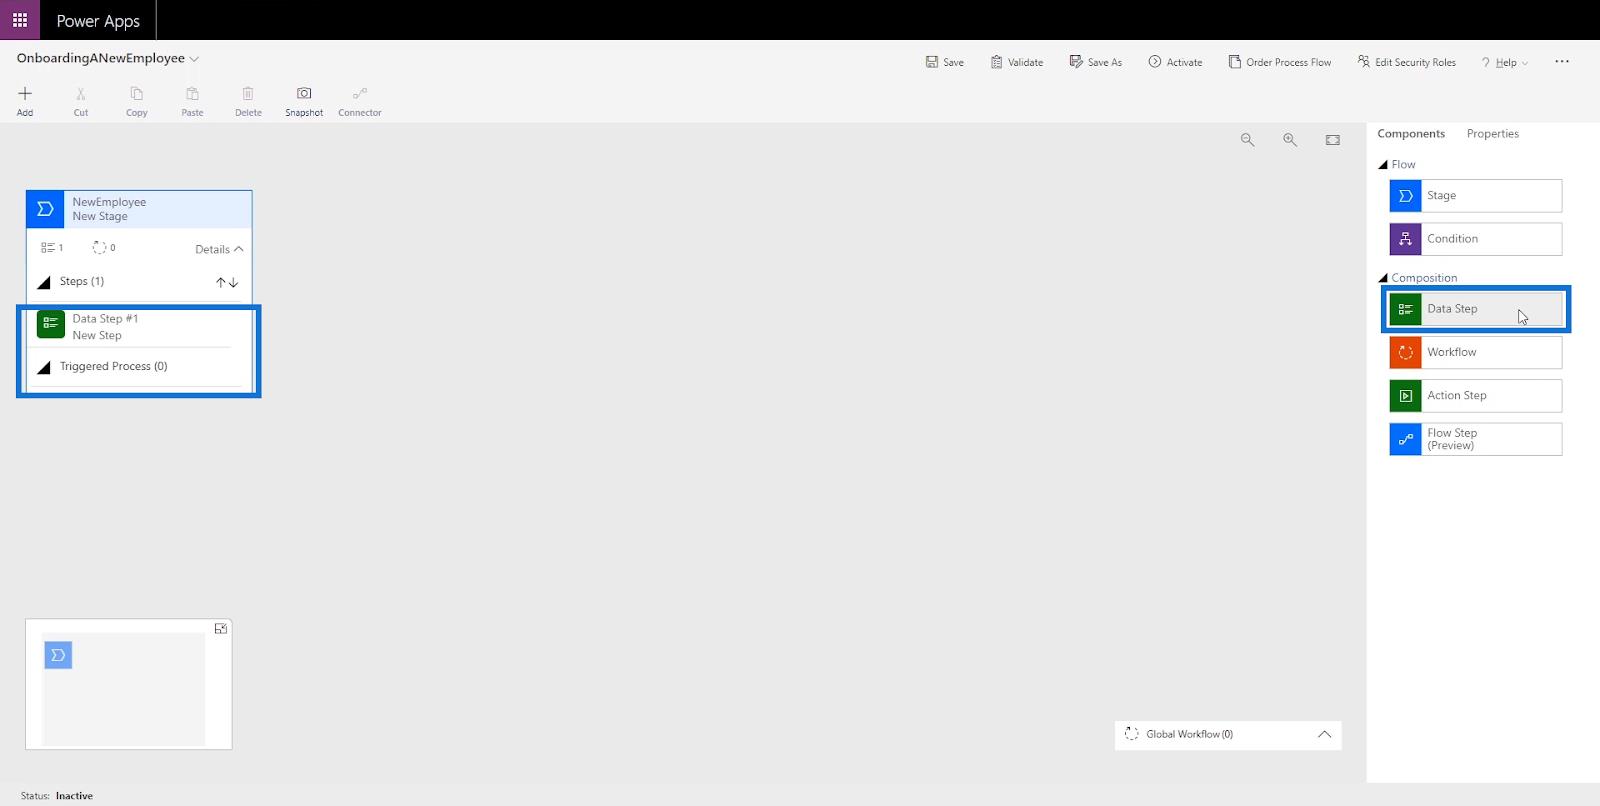
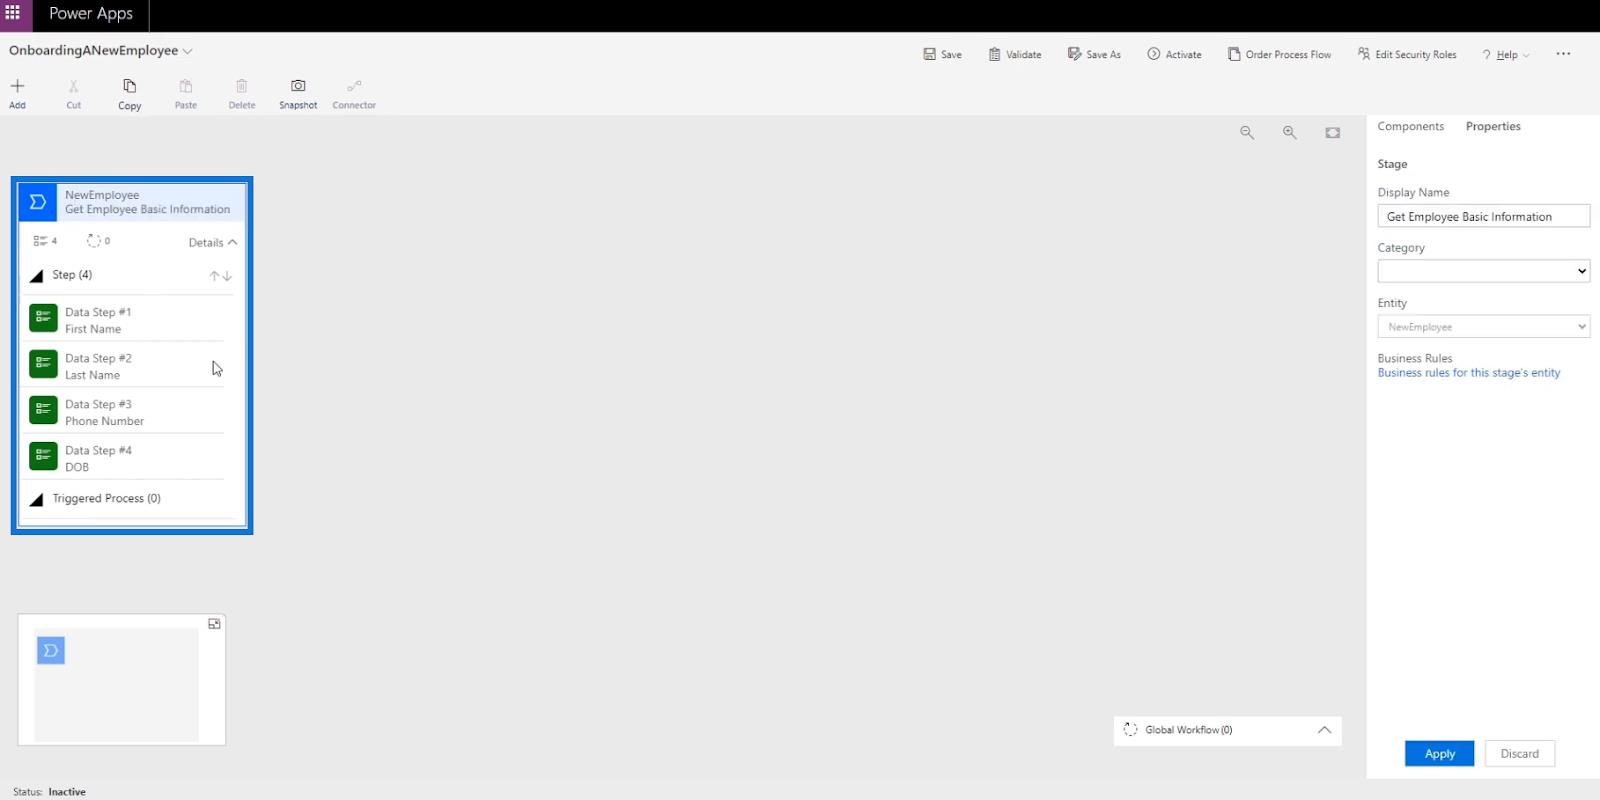
데이터 단계는 사용자가 비즈니스 프로세스 흐름 내에서 수집하기를 원하는 필수 데이터가 있는 단계 또는 여러 단계입니다 . 예를 들어 앞서 1단계에서 직원의 기본 개인 정보를 얻는 단계는 데이터 단계 #1 에서 이름 얻기 , 데이터 단계 #2 에서 성을 얻기 , 데이터 단계 에서 주소 얻기와 같은 데이터 단계를 포함할 수 있습니다. #3 , 데이터 단계 #4 에서 전화번호 가져오기 등.
비즈니스 프로세스 흐름 구성 요소: 조건
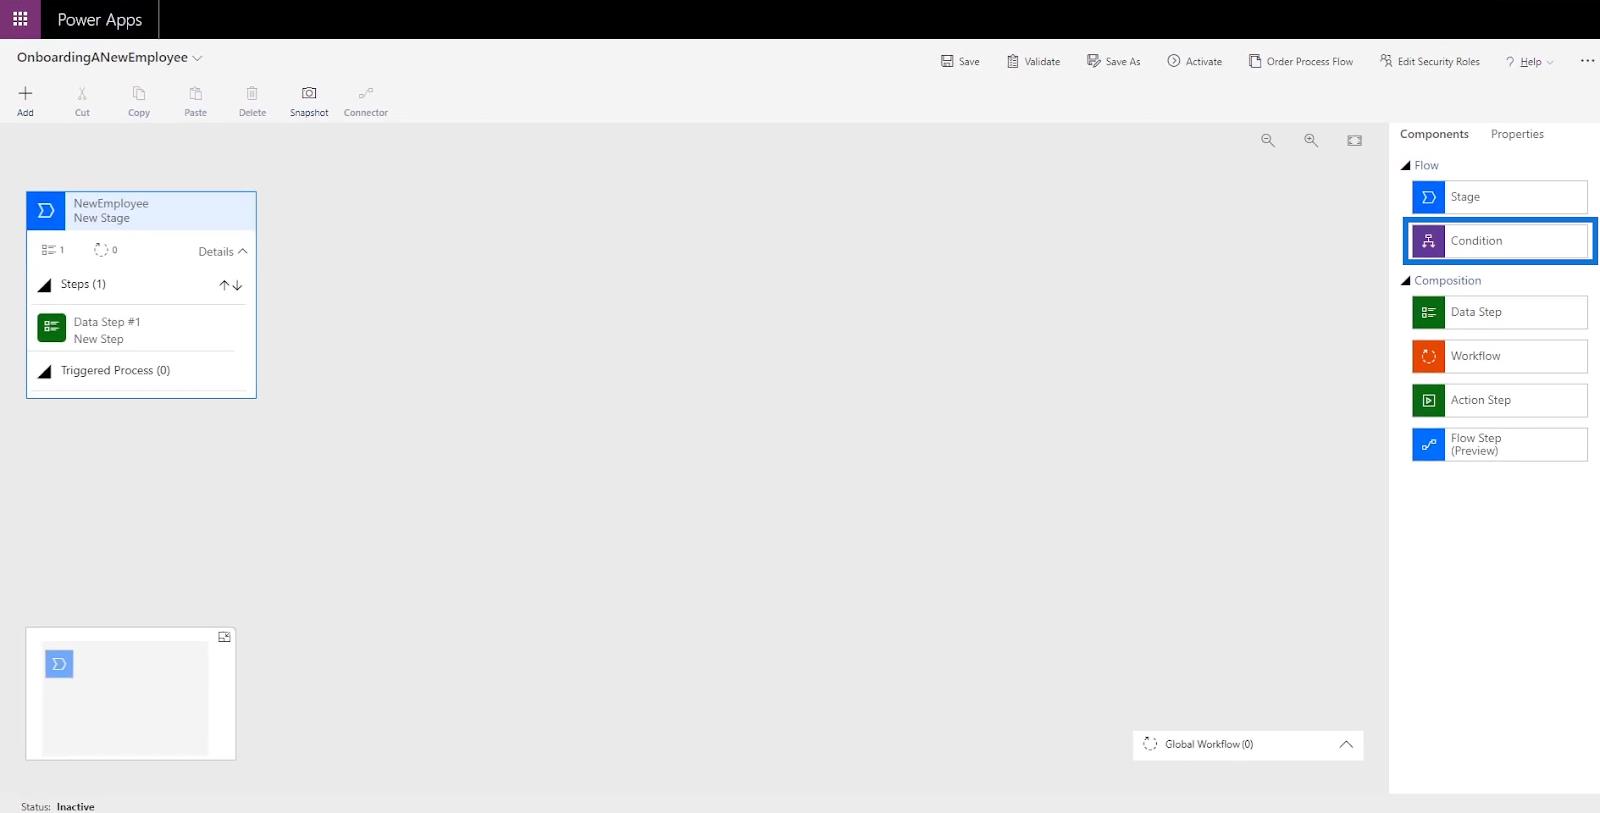
설정할 수 있는 조건 기능 도 있습니다 . 여기에서 사용자는 다른 단계 또는 다른 데이터 단계를 따르도록 유도하는 특정 결과가 있는 질문에 답합니다.
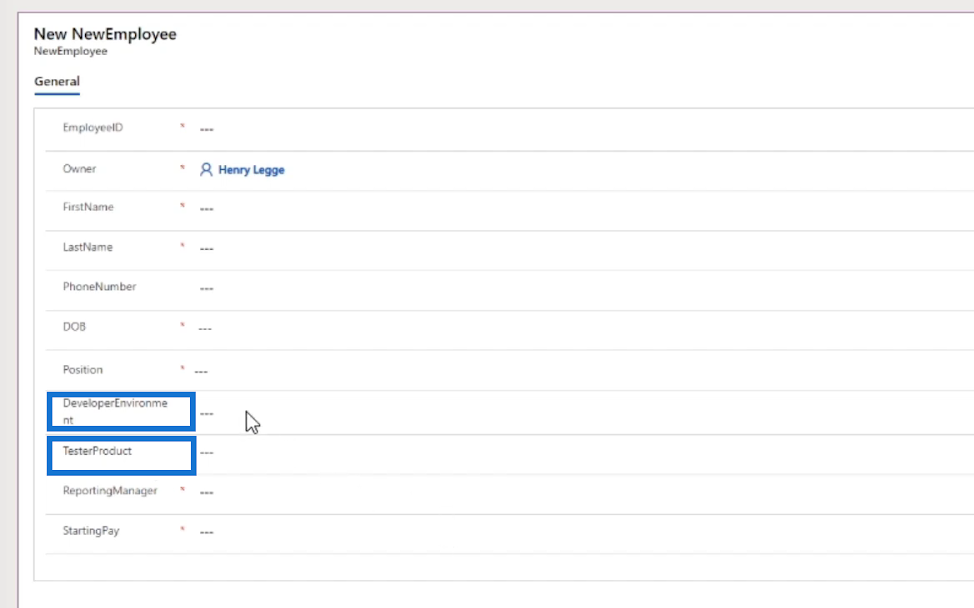
예를 들어, Condition 을 사용하여 개발자 인 경우 양식의 DeveloperEnvironment 필드에 응답하도록 사용자를 설정할 수 있습니다 . 그렇지 않은 경우 Tester 대신 TesterProduct 필드 에 입력합니다 .
비즈니스 프로세스 흐름 구성 요소: 작업 단계
작업 단계는 사용자가 데이터를 이메일로 보내는 것과 같은 작업을 수행하도록 할 때 사용됩니다. 예를 들어, 당사는 사용자가 급여를 받을 수 있도록 계정 지불 팀에 기본 개인 직원 정보 세트를 이메일로 보내도록 지시합니다. 따라서 데이터 단계 에 데이터를 입력하는 대신 사용자에게 작업을 수행하도록 요청합니다.
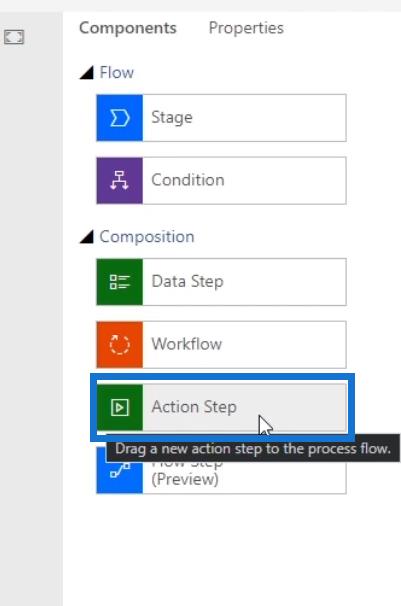
워크플로 및 흐름 단계 와 같은 두 가지 다른 비즈니스 프로세스 흐름 구성 요소 도 있지만 이 자습서에서는 이에 대해 너무 집중하지 않을 것입니다.
스테이지 수정
이제 다양한 구성 요소의 사용법을 알았으므로 첫 번째 비즈니스 프로세스 흐름 의 단계를 수정할 수 있습니다 . 이를 위해 New Stage 다이어그램을 클릭해 보겠습니다.
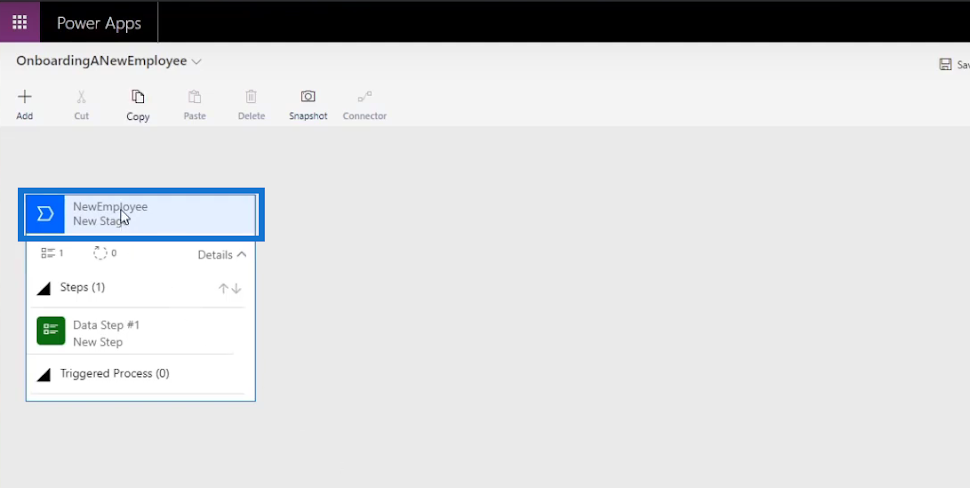
클릭하면 스테이지 의 속성이 나타납니다.
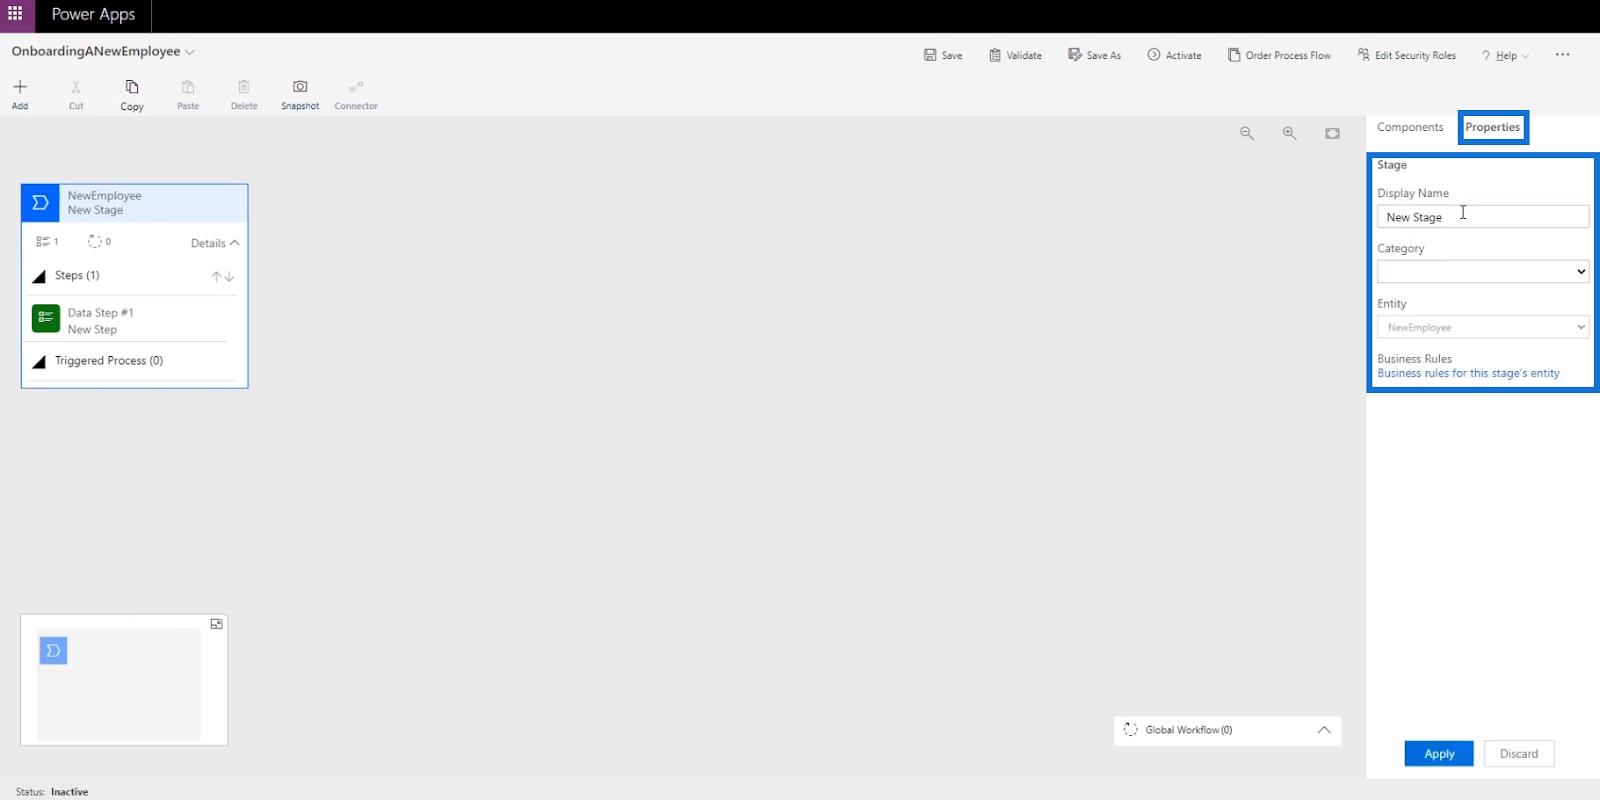
그런 다음 기본 표시 이름을 " 직원 기본 정보 가져오기 "로 변경 하고 적용을 클릭합니다 .
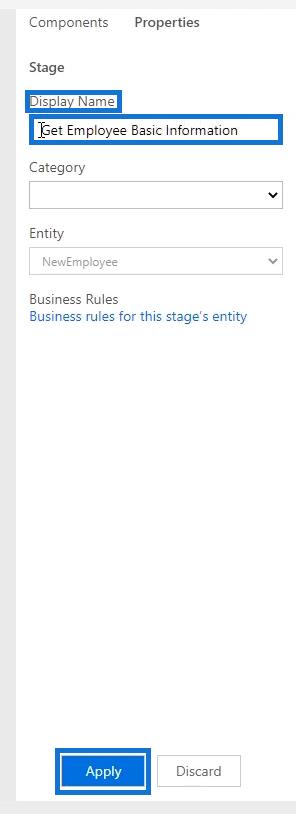
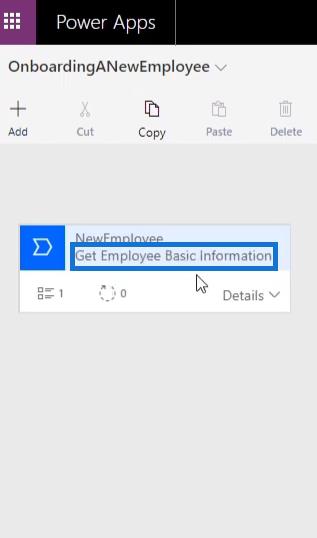
그러면 편집된 Stage 이름이 표시됩니다 .
그런 다음 세부 정보를 클릭하여 다이어그램에 데이터 단계 #1을 표시합니다 . 그런 다음 클릭하십시오.
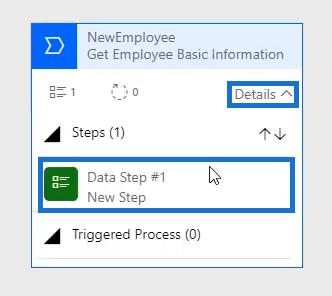
클릭하면 데이터 단계 의 속성이 표시됩니다.
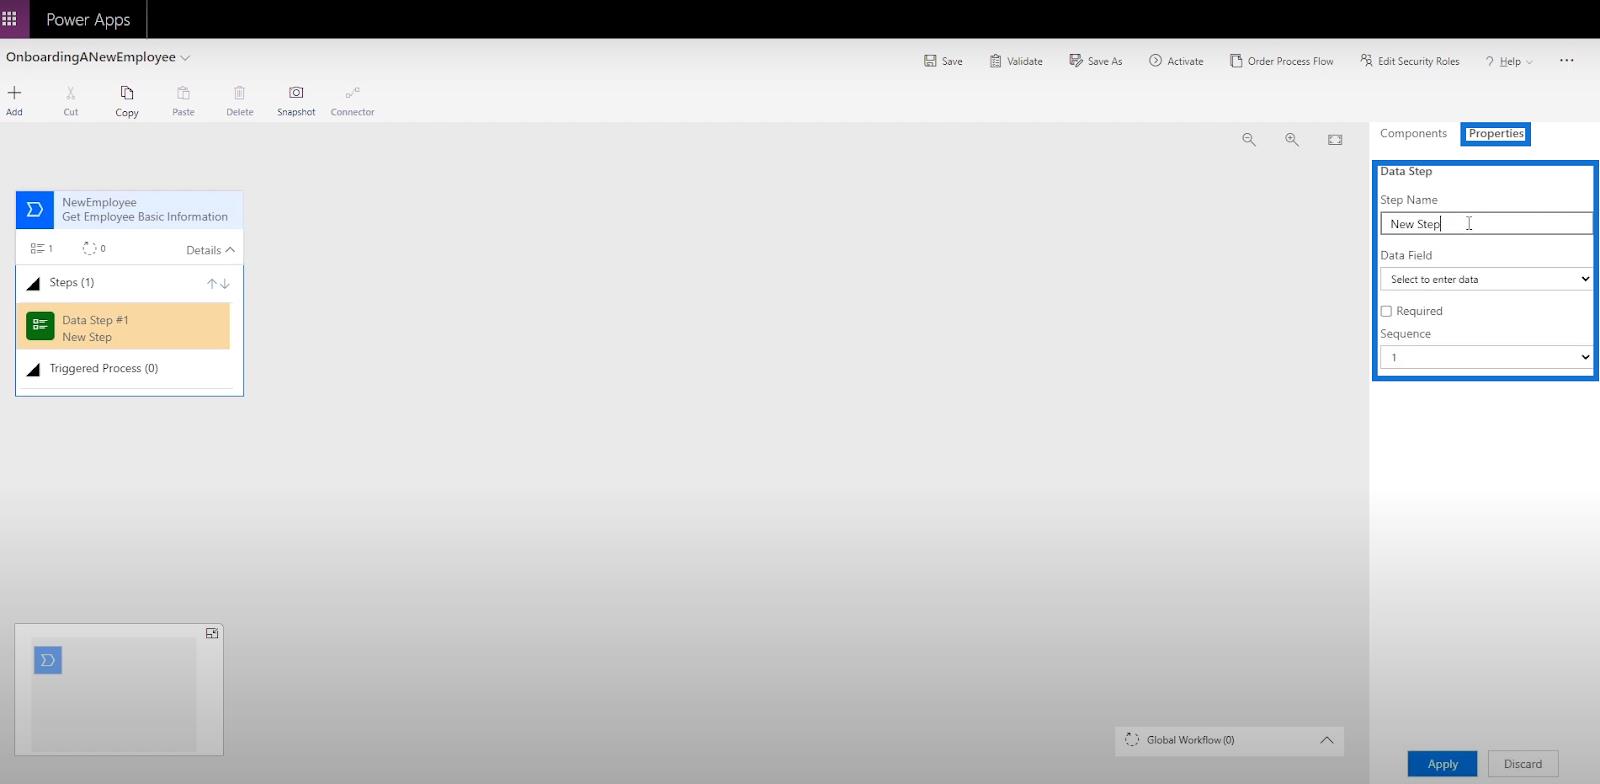
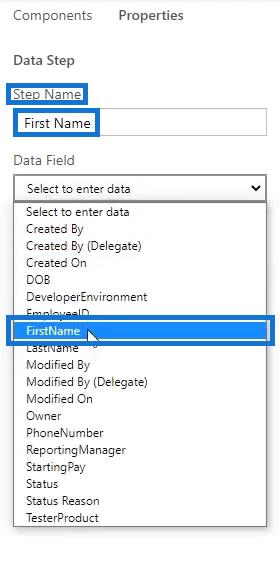
단계 이름 에 사용자가 수집하기를 원하는 특정 정보를 입력해 보겠습니다. 따라서 데이터 단계 #1 의 경우 " 이름 " 이 되고 데이터 필드 에서도 이름을 선택합니다 .
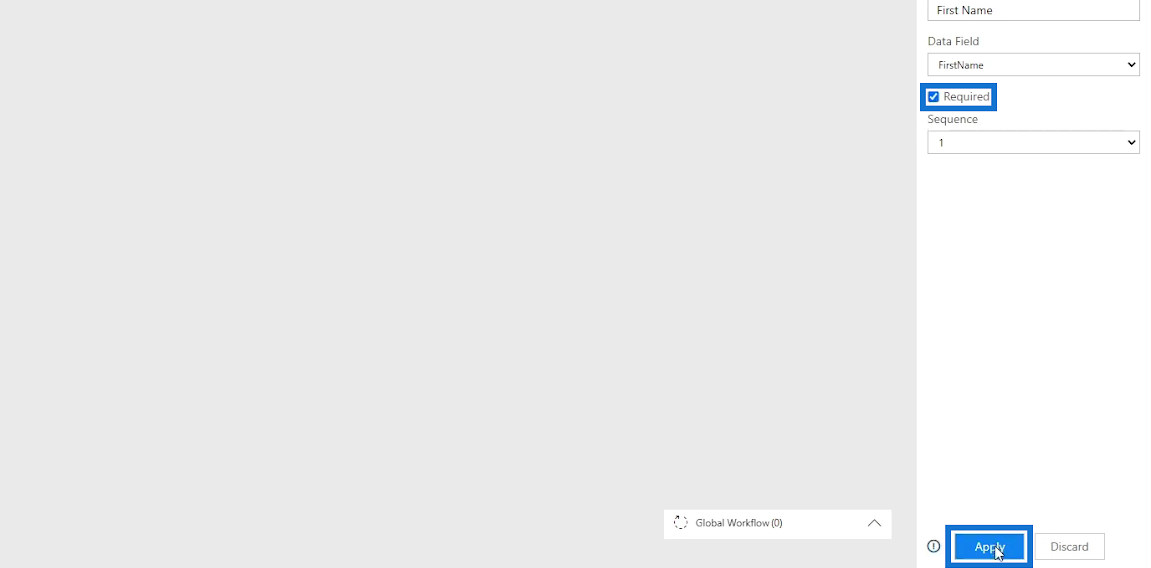
필수 를 선택 하고 적용을 클릭합니다 . 그러면 첫 번째 데이터 단계 의 편집된 이름이 표시됩니다 .
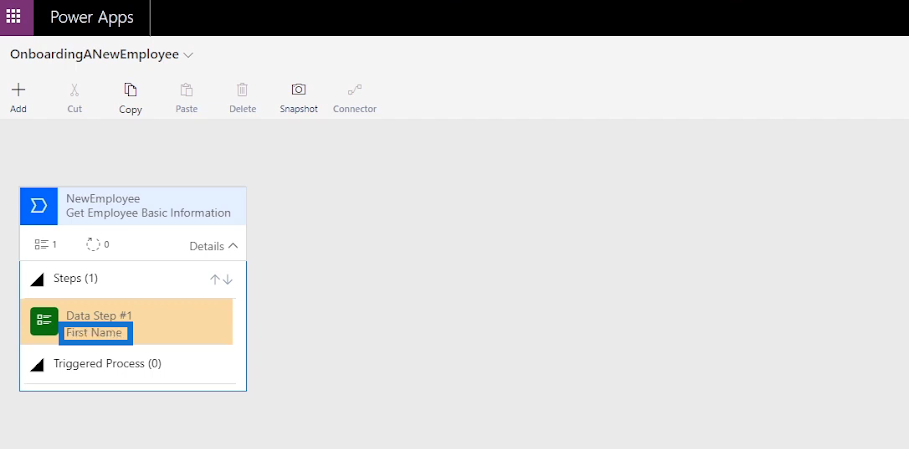
그러면 첫 번째 데이터 단계 의 편집된 이름이 표시됩니다 .
데이터 단계 구성 요소 추가
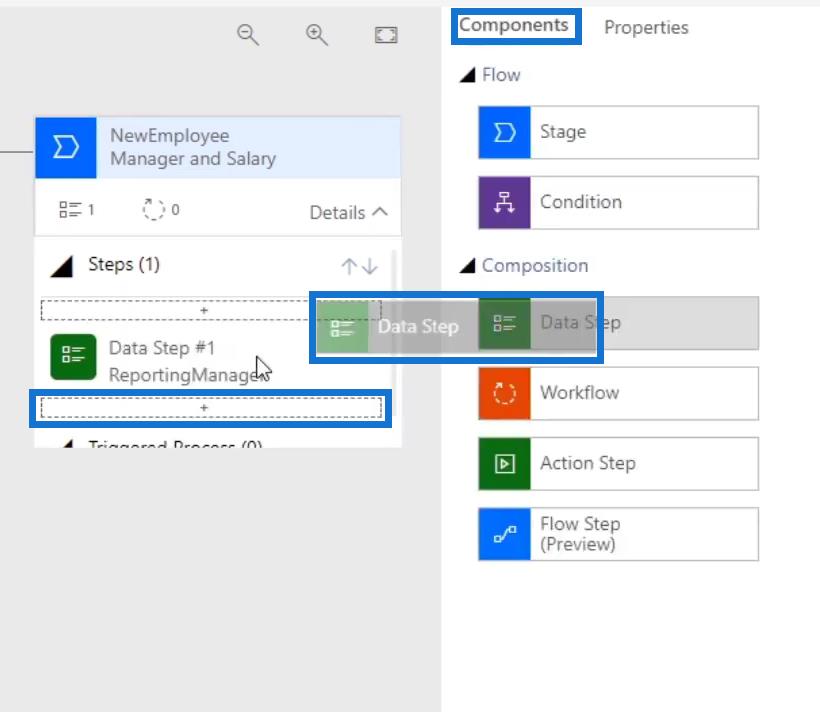
다이어그램에 새 데이터 단계를 추가하려면 구성요소 아래의 데이터 단계 버튼을 선택하고 드래그하기만 하면 됩니다 .
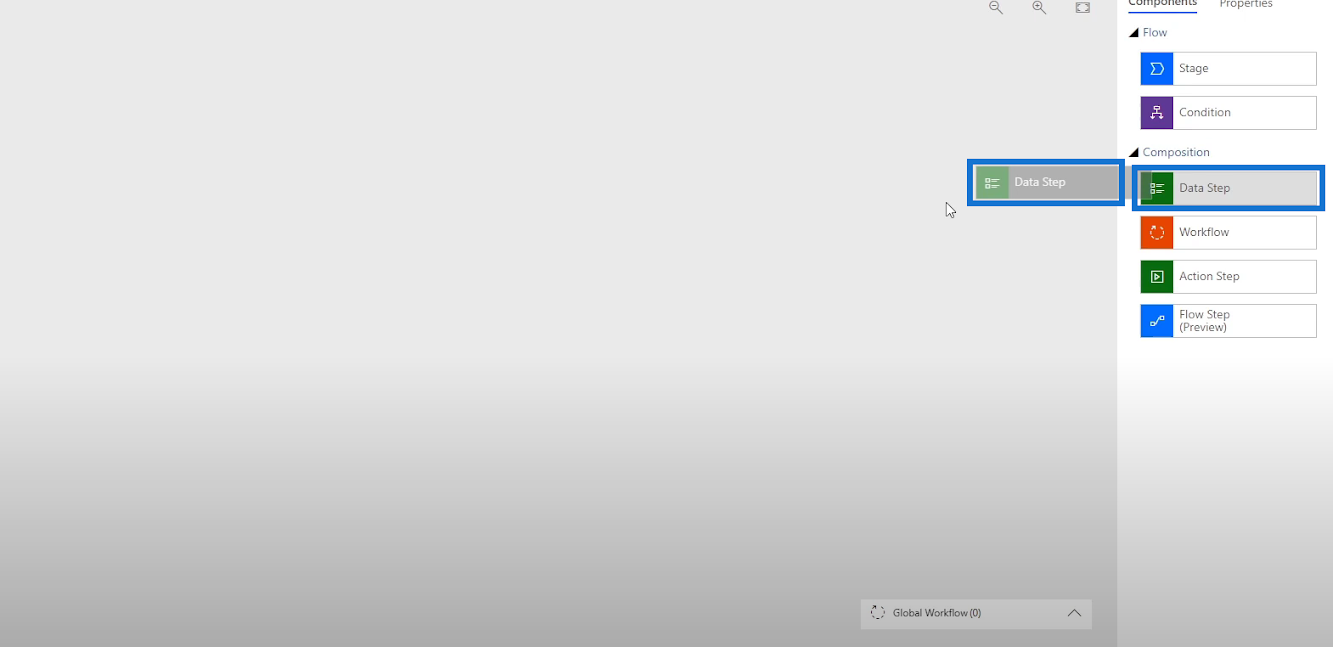
Then, place it in the plus sign (+) under Data Step #1.
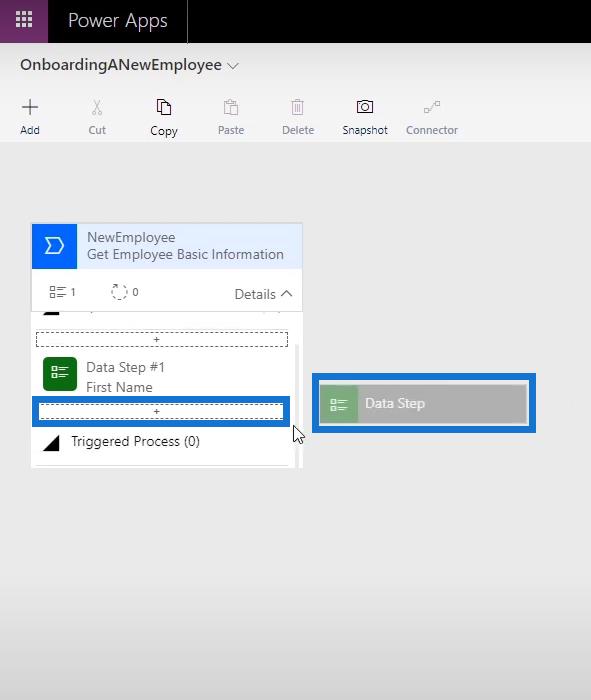
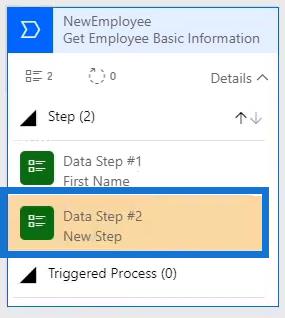
When done, we’ll see Data Step #2 added in the diagram.
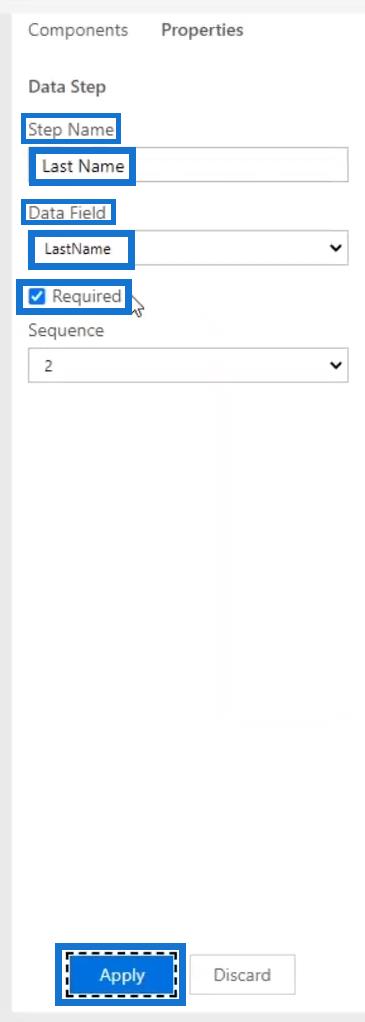
Let’s also specify the particular information we’d like the user to collect for Data Step #2. Type in “Last Name” as the Step Name, select LastName also in the Data Field, tick Required and lastly click Apply.
Let’s add another Data Step for this diagram. To do that, drag and drop the Data Step button in the plus sign (+) under the recent Data Step, just like ejat we did earlier.
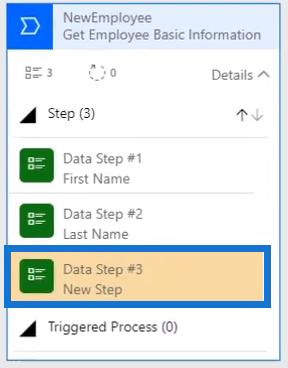
For Data Step #3, type in “Phone Number” for the Step Name, select PhoneNumber in the Data Field as well, tick Required, and lastly, click Apply.
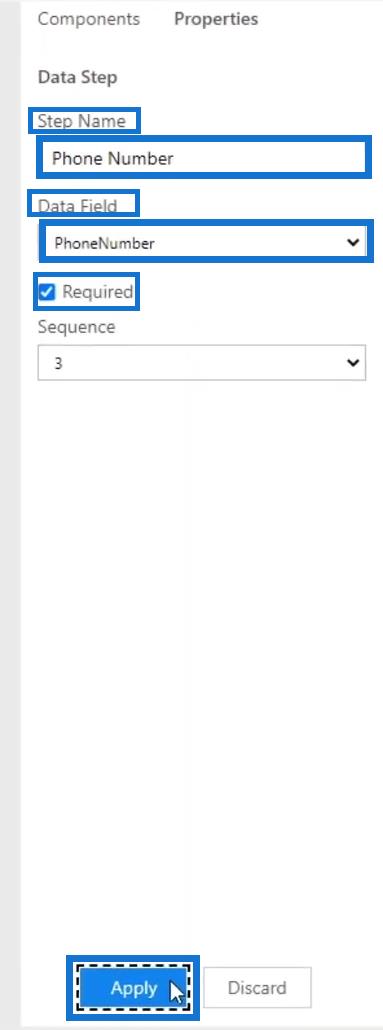
Let’s add another Data Step in the diagram.
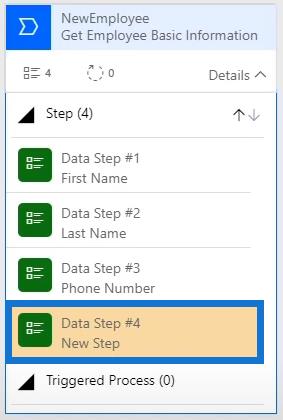
For Data Step #4, the user will collect Date of Birth but will just type in “DOB” as the Step Name. Select DOB in the Data Field, tick Required, and click Apply.
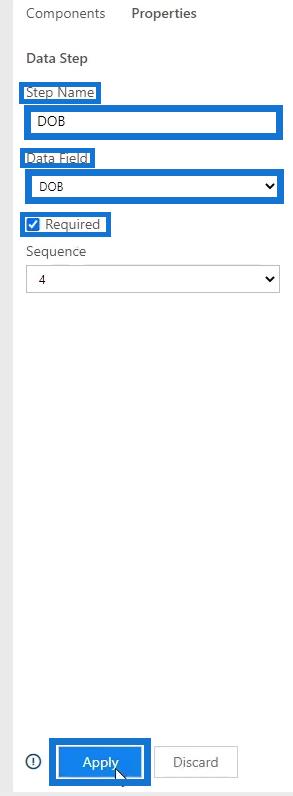
Now we’re done creating our first Business Process Flow diagram consisting of 4 Data Steps.
Adding A Stage
To add another Stage in the Business Process Flow diagram, select and drag the Stage button found under Components.
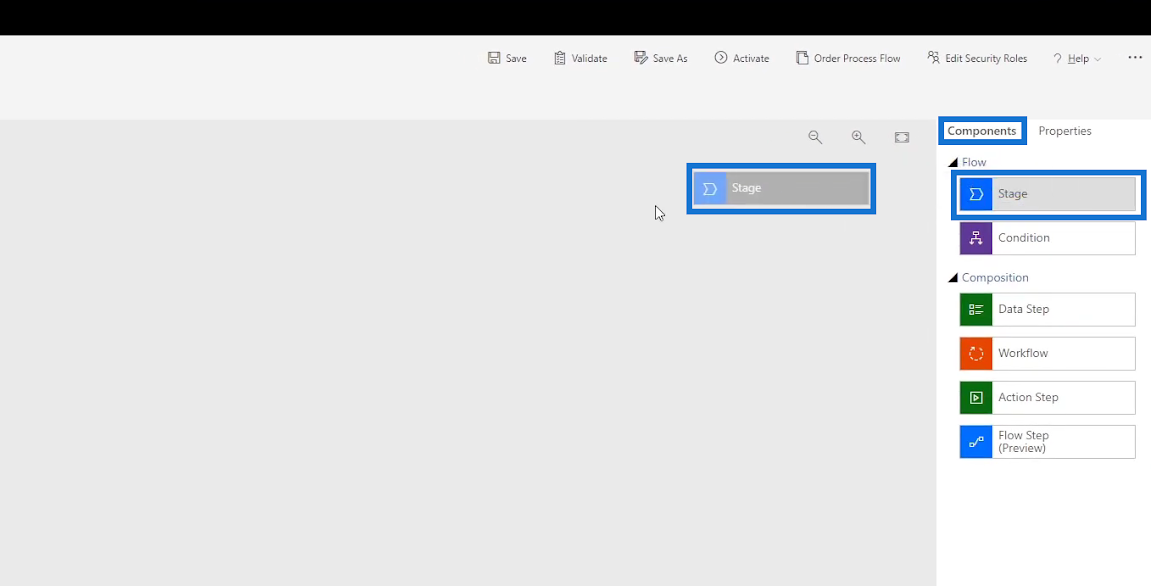
Then, place it in the plus sign (+) beside our recent Stage.

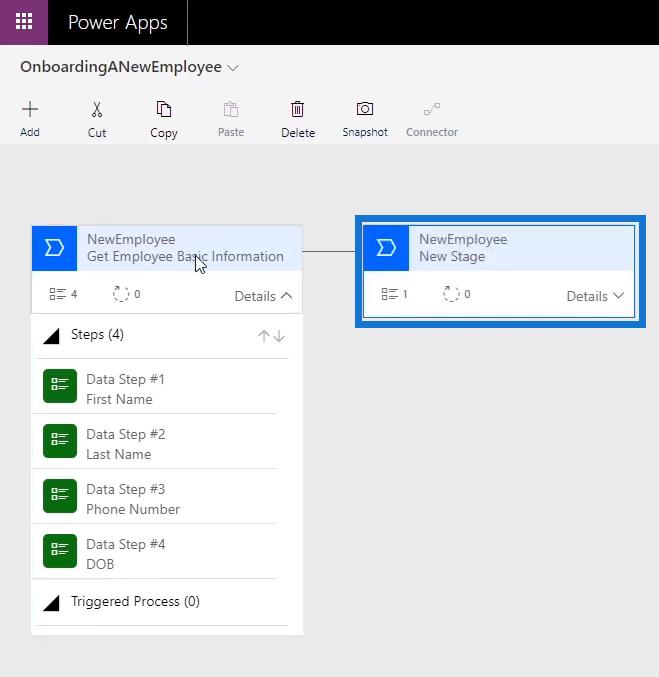
When done, we’ll see the diagram for the new Stage.
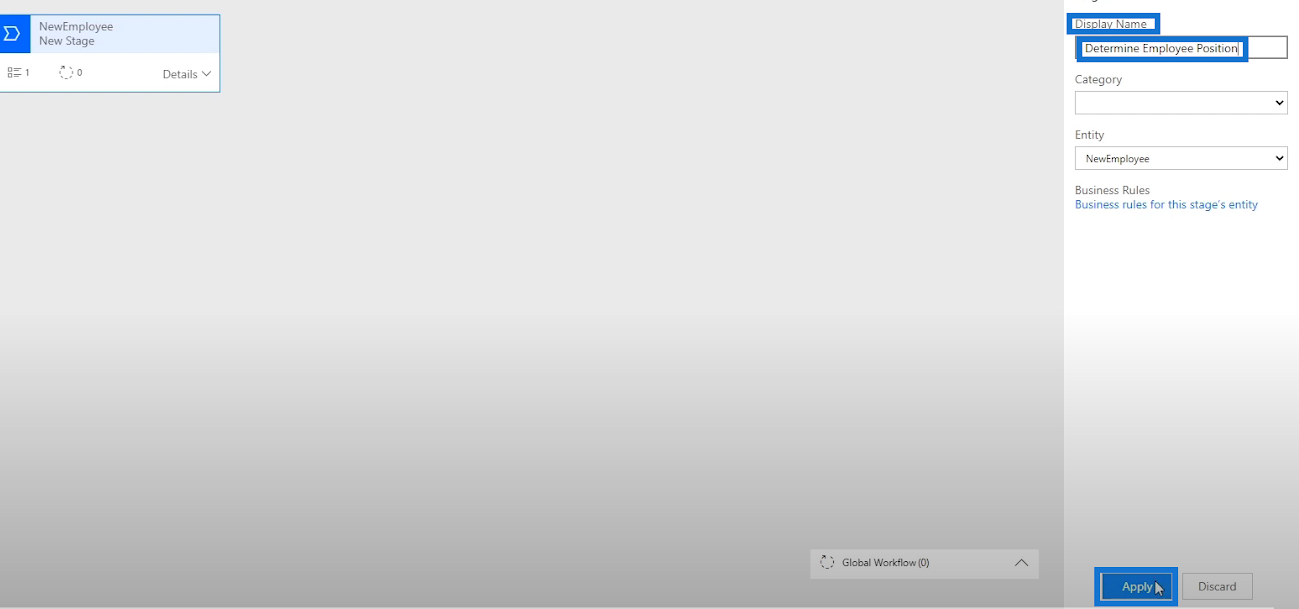
After getting the employee’s basic information, we need to determine the employee position. So, we’ll name the added Stage “Determine Employee Position” and click Apply.
After naming the Stage, we’ll create a Data Step. Click Details within the diagram then click Data Step #1.

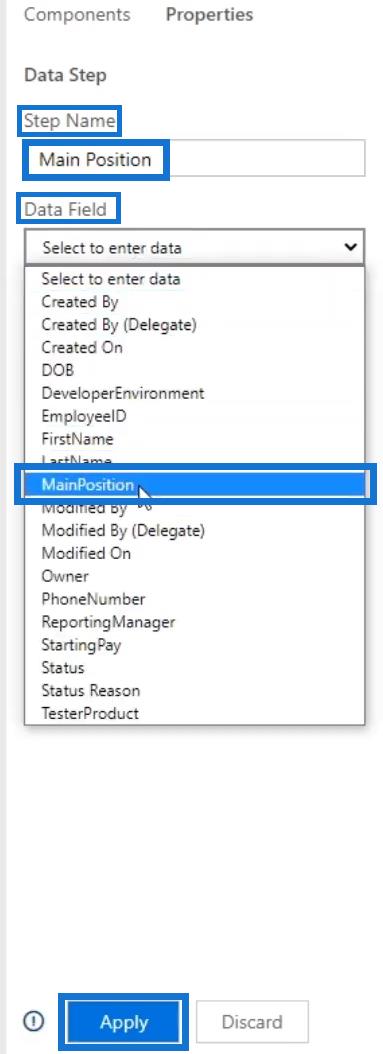
Let’s name the Data Step “Main Position”, select MainPosition as well for the Data Field and lastly click Apply.
Adding Condition To Business Process Flows
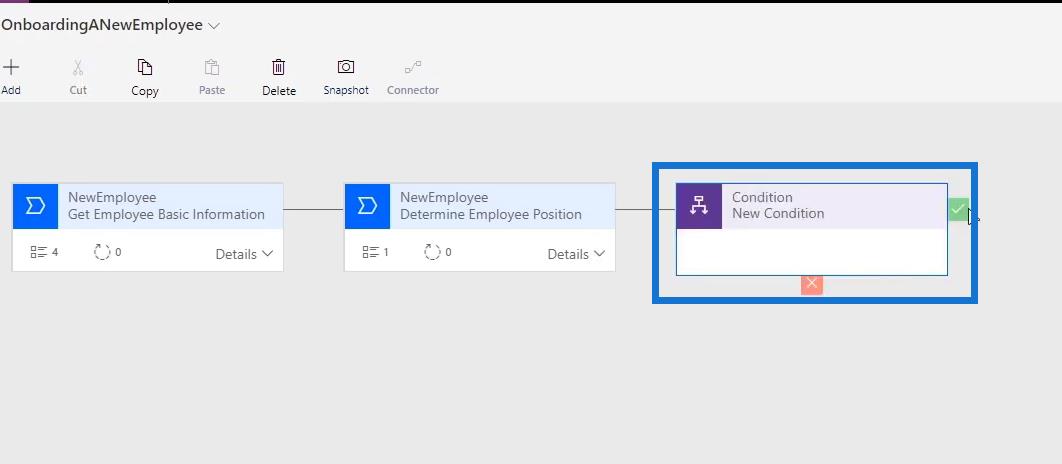
We’ll now add a Condition because we’d like the user to only populate the DeveloperEnvironment field if their main position is a Developer. Otherwise, the user would populate the TesterProduct field if the main position is a Tester. This is the main reason why we’re making this flow in the first place. To do that, let’s select and drag the Condition button.

Then, place it in the plus sign (+) right next to the Stage where the Condition will be added.

We’ll then see the new Condition diagram. The condition statement we’ll have is to test whether or not the main position is the same as the value of a developer or a tester. So, we’ll set the Yes path (?) for the Developer and the No path (X) for the Tester. If the user is a Developer, then he’ll follow the condition for Yes path. If it’s a Tester, then the condition for the No path will be followed, instead.
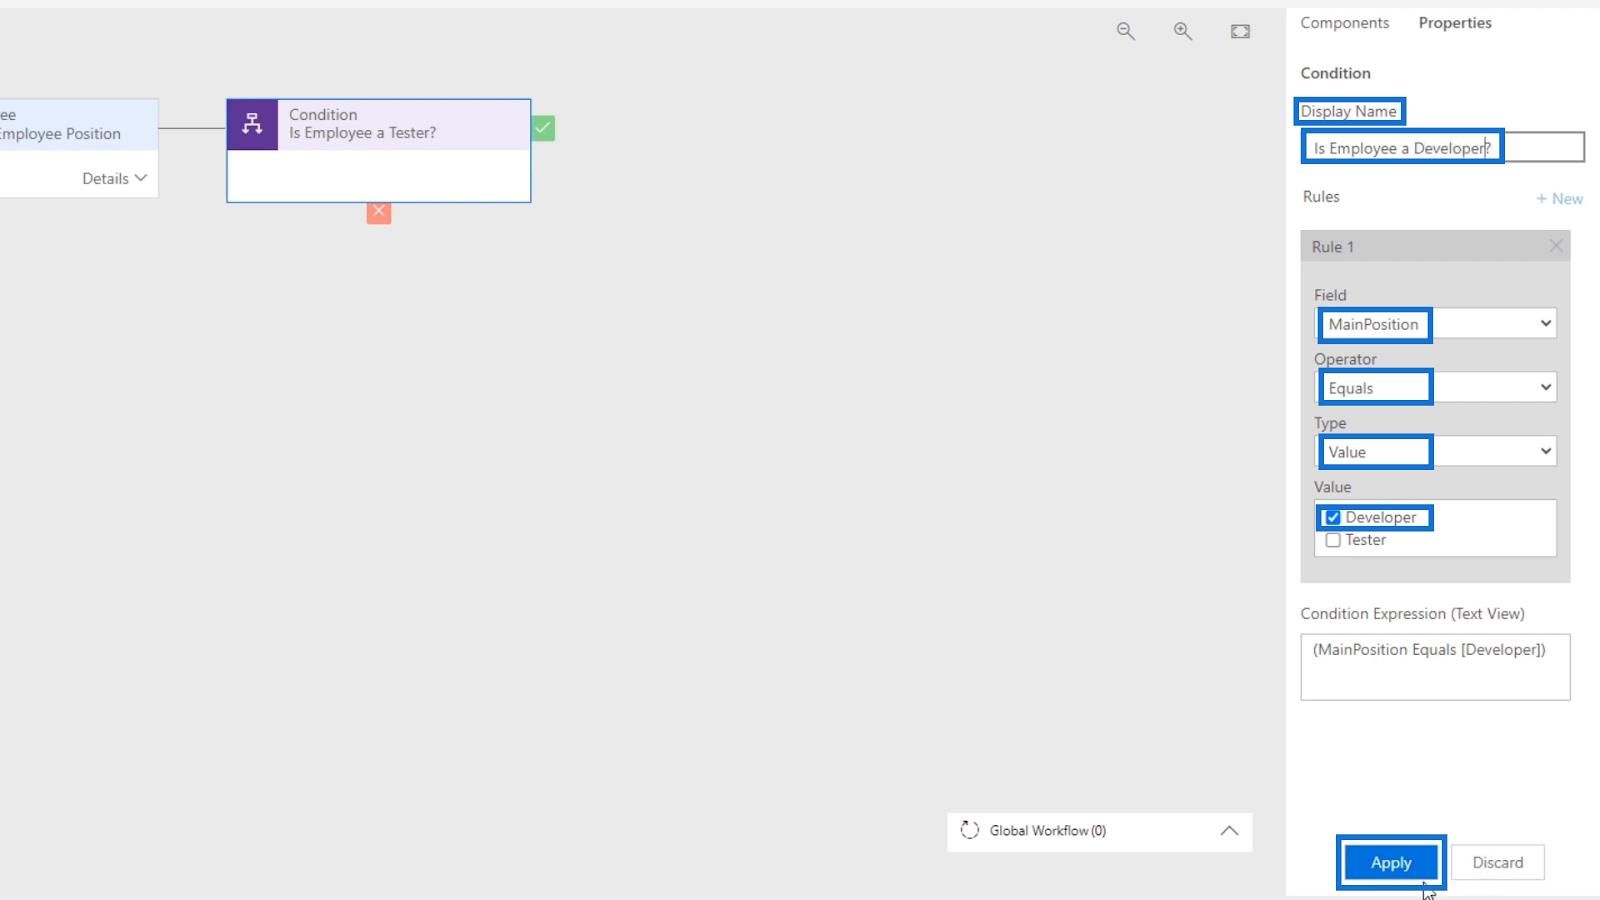
To set the Condition, edit its Properties. To do that, let’s type the statement “Is Employee a Developer?” as the Display Name for the Condition. Then, we’ll set the rules Main Position Equals the Value of a Developer. After that, click Apply.
Adding Stage To The Condition Diagram
Now, let’s add a Stage with Data Steps for the path when the user’s position matches the condition within the yes path (?). Select and drag the Stage button then place it in the plus sign (+) right next to the check mark (?).

Type in the Display Name “Fill out Develop Information” for the Stage.

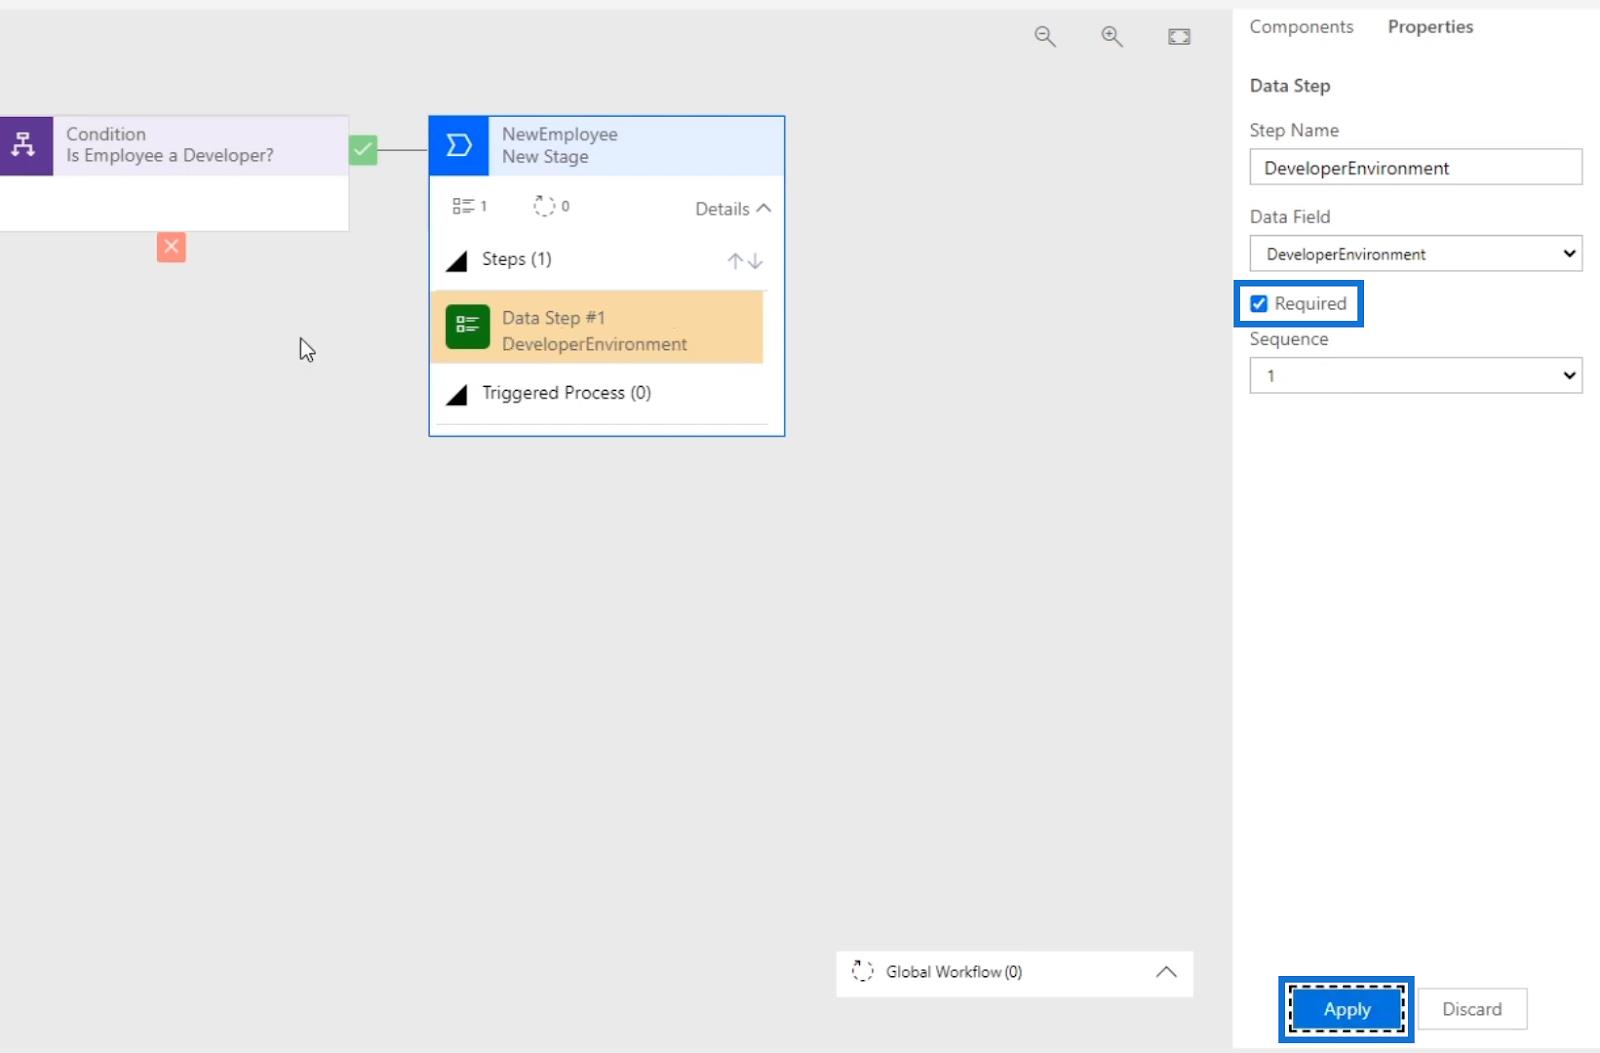
After that, let’s set the Data Step. Click Details, then Data Step #1. Select DeveloperEnvironment as Data Field under Properties.
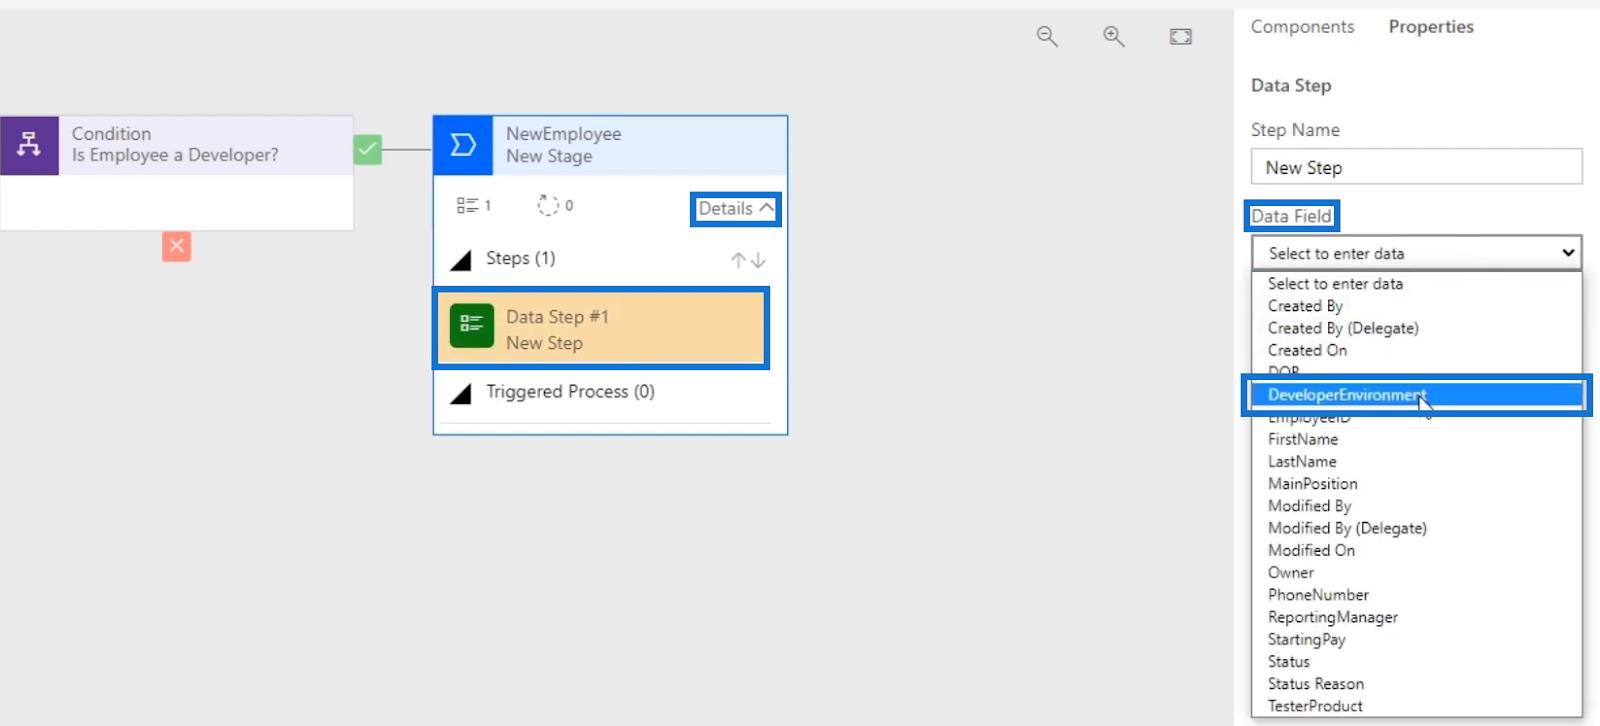
Then, tick Required and click Apply.
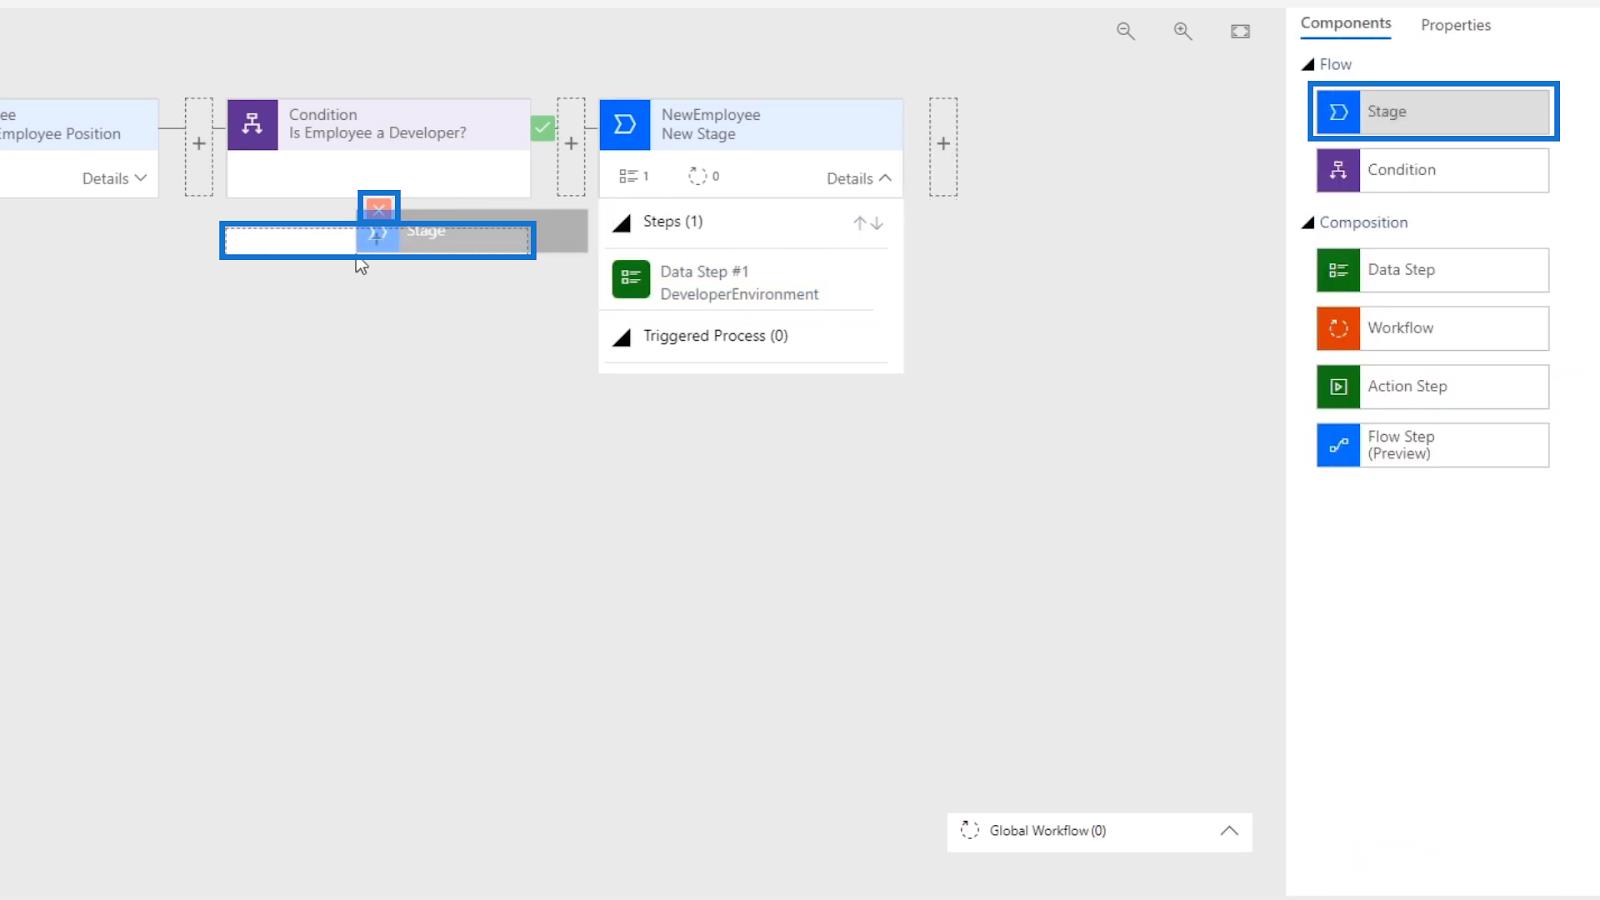
Let’s also add a Stage for the no path (X) or the “no” answer for the Condition. Like what we did earlier, we’ll just select and drag the Stage button then place it in the displayed plus sign (+) just beneath the no path (X).
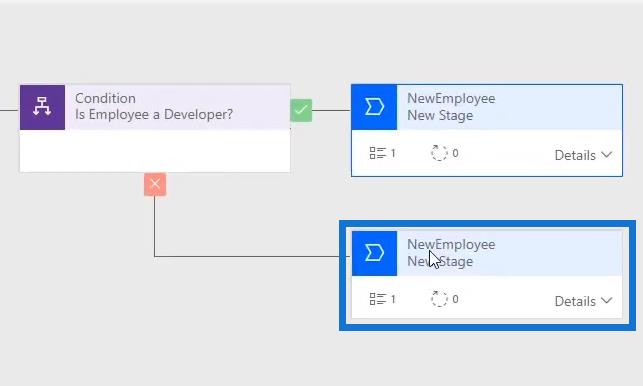
Then, we’ll see the New Stage displayed for the path.
If the user is NOT a developer, this Data Step should be the Tester Product. Let’s type in the Step Name “Tester Product ” and select TesterProduct for the Data Field. Then click Apply.
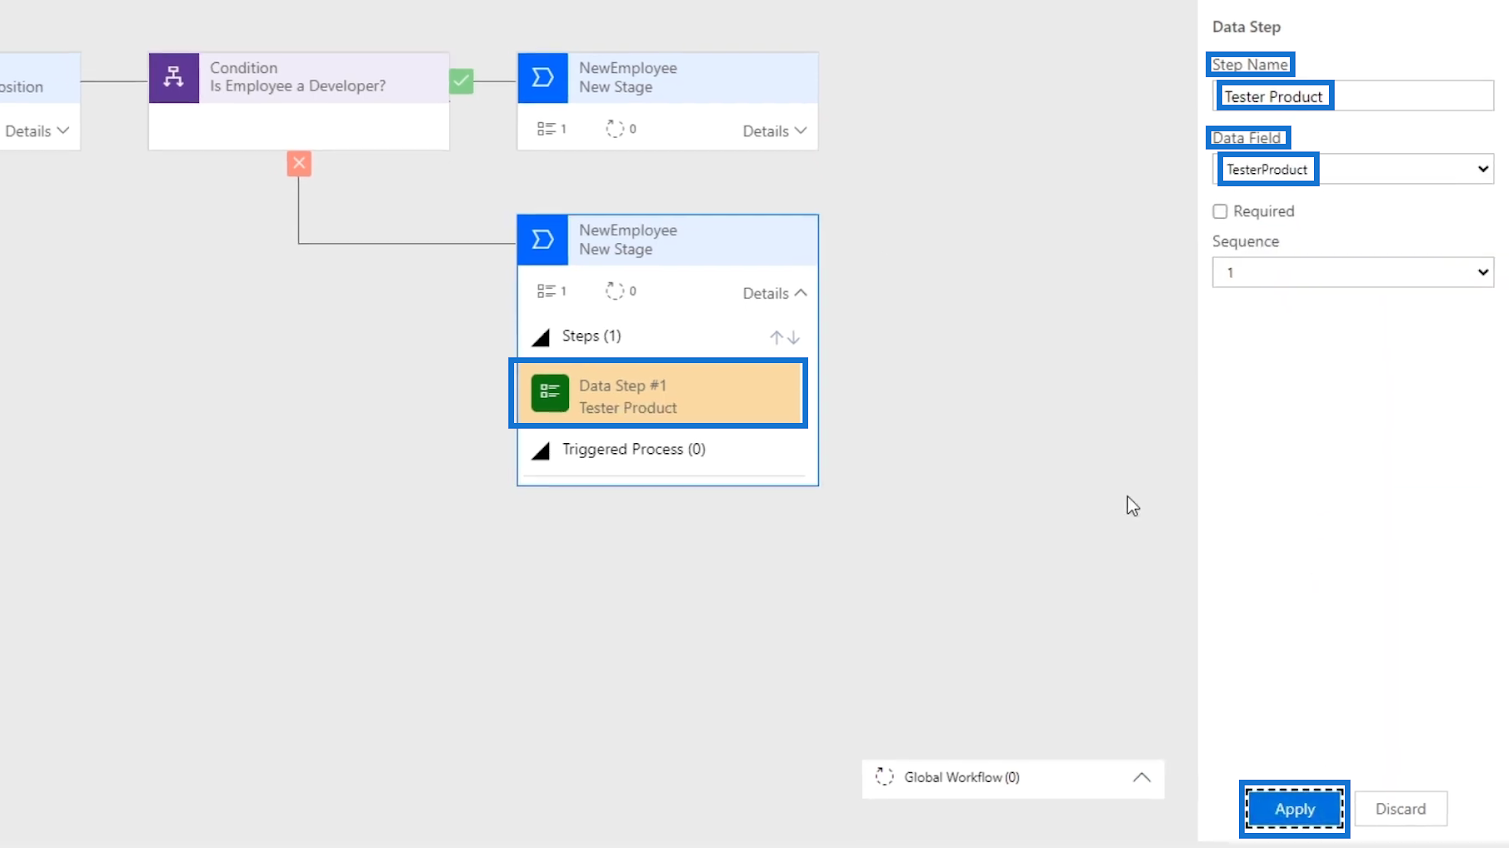
Now, we’re done with adding Conditions to the business process flow. This just made filling out the form easier since the user won’t have to worry about the Tester Product field when he’s a Developer or the other way around if he’s a Tester.
Adding A New Stage For The Other Fields
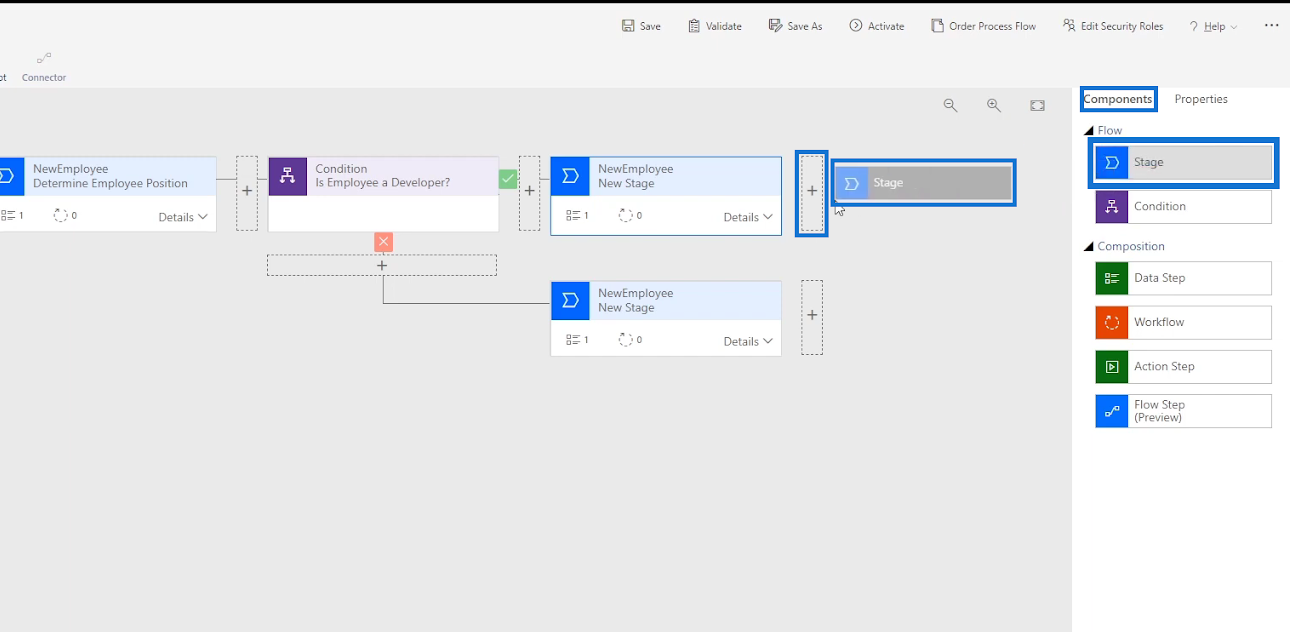
The last thing we’ll do is to add a New Stage diagram for the Manager field and Starting Pay field for both users — Developers and Testers. To do that, we’ll select and drag the Stage button from Components then place it in the plus sign (+) beside the Stage we made for the yes path (?) or for the Developers.
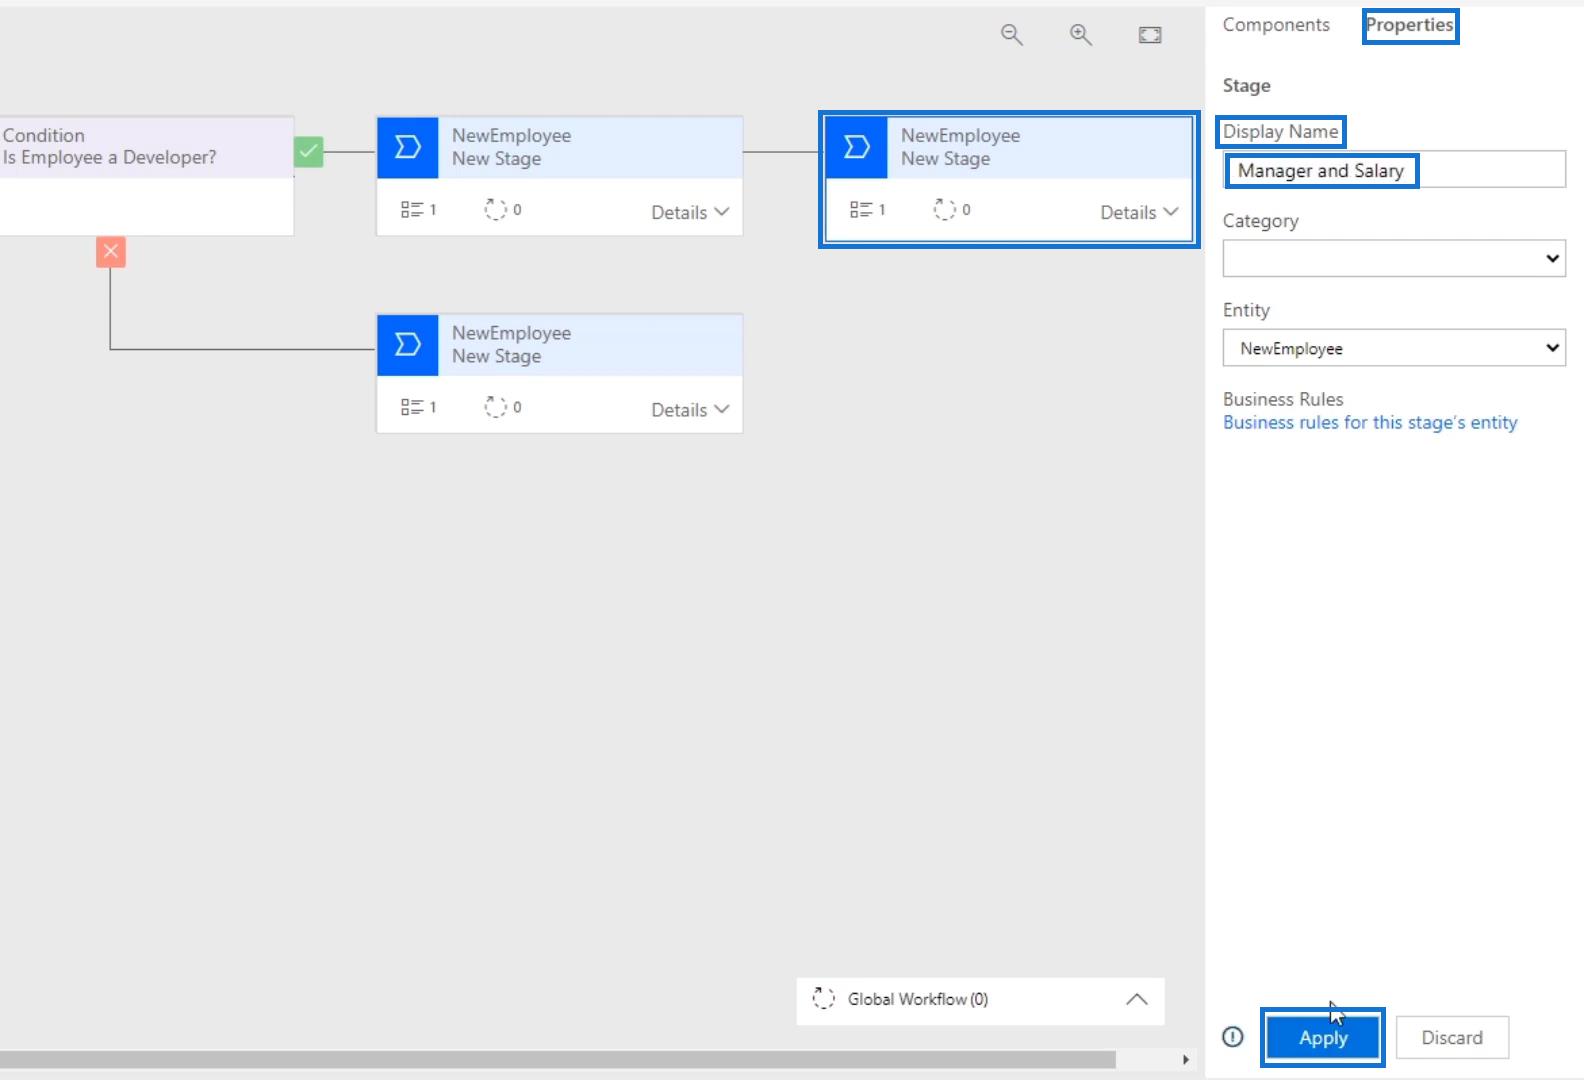
Let’s call the added New Stage “Manager and Salary” by typing it in the Display Name under Properties, then click Apply.
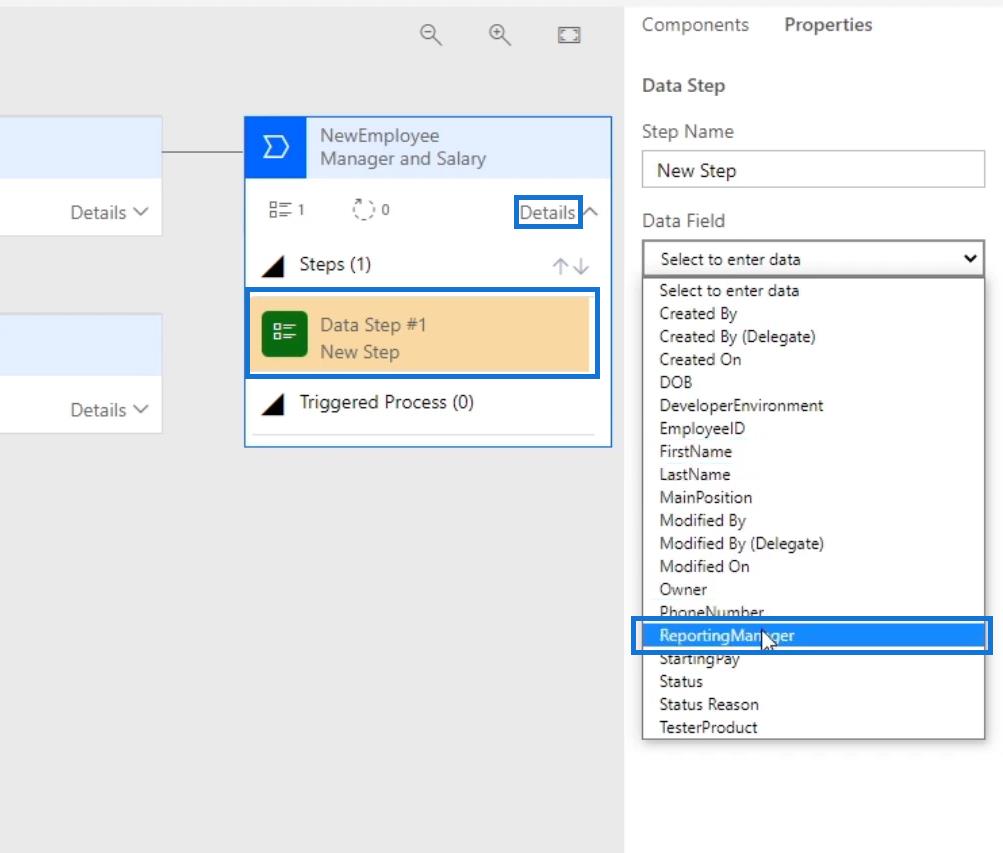
We also need to add Data Steps to the Stage. Click Details, then the Data Step #1. Select ReportingManager as the Data Field in the Properties.
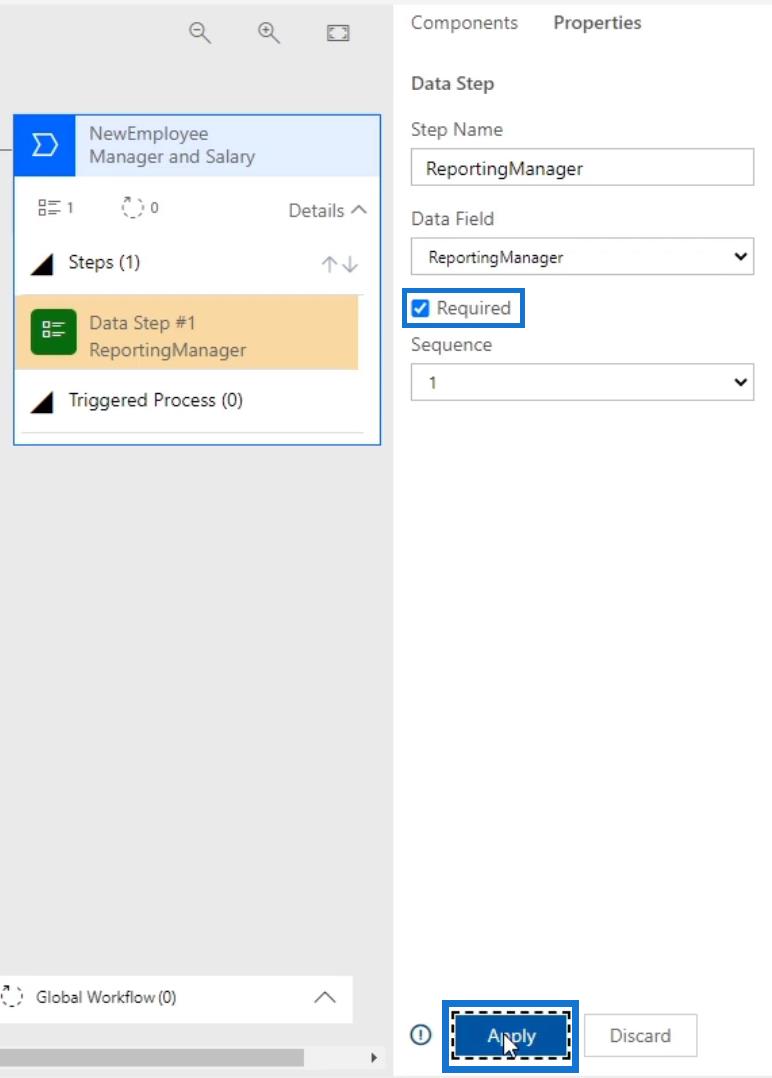
After that, tick Required and click Apply.
Since we need 2 fields in this diagram, we’ll add another Data Step for this. Simply select and drag the Data Step button under Components then place it in the plus sign (+) under Data Step #1.
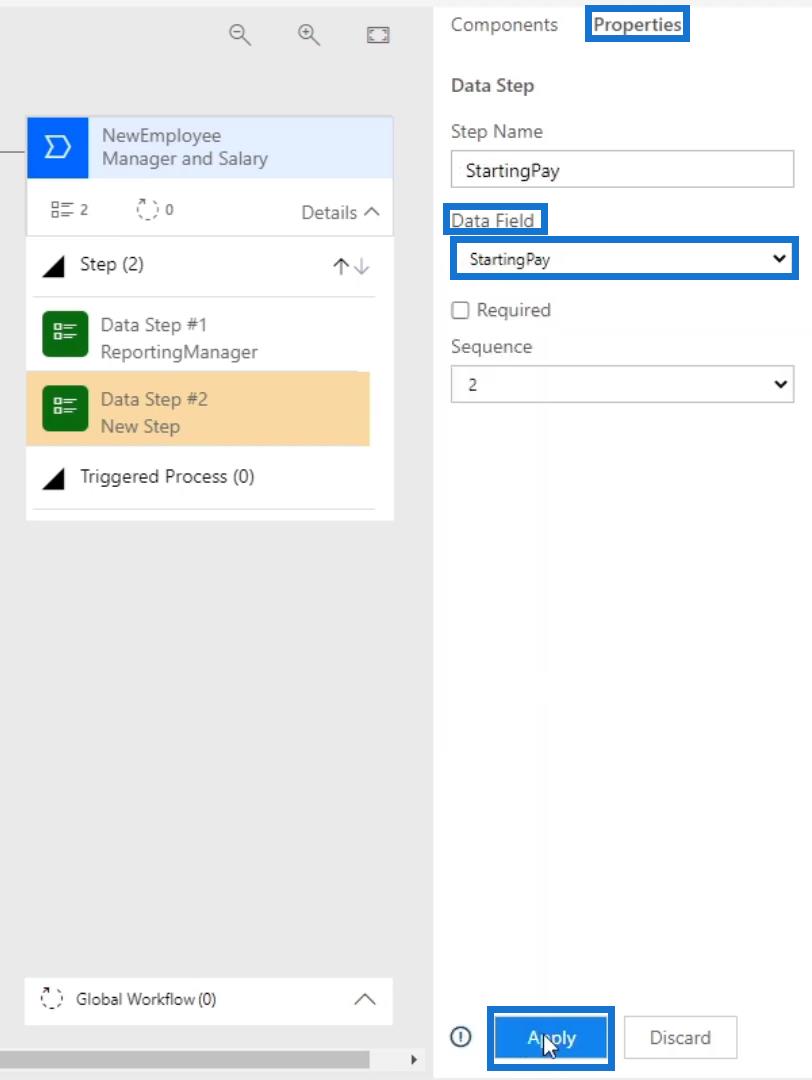
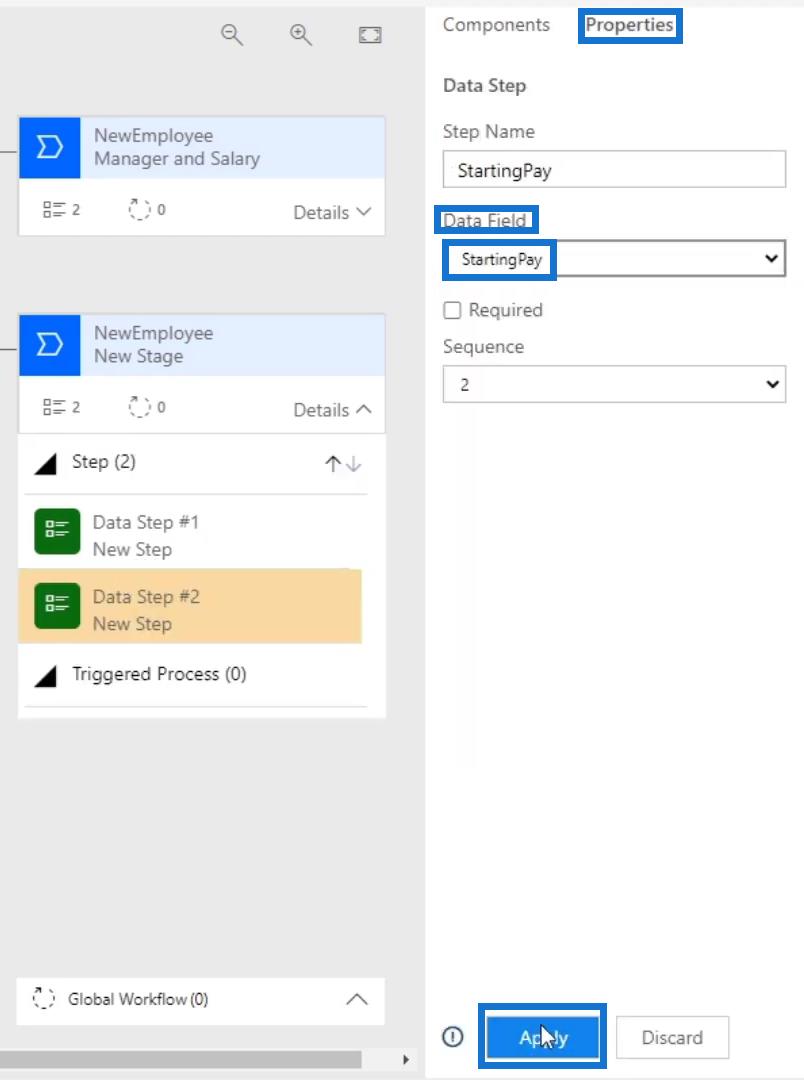
While in the Properties, we’ll select StartingPay for the Data Field and click Apply.
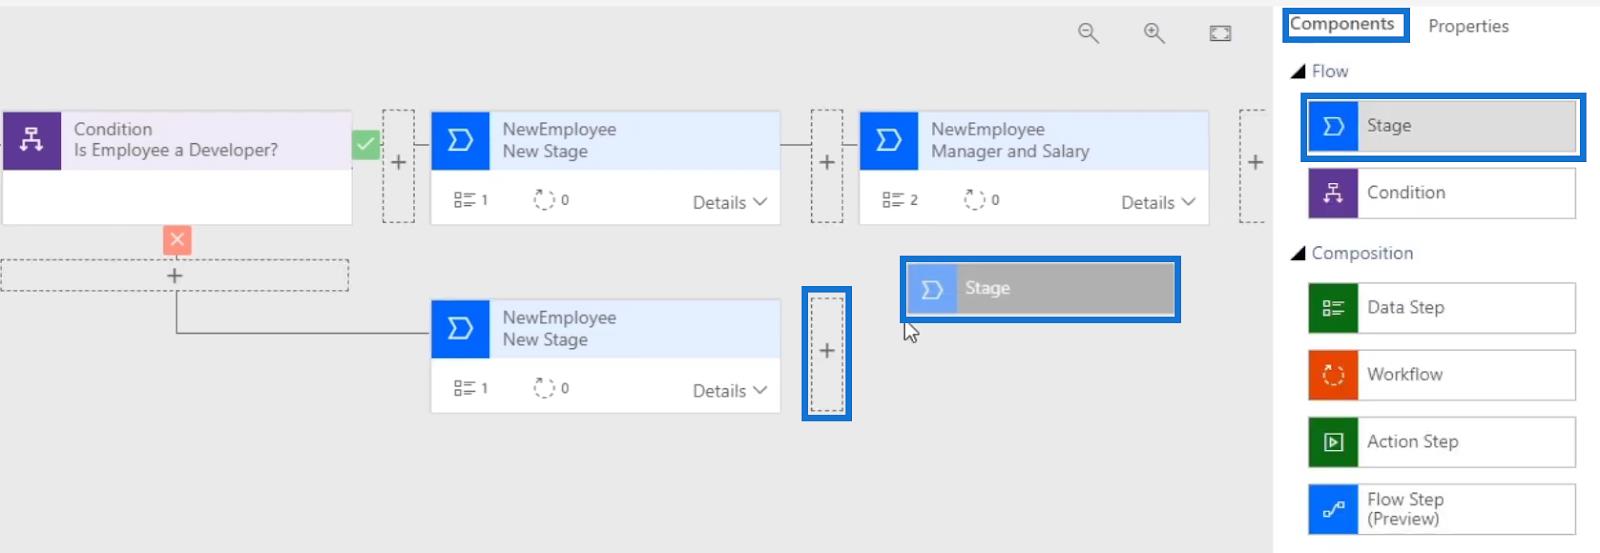
We’ll also do the same for the no path (X) or for the Testers. Select and drag the Stage button under Components and place it in the plus sign (+) beside the Stage of the Tester path.
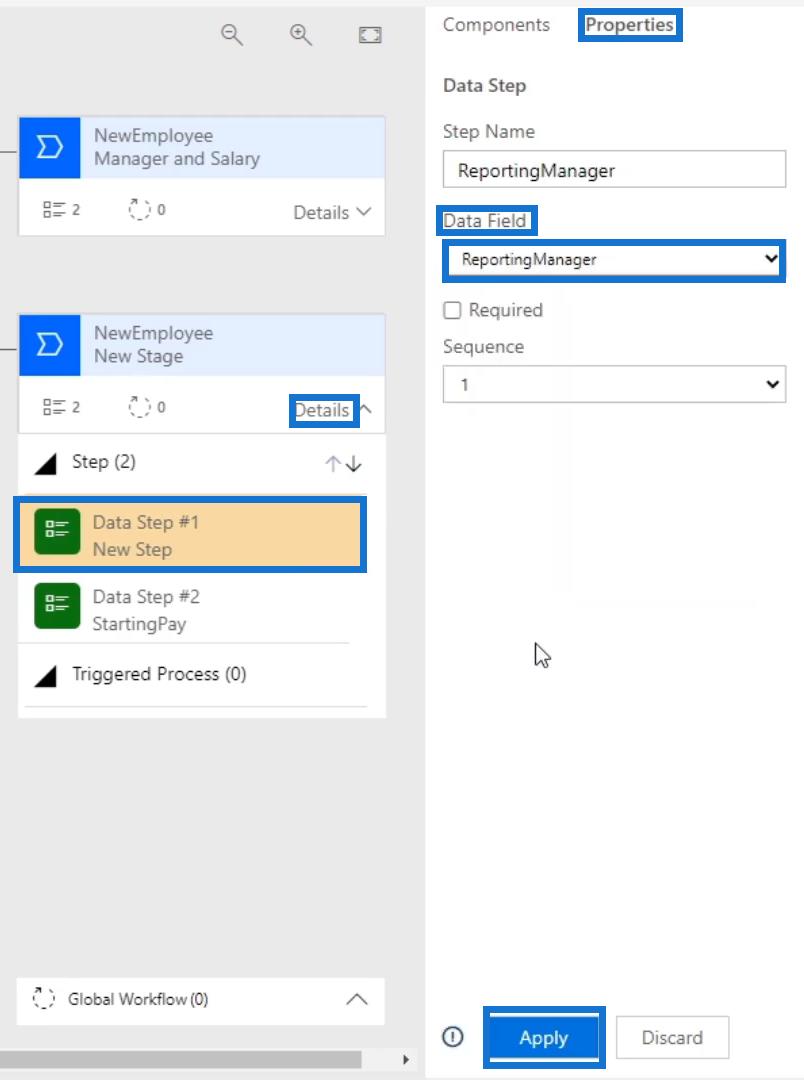
After that, we’ll also add two Data Steps in this Stage. Similar to what we did in the Developer path, just click Details, then click Data Step #1. Select ReportingManager in the Data Field and click Apply.
To add the second Data Step, just select and drag the Data Step button under Components then place it in the plus sign (+) under Data Step #1.
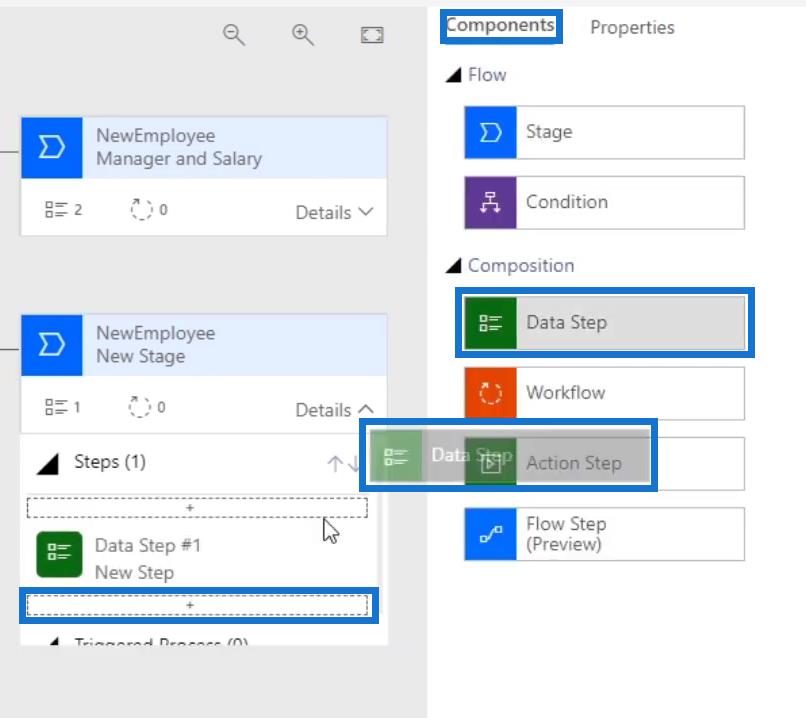
While in the Properties, select StartingPay in the Data Field and click Apply.
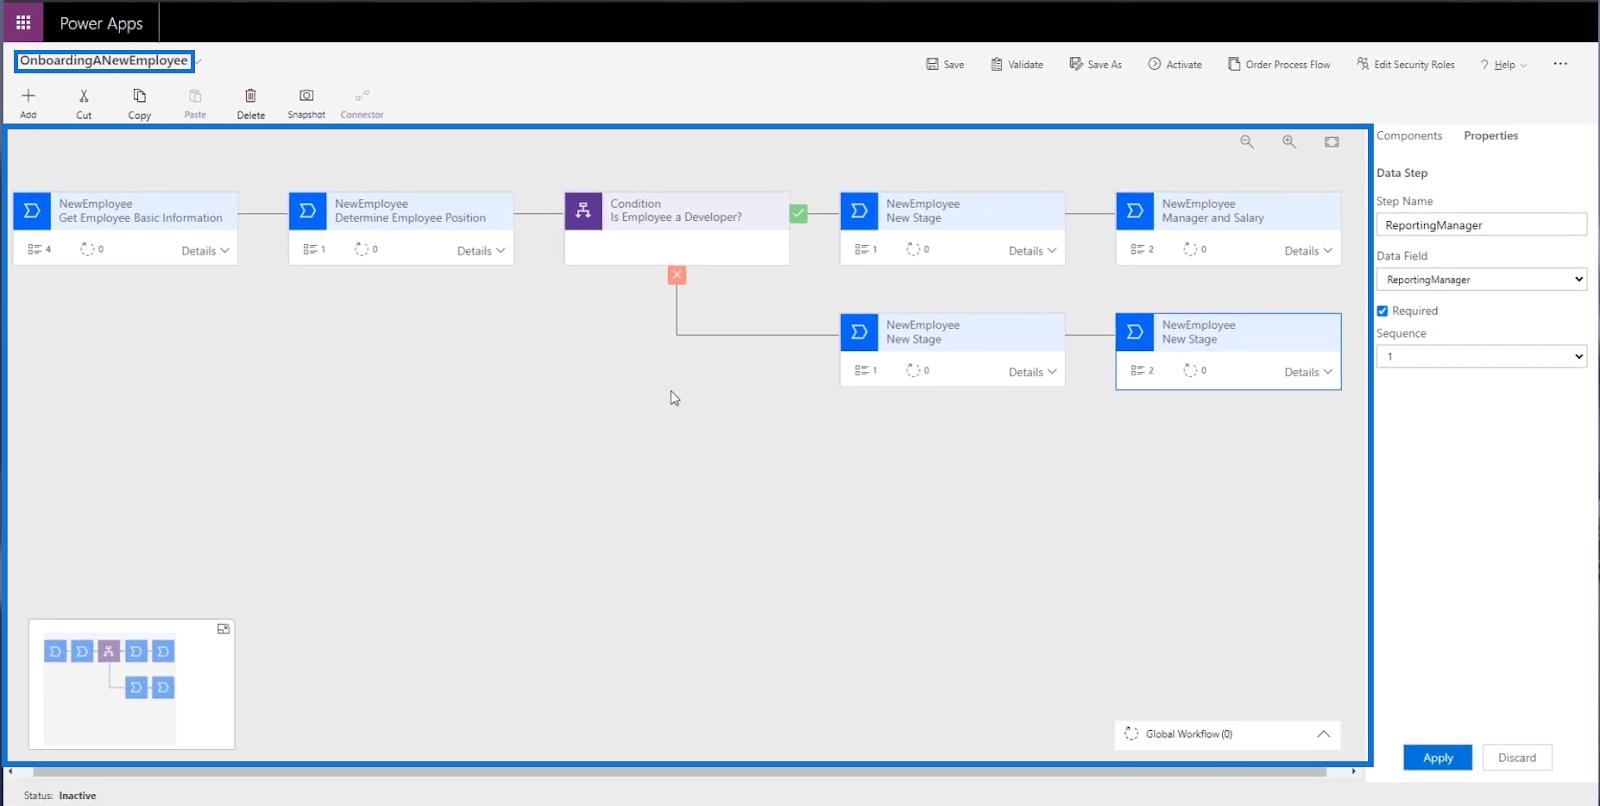
So now, we have a full Business Process Flow diagram set up for the process of Onboarding A New Employee.
Saving, Validating And Activating The Business Process Flow
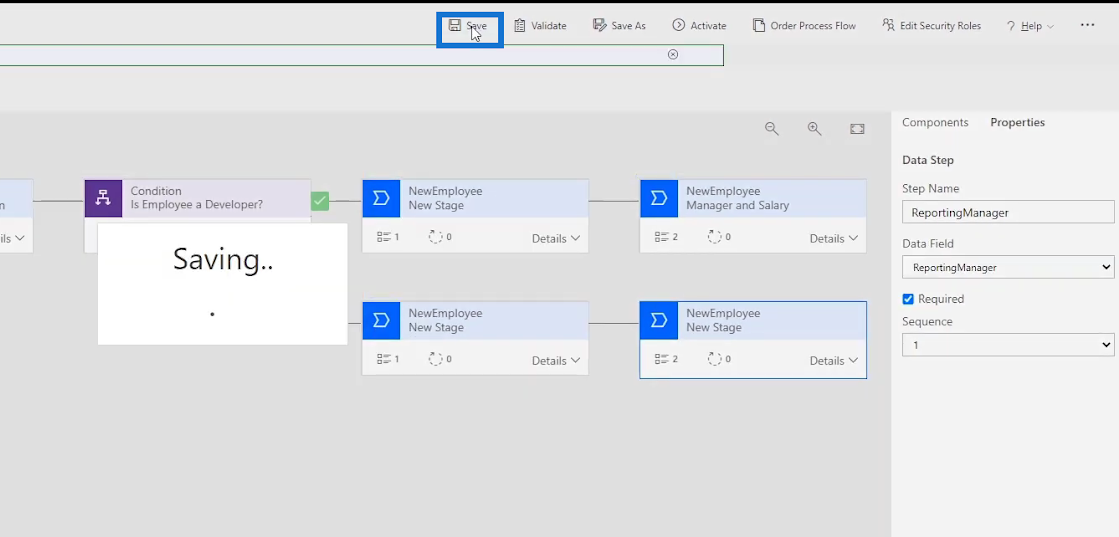
Before we can see our Business Process Flow in action, we need to save, validate and activate it first. To do that, let’s click Save.
Then, click Validate.
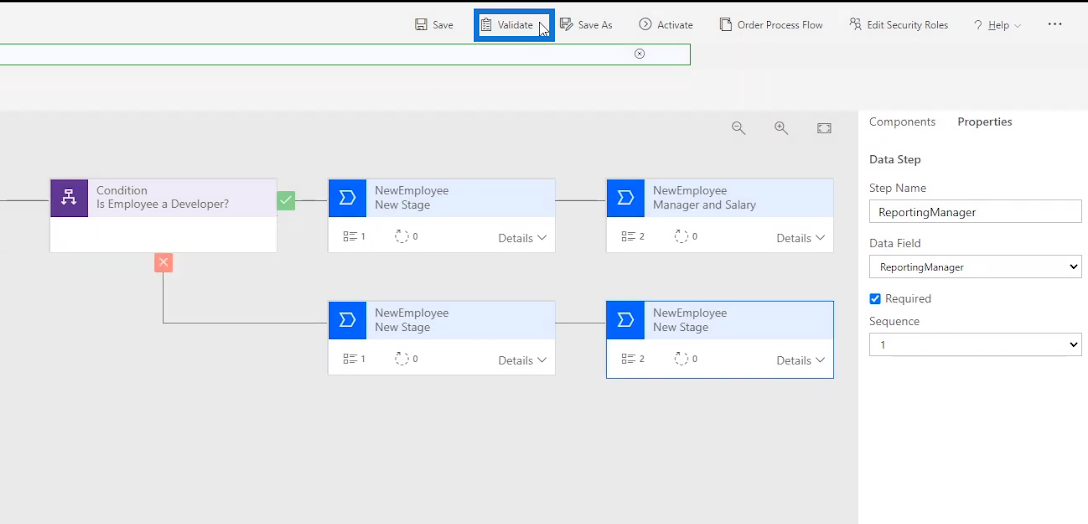
After that, click Activate.
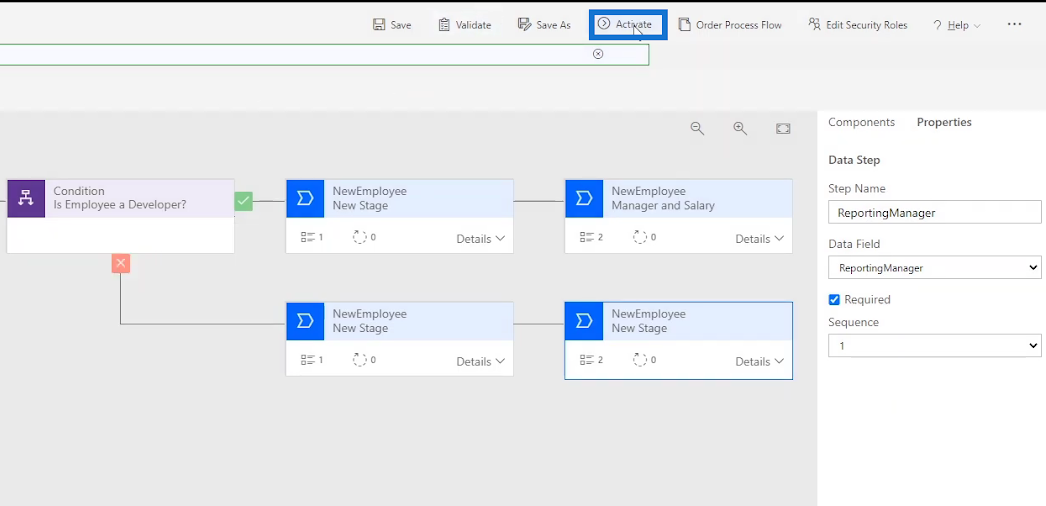
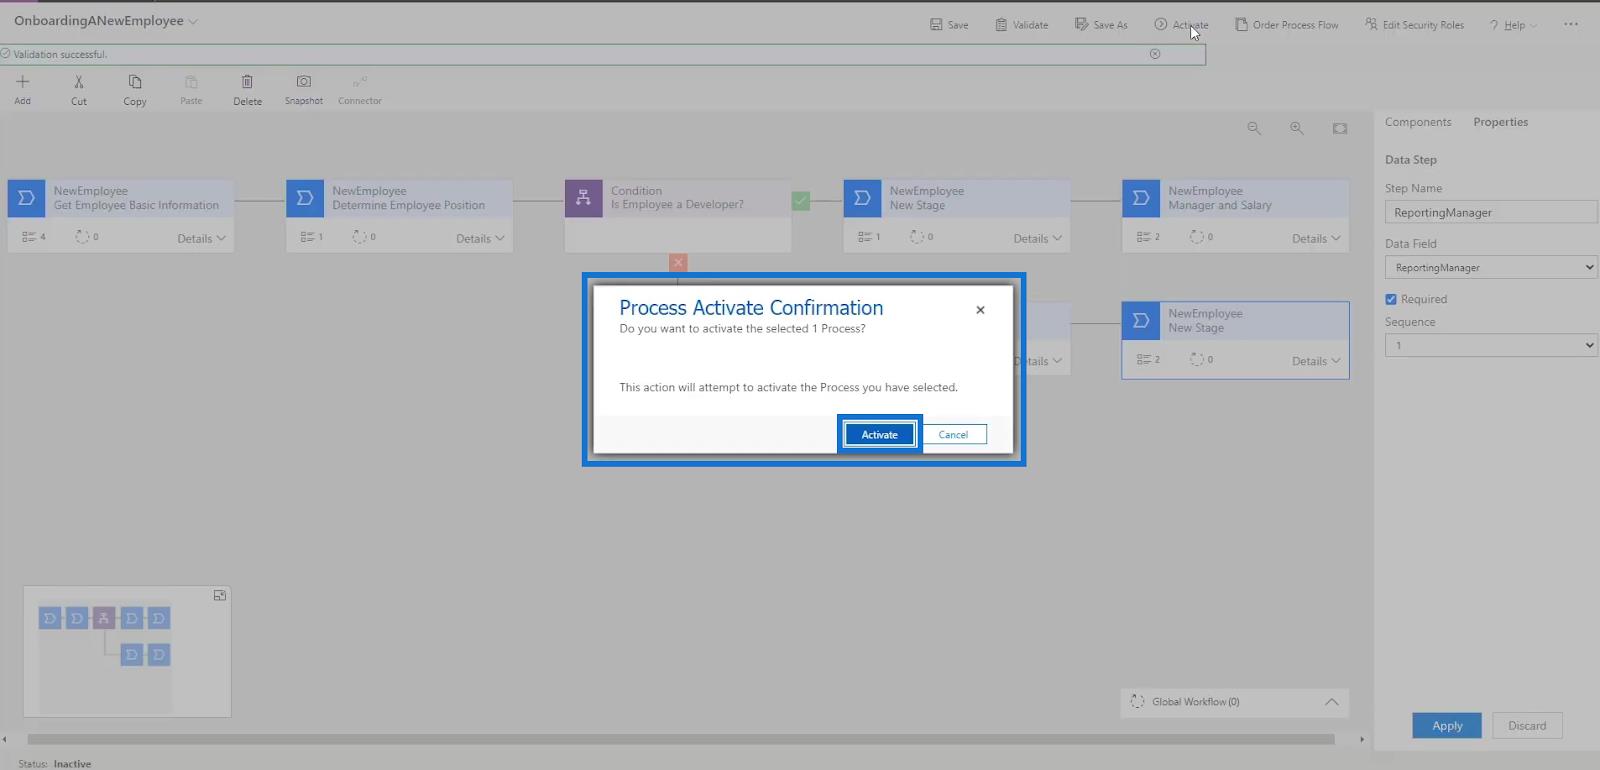
When clicked, a dialogue box will appear. Click the Activate button to confirm the process of activation.
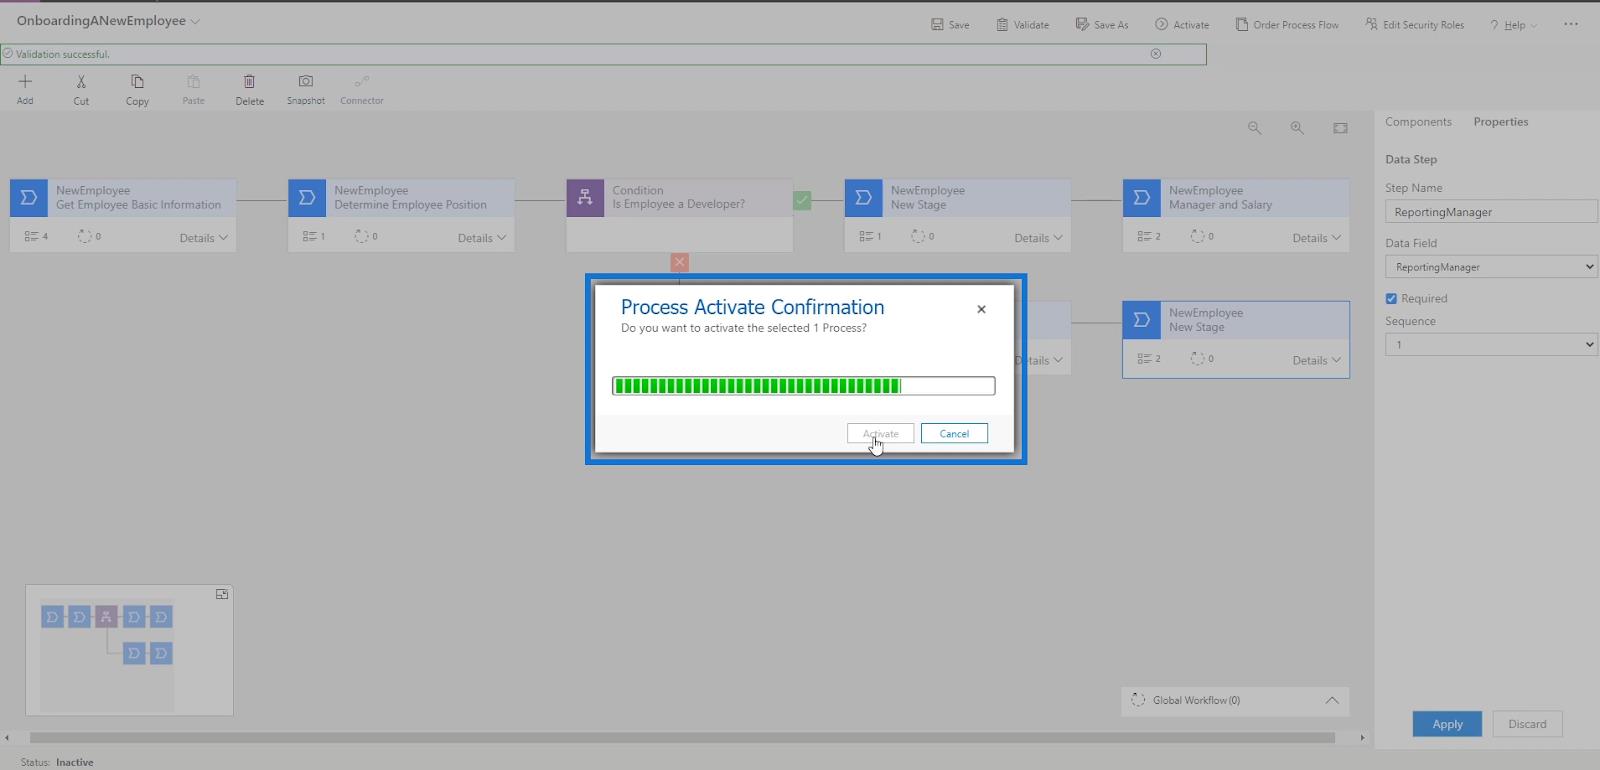
The activation process may take a while then we’ll be good to go after that.
Running The Business Process Flow
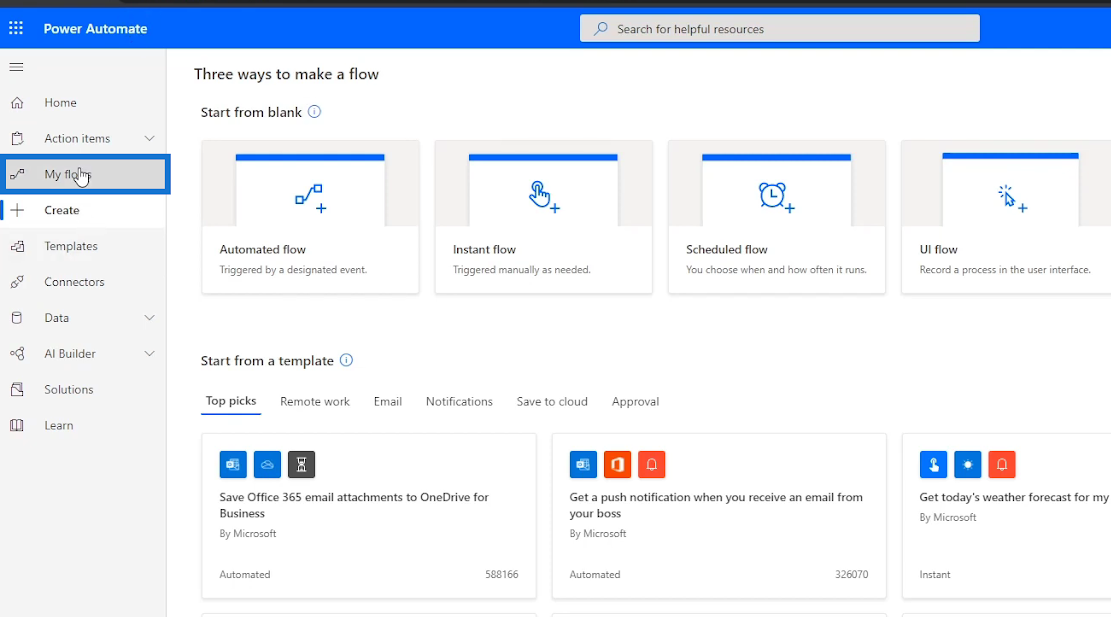
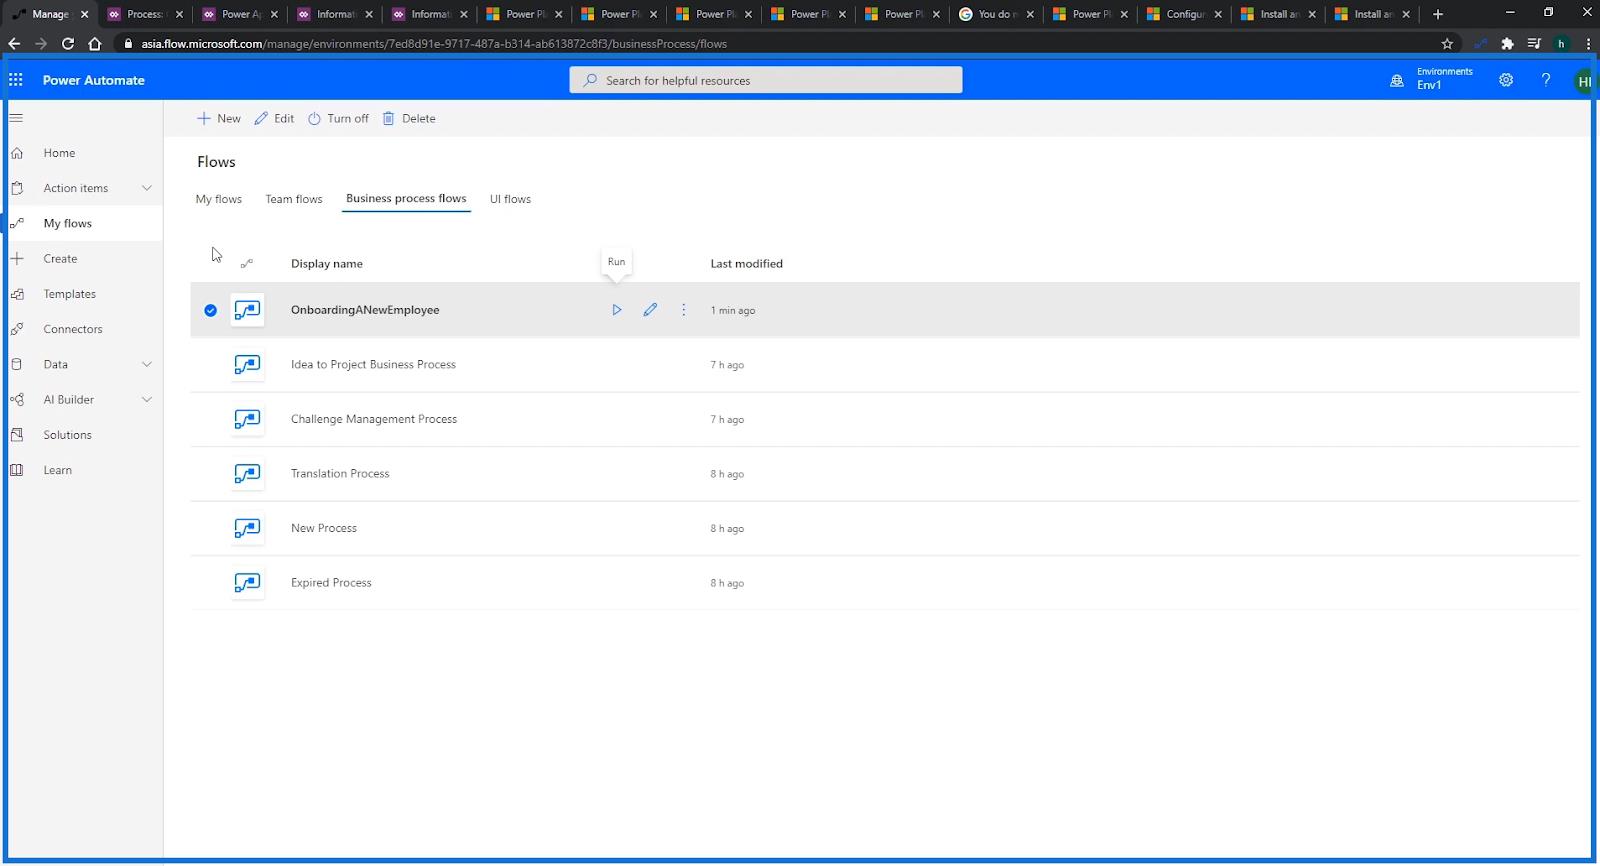
Since we’ve already activated our Business Process Flow, we can now run and test it. To do that, let’s go back to Power Automate and click My flows.
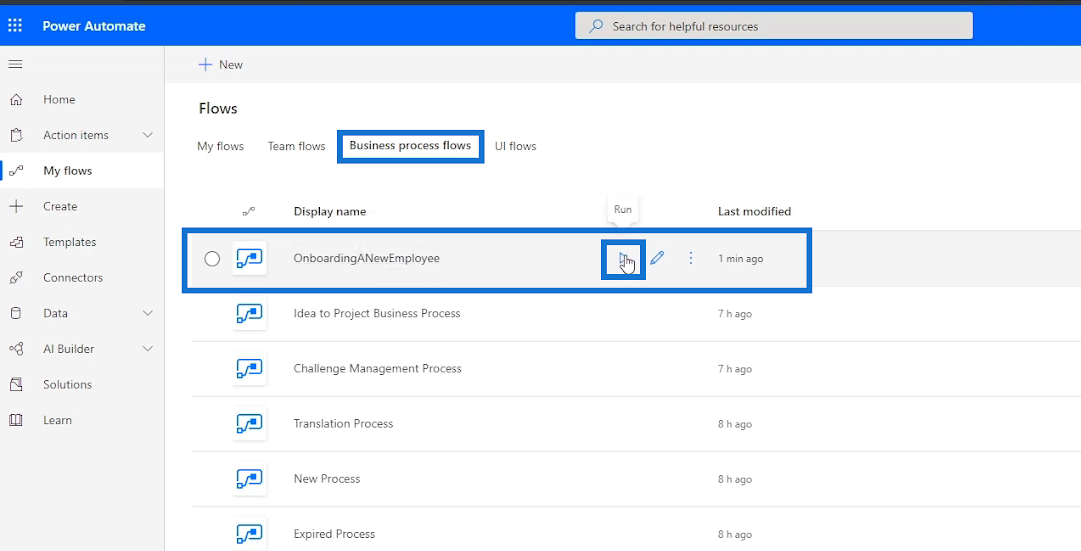
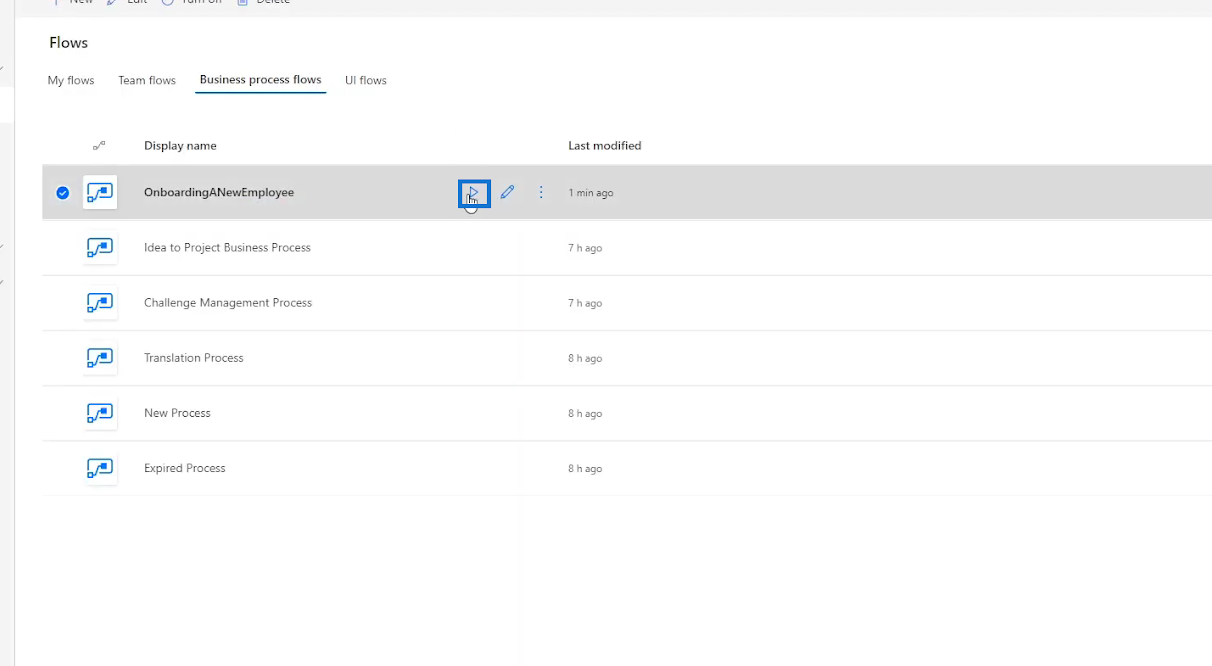
Go to the Business process flows tab and click the Run icon across the flow OnboardingANewEmployee.
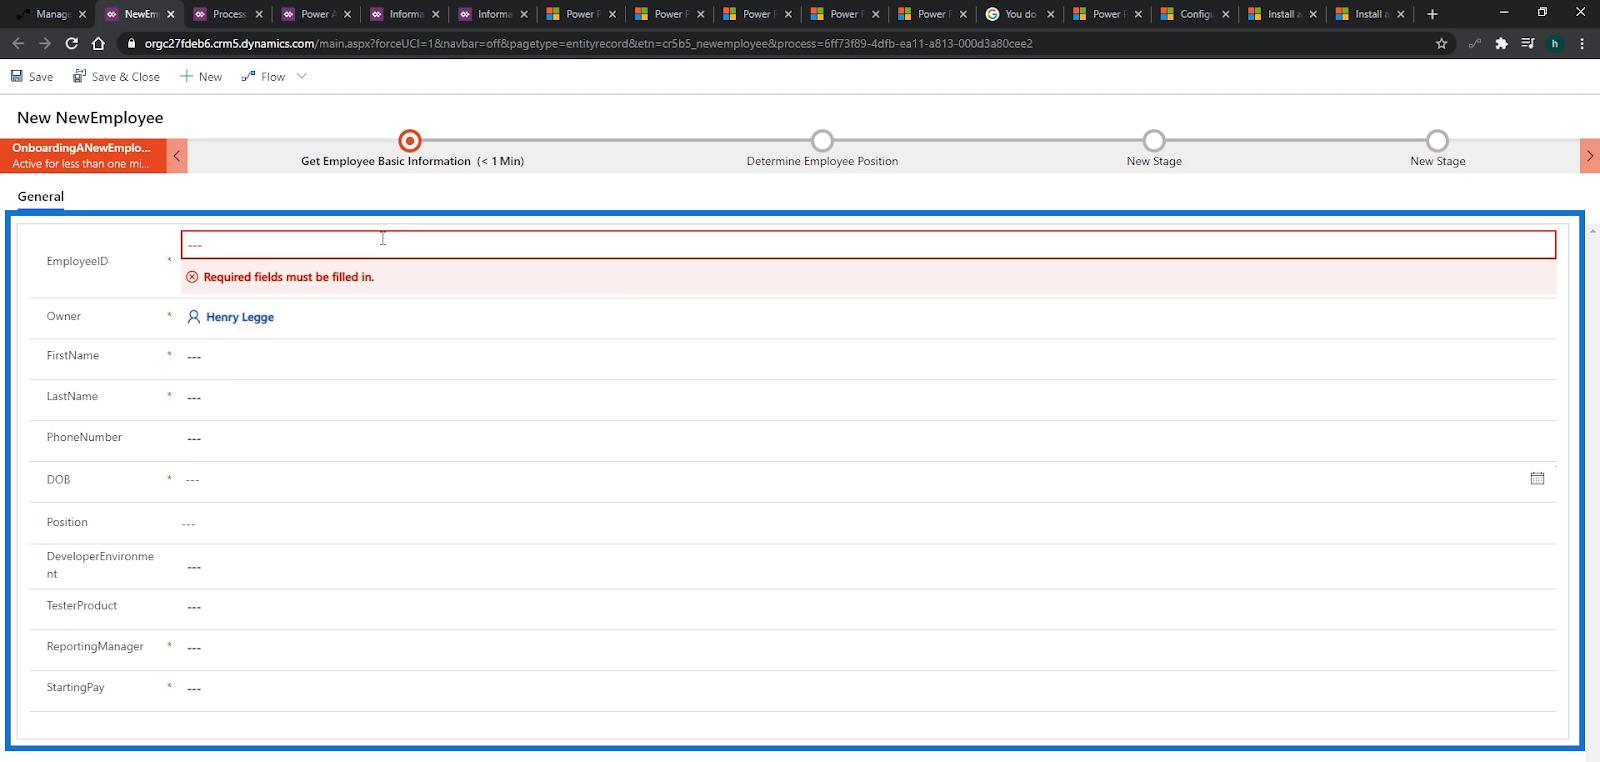
When clicked, we’ll be redirected to the similar form we had earlier.
The user can still fill in the form manually as desired, but we’ve already added a process for them to follow which is displayed on top.
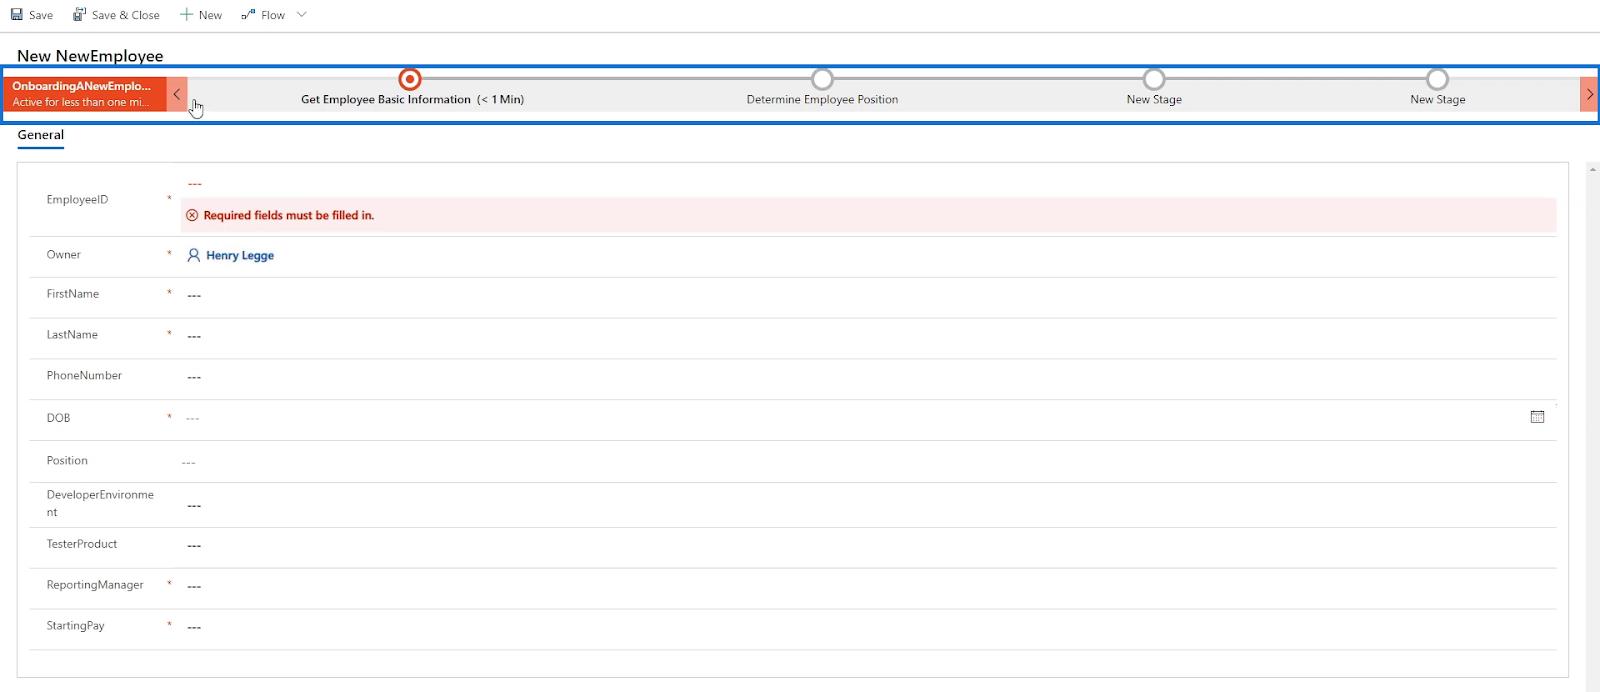
The first target we’ll see in the process is the stage that we’d like the user to follow first which is to Get Employee Basic Information.

Let’s click it and the specific portion of the form will be displayed where it wants the user to type in the employee’s First Name, Last Name, Phone Number, and the Date of Birth (DOB). These are the same things we specified in the first stage of our Business Process Flow diagram earlier.
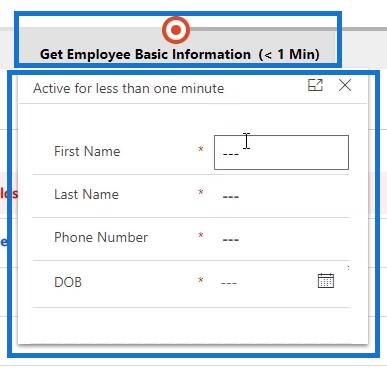
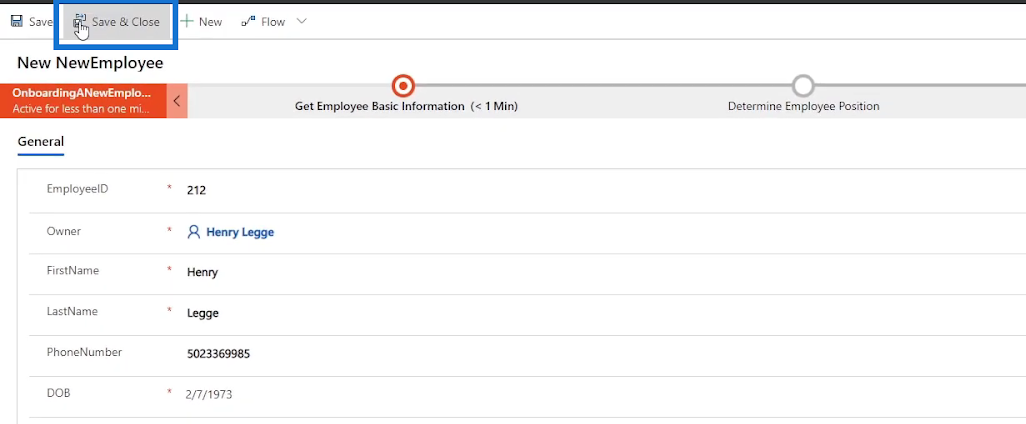
Let’s try filling in the details. For example, let’s type in “Henry” as the First Name, “Legge” as the Last Name, a random Phone Number “5023369985” and the Date of Birth “February 7th, 1973”.
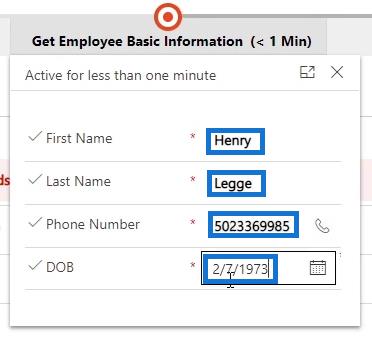
As we fill in the details of the Business Process Flow, the form is also filled in automatically.
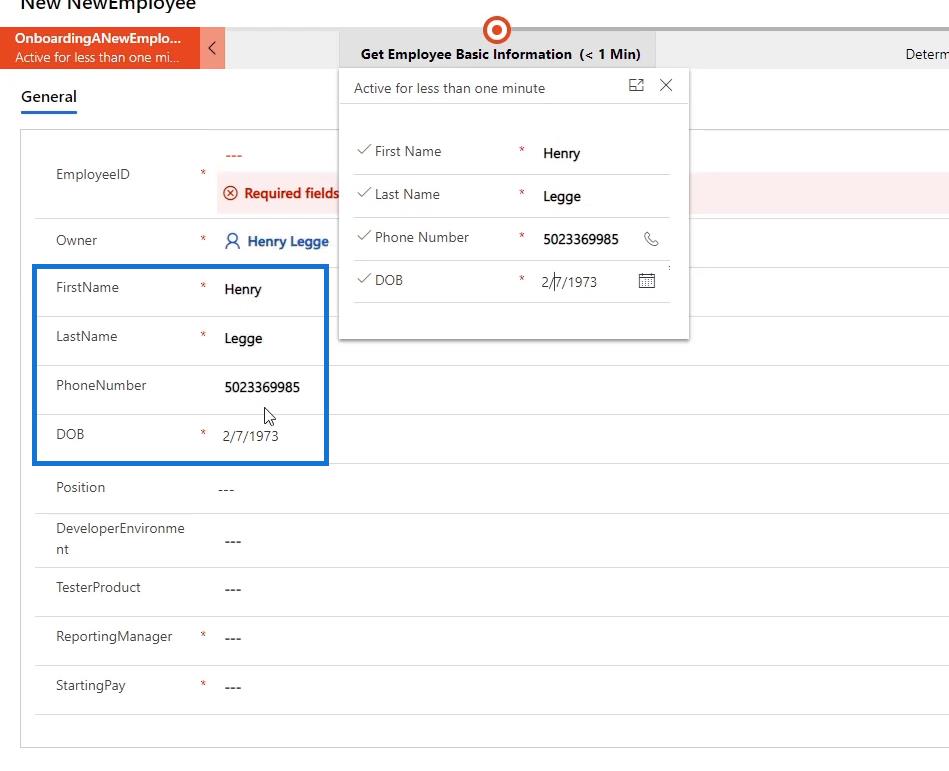
To go to the next stage, we’ll click the forward arrow on the far right of the last stage.

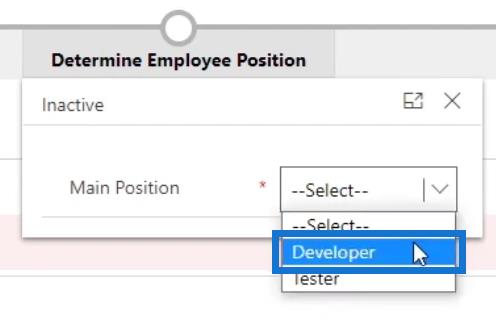
When clicked, the next stage Determine Employee Position will then ask the Main Position of the user.
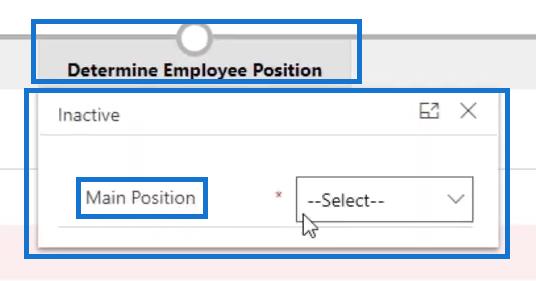
For this one, let’s try selecting Developer from the drop-down list.
Testing The Condition
If we’ve done the flow set up correctly, the next stage should only ask for the DevelopmentEnvironment and not the TesterProduct when the position is Developer. That’s what we’ve set as the Condition statement. Let’s click the forward arrow to check that.

As we can see, the next stage wants the user to type in the DevelopmentEnvironment which means the flow setup was correct.

Now, let’s go back and change our selection to Tester. To do that, we’ll just click the back arrow.

Select Tester as our position this time.
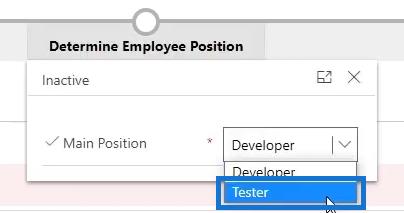
Click the forward arrow and the next stage will then tell us to type in a Tester Product.

Now, let’s go back and continue as a Developer. Click the back arrow to do that.

Choose Developer.
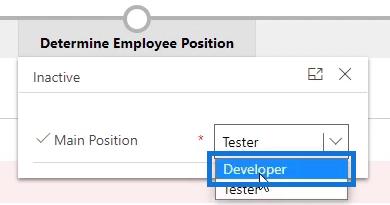
Click the forward arrow to move to the next step.

We’ll type in “Linux” as the DevelopmentEnvironment for example.
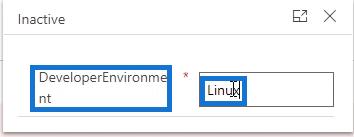
Click the forward arrow.

Then, the Manager And Salary stage will be displayed asking us to type in the details for the ReportingManager and the StartingPay.
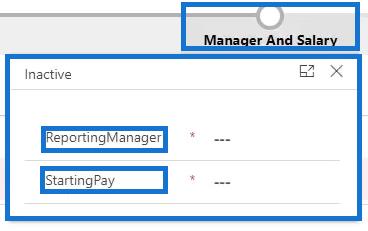
Let’s type in “Steve Jobs” in the ReportingManager field with the StartingPay of “80000”.

Click the forward arrow.
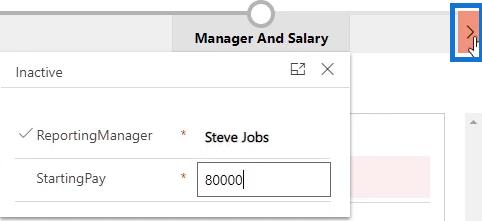
Then click the Save button.
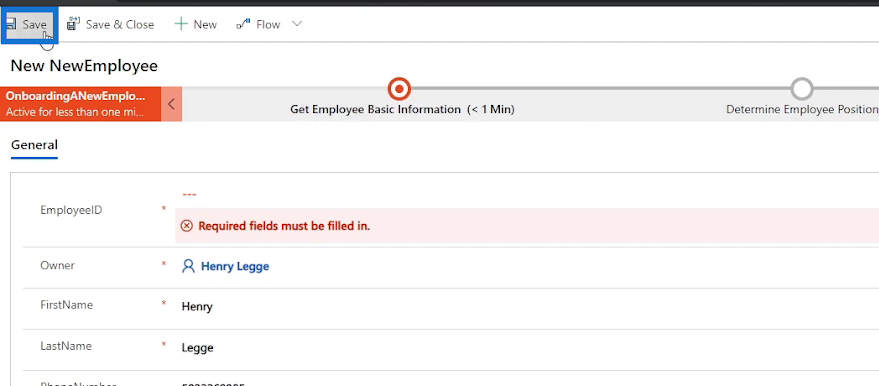
After saving the form, it’ll notify us that the EmployeeID is a required field to fill in. Hence, this is one thing we forgot to integrate into our Business Process Flow and we’ll fix this one later on.
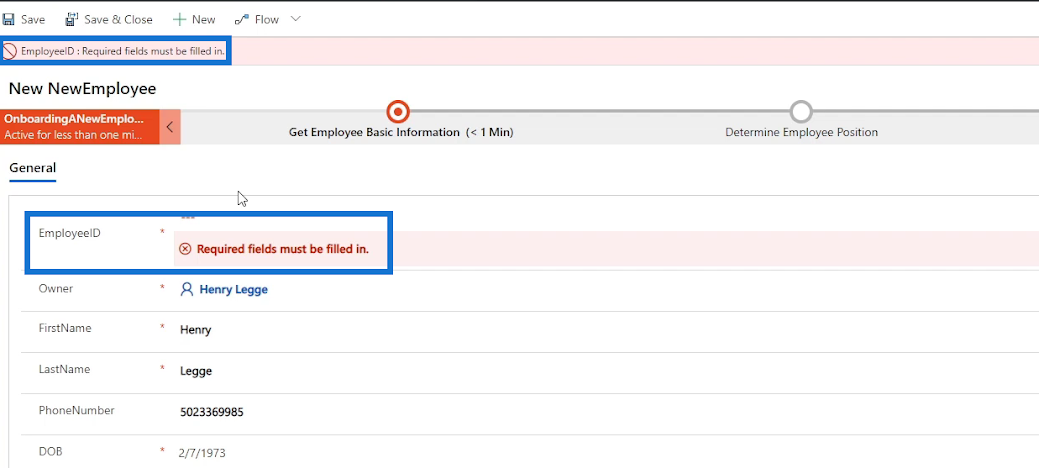
For this example, let’s just enter the Employee ID “212” manually in the form.

Lastly, click Save & Close.
Then, it will redirect us to our business process flows in the Power Automate page.
Fixing Form Errors
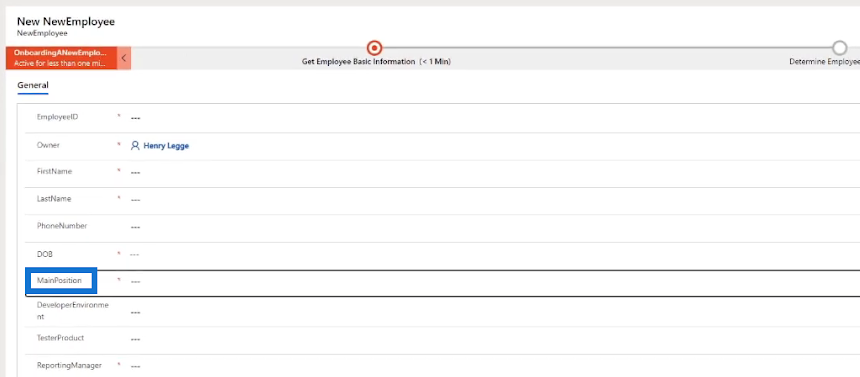
We can also fix the different issues we have with our flow. For example, the Position field in the form earlier should’ve been MainPosition instead.
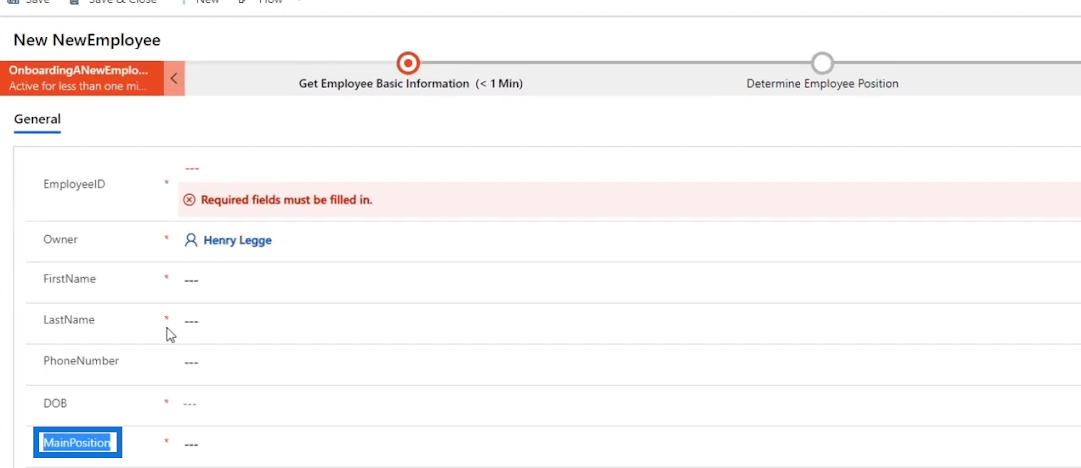
To correct that, we need to go back to Power Apps Form and edit the displayed field label.
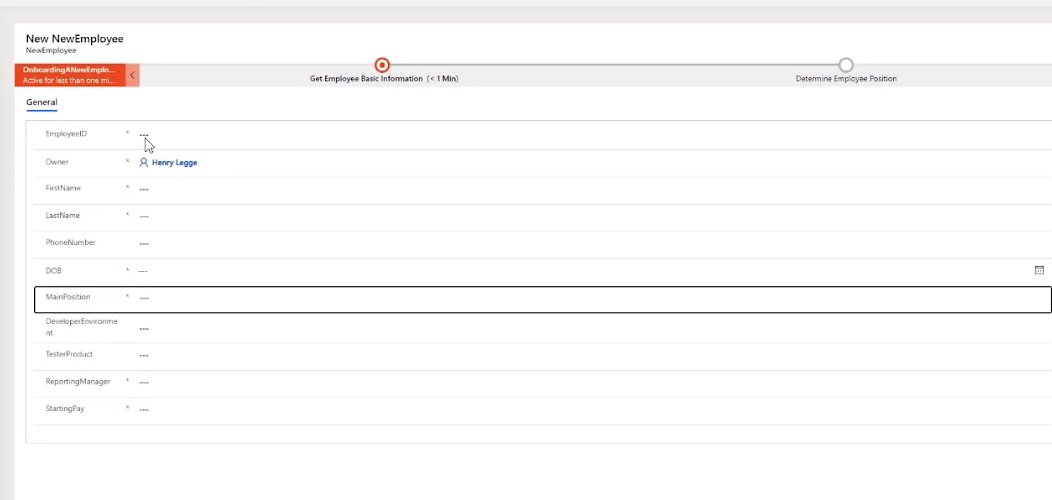
Since I already corrected it, MainPosition is now displayed as the label. What I did was just click the label in the form I want to correct.
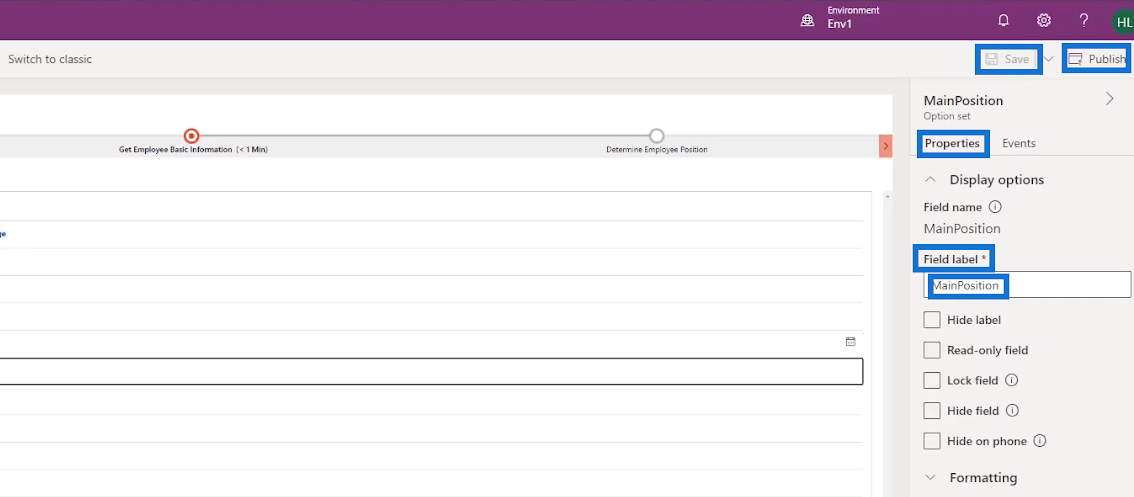
Then in its Properties, type the correct Field label, click Save and click Publish.
Fixing The Current Flow
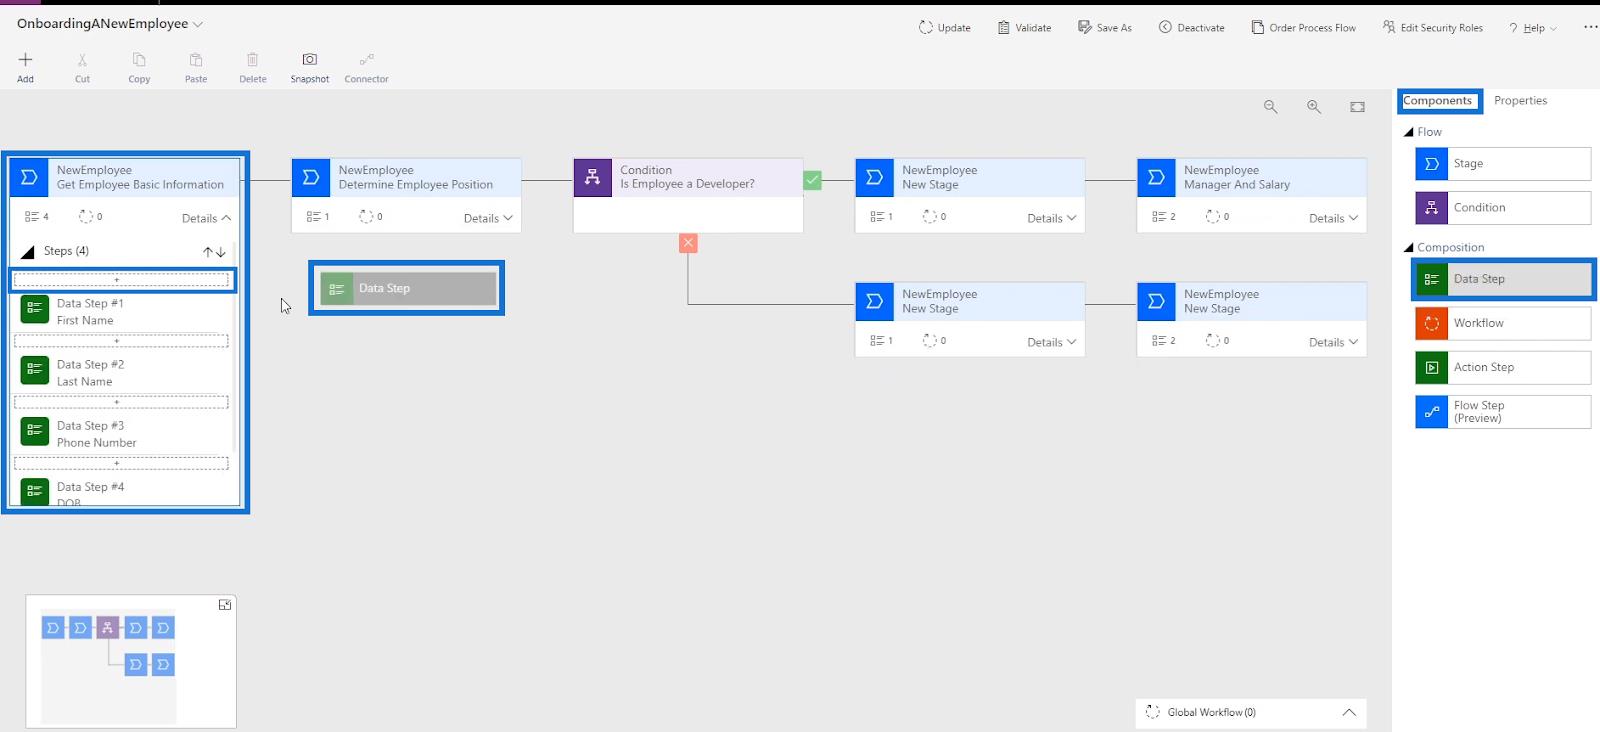
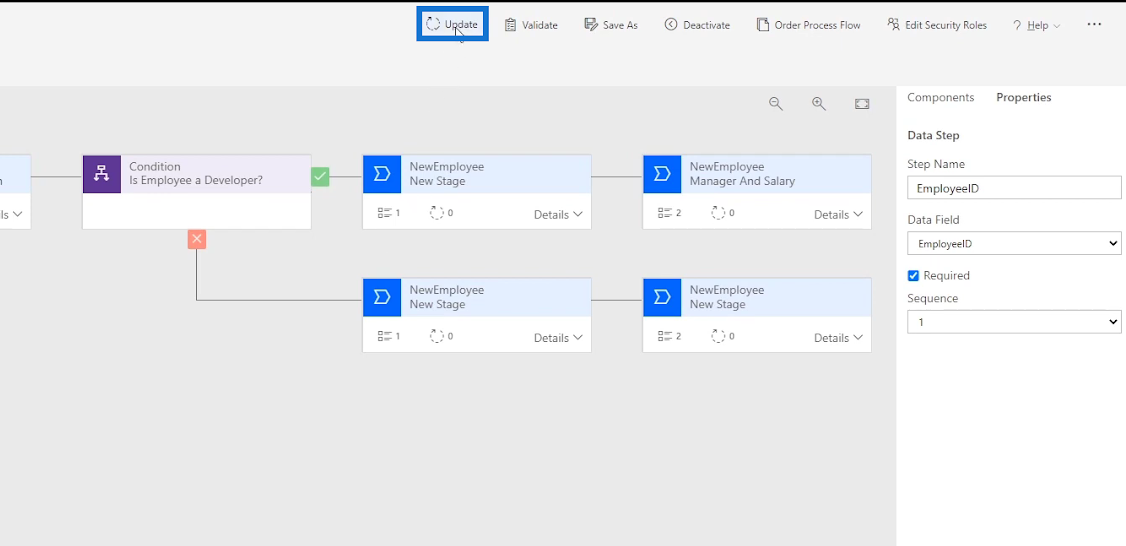
We also need to fix the flow since our current flow doesn’t tell the user to enter an Employee ID. To do that, let’s go back to our Business Process Flow diagram. First, add a new Data Step to the stage Get Employee Basic Information by selecting and dragging the Data Step button under Components then place it in the plus sign (+) above Data Step #1.
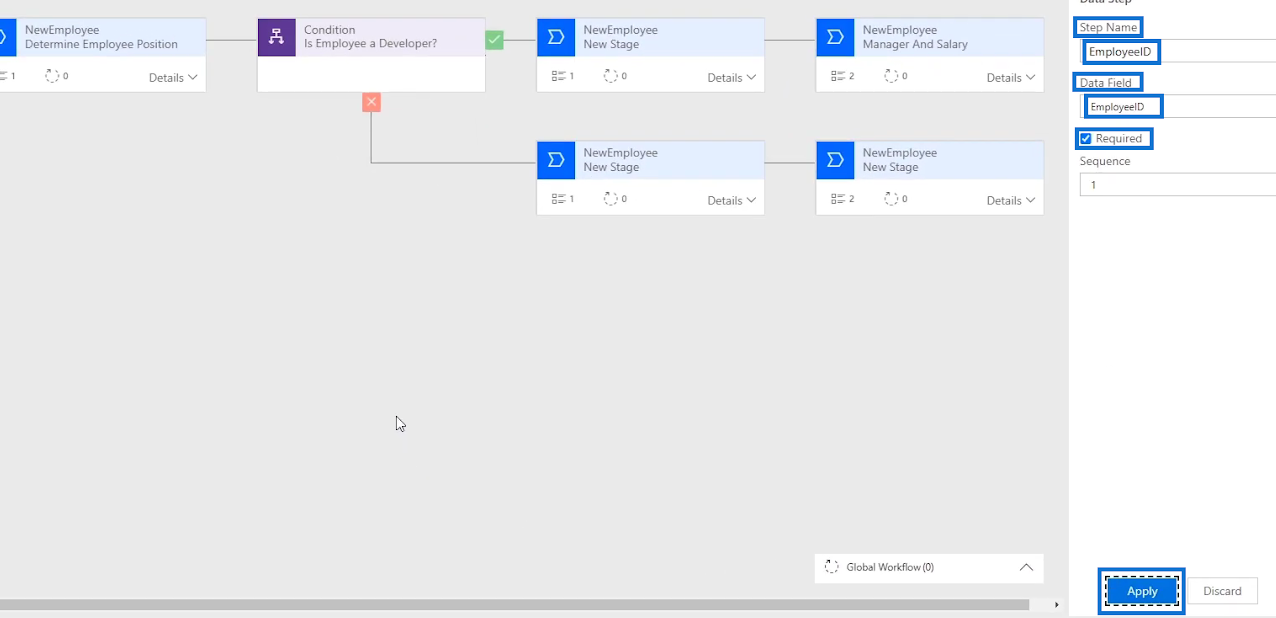
Under its Properties, let’s type in “EmployeeID” as the Step Name. Select EmployeeID in the Data Field, tick Required, and lastly click Apply.
After that, let’s click Update to save the form.
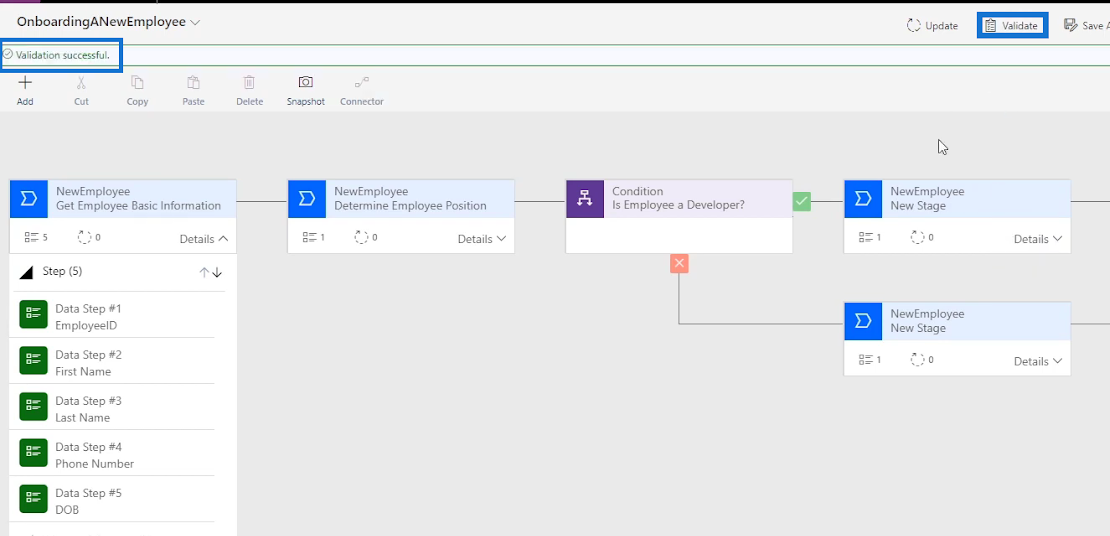
Click Validate and make sure the validation is successful as displayed.
Rechecking The Business Process Flow
Let’s run the flow to check if the fixes were successful. To do that, go back to Power Automate and click the Run icon to display the form.
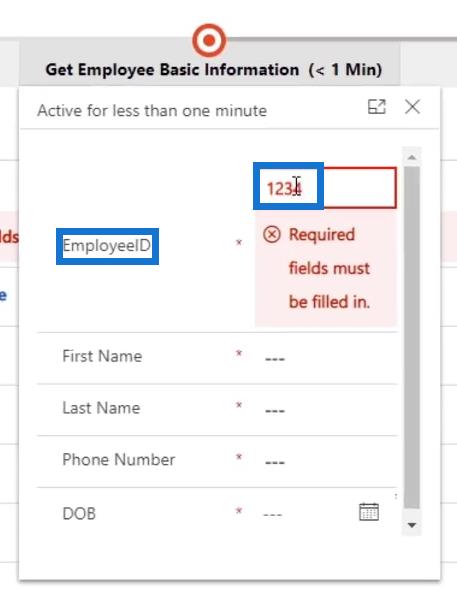
When the stage Get Employee Basic Information is clicked in the form, it’s now requiring us to fill in the EmployeeID field.
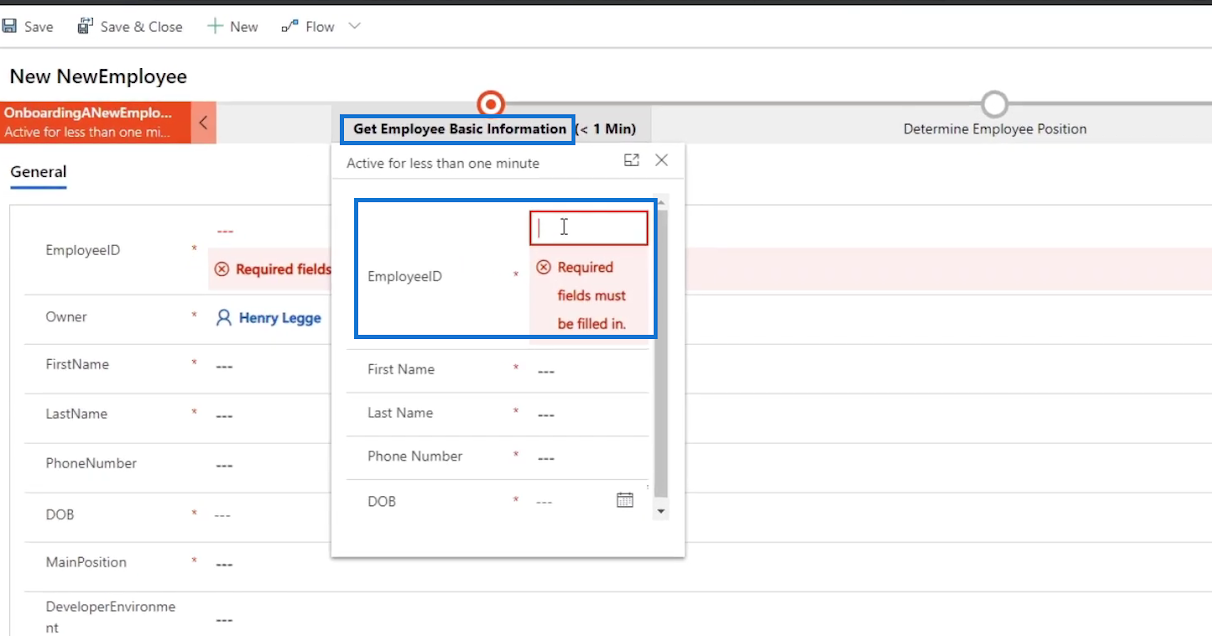
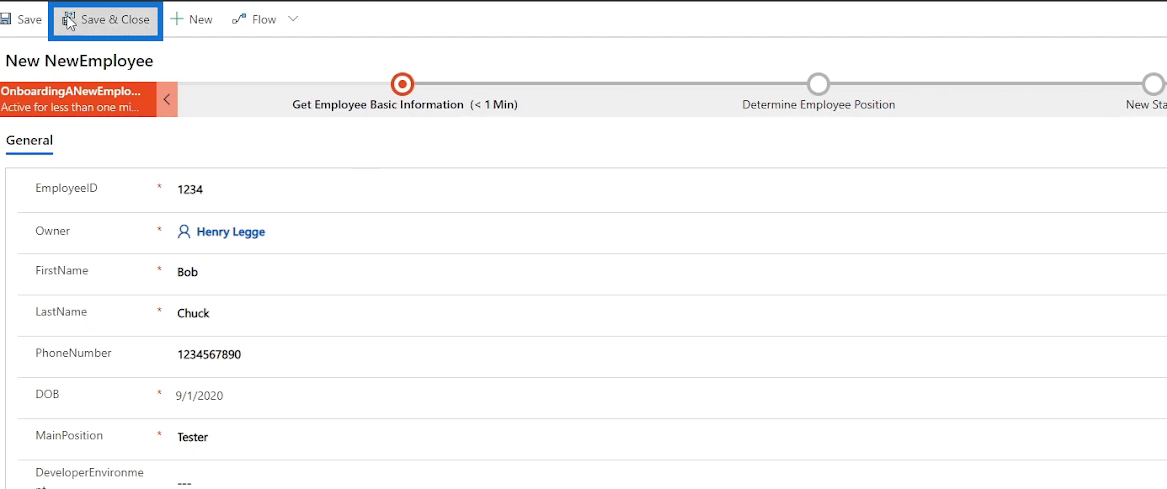
Let’s try it. Type in “1234” as our Employee ID.
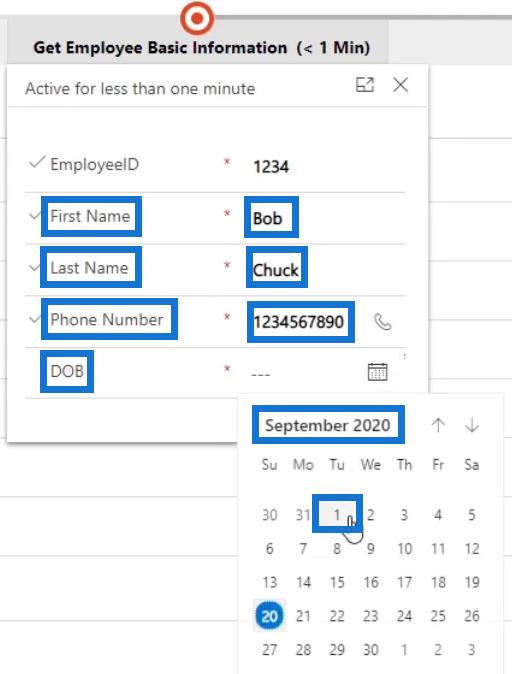
Fill in the other fields as well. For this time, we’ll type in “Bob” as the First Name, “Chuck” as the Last Name, “1234567890” for the Phone Number and “September 1, 2020” as the DOB.
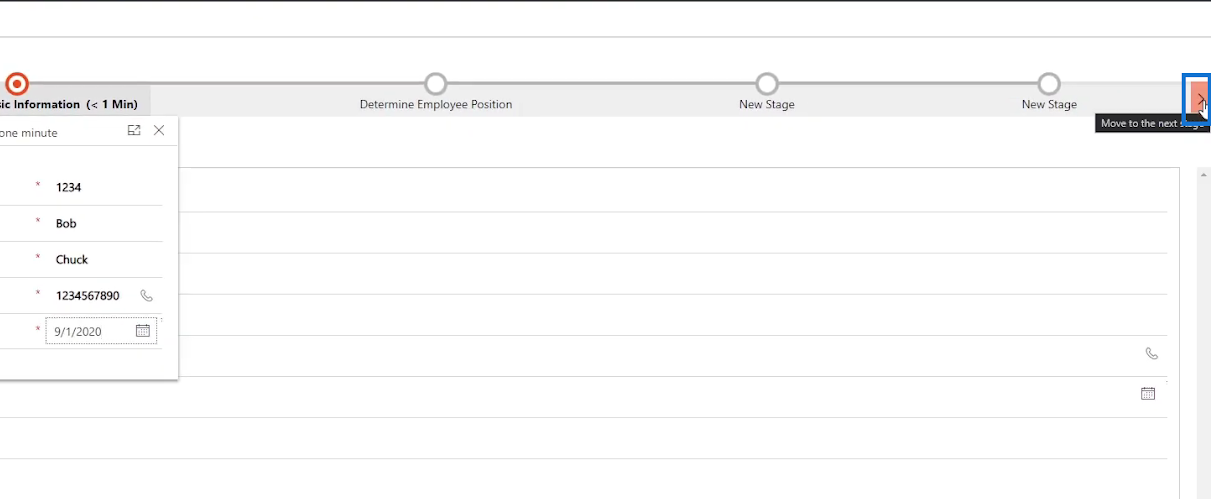
Click the forward arrow.
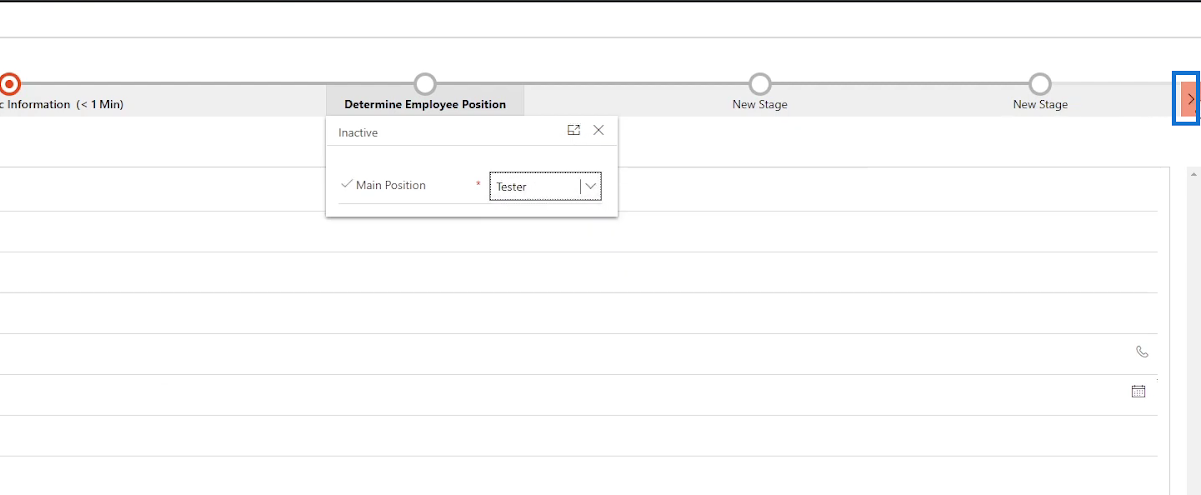
Let’s select the Main Position “Tester” for this one.

Click the forward arrow.
For the Tester Product field, let’s type in “Video Game”.
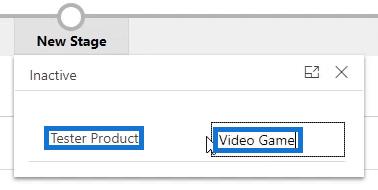
Click the forward arrow.
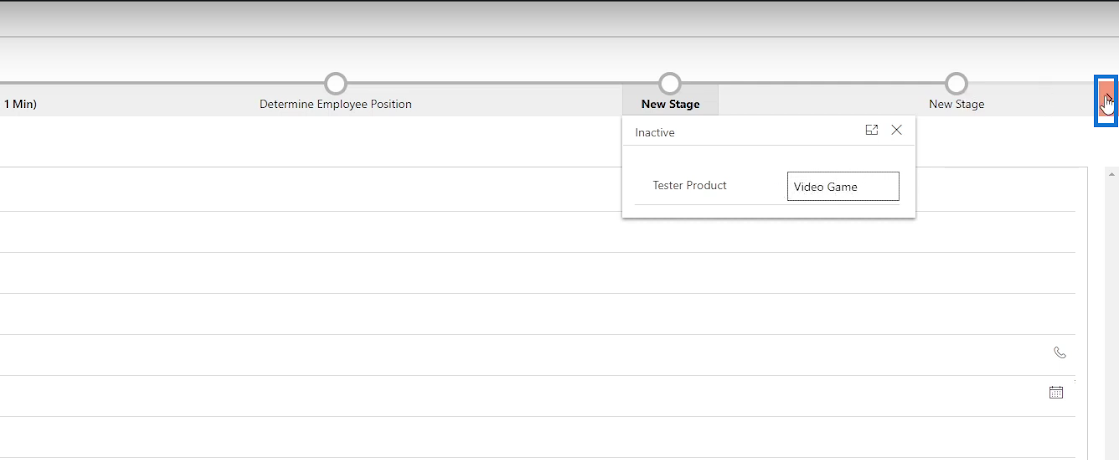
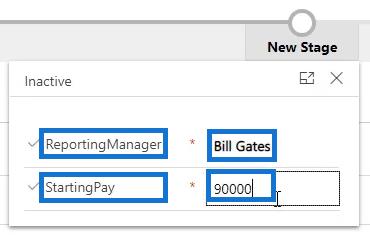
Then, on the ReportingManager field let’s type “Bill Gates” and “90000” in the StartingPay.
Lastly, click the Save & Close button.
Business Process Flow Integration In Power Automate
PowerApps Form: Adding And Modifying Fields
Microsoft Power Automate: Workflow Automation
Conclusion
That’s how we can use business process flows to create a flow guide for the HR Personnel that needs to submit a form when they’re onboarding a new employee.
A business process flow powerfully works as it shows a user what specific steps to follow through Stages and Conditions consisting of Data Steps and Action Steps. The flow simply guides a user through a business process. In addition, a business process flow is useful when we’d like the user to enter and fill out only specific fields of a business process form rather than going through the form from top to bottom which is rather confusing most of the time. Hopefully, you were able to clearly understand its usage and concept via this tutorial.
All the best,
Henry
SharePoint에서 계산된 열의 중요성과 목록에서 자동 계산 및 데이터 수집을 수행하는 방법을 알아보세요.
컬렉션 변수를 사용하여 Power Apps에서 변수 만드는 방법 및 유용한 팁에 대해 알아보세요.
Microsoft Flow HTTP 트리거가 수행할 수 있는 작업과 Microsoft Power Automate의 예를 사용하여 이를 사용하는 방법을 알아보고 이해하십시오!
Power Automate 흐름 및 용도에 대해 자세히 알아보세요. 다양한 작업 및 시나리오에 사용할 수 있는 다양한 유형의 흐름에 대해 설명합니다.
조건이 충족되지 않는 경우 흐름에서 작업을 종료하는 Power Automate 종료 작업 컨트롤을 올바르게 사용하는 방법을 알아봅니다.
PowerApps 실행 기능에 대해 자세히 알아보고 자신의 앱에서 바로 웹사이트, 전화, 이메일 및 기타 앱과 같은 기타 서비스를 실행하십시오.
타사 애플리케이션 통합과 관련하여 Power Automate의 HTTP 요청이 작동하는 방식을 배우고 이해합니다.
Power Automate Desktop에서 Send Mouse Click을 사용하는 방법을 알아보고 이것이 어떤 이점을 제공하고 흐름 성능을 개선하는지 알아보십시오.
PowerApps 변수의 작동 방식, 다양한 종류, 각 변수가 앱에 기여할 수 있는 사항을 알아보세요.
이 자습서에서는 Power Automate를 사용하여 웹 또는 데스크톱에서 작업을 자동화하는 방법을 알려줍니다. 데스크톱 흐름 예약에 대한 포괄적인 가이드를 제공합니다.


